Unit and integration testing in an Angular wonderland
Blog: Capgemini CTO Blog
In my previous blog, I described the possibilities of layered test automation in an Angular 4 application and focused on what to test on which layer. After that brief introduction, it is now time to delve deeper into the rabbit hole where the different layers of testing and our best practices are illustrated with code examples.
Unit test an Angular component
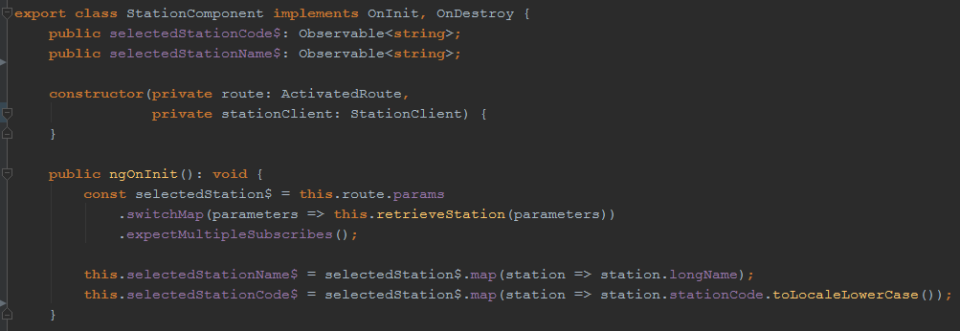
We are going to test the initialization of StationComponent, a component that retrieves station data based on a “stationcode.”
This is an actual component, but simplified in the example to keep things as compact as possible.
The unit and integration tests are both situated in the spec.ts file. We use Jasmine—a Javascript testing framework—to structure these tests. Every “describe” function is a test suite and every “it” is a test scenario. Both require a title and it is possible to test multiple describes. We follow these best practices to structure our tests:
- Create one describe for the unit tests and one for the template integration tests
- Create one describe for every function that has to be unit tested
- Start the title of every test scenario with “should” to describe the expected behavior.
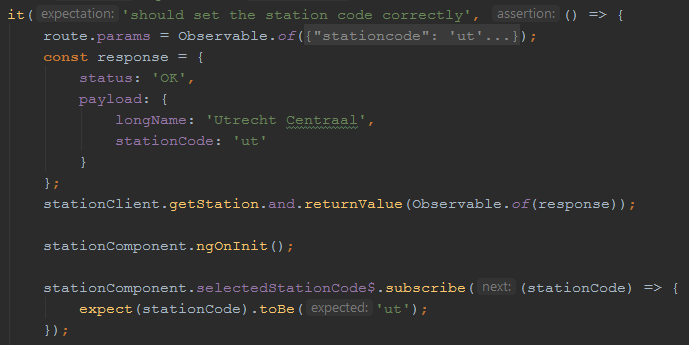
Upon creating the titles, it is good to know that, in runtime, all titles will be concatenated for logging, so when the test in the example is executed, it results in “StationComponent unit tests ngOnInit should set the station code correctly.”

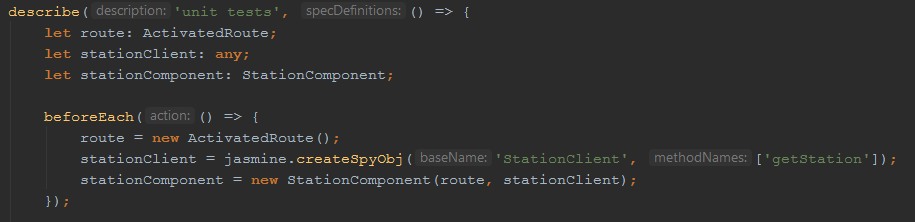
We unit test one function (described in the ts file) at a time starting with the happy flow scenario. In this case, it is the ngOnInit function where functionality is executed when this particular Angular component is initialized. We initialize the component under test with its dependencies in the “beforeEach” within the describe scope of the unit tests.
We simulate as many dependencies as possible using the createSpyObj function of Jasmine, which requires the name and method of the class to be simulated. There are great possibilities with Jasmine spies, so check out their website for specifics. In this case, “getStation” of the StationClient is mocked.
To mock or not to mock?
If you look closer at the example, not all dependencies are simulated; an actual object of the ActivatedRoute class is used, which means an extra dependency of the test is created. But we do not want that, right?
ActivatedRoute is an Angular functionality that requires significant effort to simulate. We chose not to simulate this functionality because of this effort and because there is no risk that this test can fail because of this dependency. I want to emphasize that a decision whether to mock is dependent on your environment and situation. Consider factors like risk and effort before choosing the solution that best fits your situation.
Now we can really get down to business and test this little rabbit! We like to follow the Given/When/Then principle (or Arrange/Act/Assert) to structure our tests; we set up the start situation by defining data and instructing the mock. With “returnValue”, we instruct the mock to return the response we defined when “getStation” of the StationClient is called. Then, the test executes when ngOnInit is called. Because of our use of Observables, we need to subscribe to the result to finally do an assertion of the selected StationCode, a variable of the StationComponent.
Template integration tests
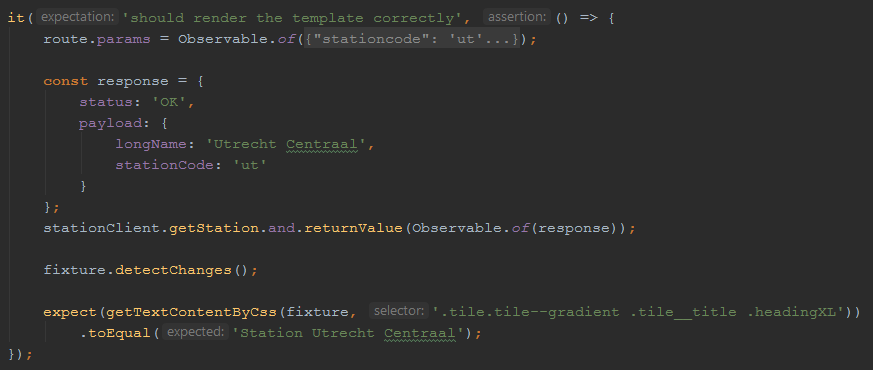
In my previous blog, I mentioned “template integration testing”, a term we use because we test how the HTML template of our component interacts with Angular using the Angular test module. With this test, we are going to assert whether the title of the correct station is loaded in the template (see below for our HTML code of this title).

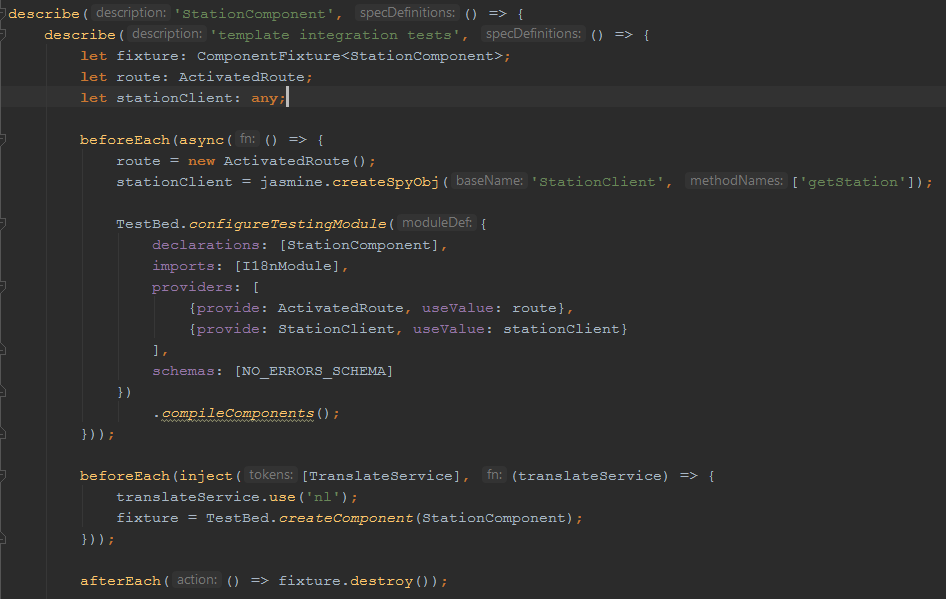
In order to execute an integration test, we need additional configuration to set up the test environment. We start with a “beforeEach” to configure and compile the Angular test module, which requires the following items (when applicable):
- Declarations: declare the component under test
- Providers: declare the dependent services of the component under test
- Imports: declare the dependent modules of the component under test
- Schemas: use [NO_ERROR_SCHEMA] when you do not want to have errors on underlying dependencies.
This beforeEach is asynchronous because we want to make sure that the asynchronous creation of the test module is ready before executing the test.
Create a new beforeEach where the component under test is created in the configured Angular test module, under the name “fixture.” Destroy the fixture component at the end of each test, this is mentioned in the afterEach.
When this Mad Hatter is set up, we again start our test by setting up the data and instructing the mock. In order to execute the test, the setup needs to be recognized by our fixture with “detectChanges”.
Instead of calling the ngOnInit to execute the test, we call the detectChanges function to make sure that the changes are detected by Angular. The first time it is called, the ngOnInit() function will be executed. If the component is changed again, another detectChanges call is needed to detect these changes in the template.
We then do our assertion on HTML elements rather than the output of a component.
I didn’t mention a new player in the game; the TranslateService. This is the Angular translation functionality (ngx translate) where we build a module around to make it work for us (I18Nmodule). We also chose not to mock this service. We import the I18Nmodule and inject the TranslateService in the synchronous beforeEach. This means that we also test the translation with this assert.
These are examples of the unit and integration tests in our environment, which work well for us. With the choice of whether to mock your dependencies, the discussion can always be raised about scope and definitions. But remember, as long as the scope and definitions within your team are clear, all is good in the wonderland. So, have you already gone mad over this code madness? I’ll tell you a secret, all the best people have!
Wallpaper image source
Leave a Comment
You must be logged in to post a comment.