U-Net Architecture: A Comprehensive Guide
The U-Net architecture is a brilliant concept that has amazed researchers, developers, and creative thinkers. This blog will thoroughly explore the concept of U-Net, its fundamental components, its diverse applications, and the profound impact it’s having in the field of computer vision.
Let us explore the following topics:
- What is U-Net Architecture?
- Need for U-Net Architecture
- Working of U-Net Architecture
- Implementation of U-Net Architecture in Keras
- Difference Between U-Net and V-Net
- Benefits of U-Net Architecture
- Application of U-Net Architecture
- Conclusion
Watch this Data Science Tutorial:
{
“@context”: “https://schema.org”,
“@type”: “VideoObject”,
“name”: “Data Science Course | Data Science Training | Data Science Tutorial for Beginners | Intellipaat”,
“description”: “U-Net Architecture: A Comprehensive Guide”,
“thumbnailUrl”: “https://img.youtube.com/vi/osHjb7QhgWk/hqdefault.jpg”,
“uploadDate”: “2023-08-25T08:00:00+08:00”,
“publisher”: {
“@type”: “Organization”,
“name”: “Intellipaat Software Solutions Pvt Ltd”,
“logo”: {
“@type”: “ImageObject”,
“url”: “https://intellipaat.com/blog/wp-content/themes/intellipaat-blog-new/images/logo.png”,
“width”: 124,
“height”: 43
}
},
“embedUrl”: “https://www.youtube.com/embed/osHjb7QhgWk”
}
What is U-Net Architecture?
The U-Net architecture, a groundbreaking innovation in the field of computer vision, has garnered significant attention for its exceptional expertise in image segmentation tasks. At its core, U-Net is characterized by its unique U-shaped design. It incorporates both a contracting path (encoder) and an expansive path (decoder). This design enables U-Net to capture intricate details and contextual information, making it accurate in segmenting objects of interest.
This design allows the network to capture both global context and fine-grained details, making it effective for segmentation tasks where precise boundary delineation is crucial. U-Net has also found applications in other areas beyond medical imaging, such as in tasks like image-to-image translation and semantic segmentation.
History of U-Net Architecture
The history of U-Net architecture is the story of ongoing innovation. From its creation to its current widespread use, it showcases how it has revolutionized image segmentation. Let us look at the evolution of U-Net architecture.

- 2015: Inception: Olaf Ronneberger, Philipp Fischer, and Thomas Brox introduce the U-Net architecture in their research paper, “U-Net: Convolutional Neural Networks for Biomedical Image Segmentation.” It is designed to tackle challenges in biomedical image segmentation through convolutional neural networks and features a unique U-shaped structure.
- 2015–2017: Biomedical Breakthrough: U-Net gains prominence in the medical field, excelling in tasks like cell segmentation, organ identification, and tumor detection. Its precision and adaptability to limited data become evident.
- 2018–2019: Broadening Horizons: U-Net’s applications expand beyond biomedicine. In the Kaggle Data Science Bowl 2018, a U-Net-based solution achieved top performance in lung cancer detection. This showcased its versatility.
- 2020–Present: Versatility in Various Domains: U-Net’s influence transcends industries. It finds application in diverse areas such as autonomous vehicles, satellite imagery analysis, and artistic style transfer. This solidified its position as a versatile architecture.
- Future: Continuing Evolution: As computer vision advances, U-Net’s legacy is poised for further refinement and adaptation. Researchers are likely to explore architectural enhancements and extensions. This ensures that U-Net remains at the forefront of image segmentation innovation.
Enroll in Intellipaat’s Data Science Certification Course and make your career in data science!
Need for U-Net Architecture
In the ever-evolving field of computer vision, the need to accurately identify and separate objects within images has become increasingly vital. This demand spans various industries, from healthcare and self-driving cars to environmental monitoring and creative applications. Here enters the U-Net architecture, a solution that has emerged as a direct response to this pressing need.
Traditional methods of image segmentation often struggle to achieve the level of accuracy required for complex tasks. Many objects have intricate shapes, textures, and structures that conventional techniques find challenging to capture. This gap between demand and capability prompted the development of the U-Net architecture.
Working of U-Net Architecture
The U-Net architecture works through a U-shaped design. It has a contracting path (encoder) and an expansive path (decoder). U-Net’s design is excellent for image segmentation tasks. It captures intricate details and preserves important contextual information.
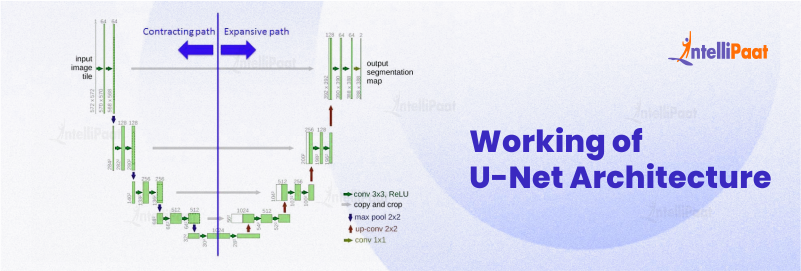
In the contracting path, successive layers of convolutional operations and max-pooling reduce the spatial dimensions of the input image. This process extracts high-level features, gradually refining the representation of the image. Here’s an example of code for a contracting path (encoder) block in a U-Net architecture using Python and the PyTorch library:
import torch
import torch.nn as nn
class UNetEncoderBlock(nn.Module):
    def __init__(self, in_channels, out_channels):
        super(UNetEncoderBlock, self).__init__()
        self.encoder = nn.Sequential(
            nn.Conv2d(in_channels, out_channels, kernel_size=3, padding=1),            nn.ReLU(inplace=True),
            nn.Conv2d(out_channels, out_channels, kernel_size=3, padding=1),
            nn.ReLU(inplace=True),
            nn.MaxPool2d(kernel_size=2, stride=2)
        )
    def forward(self, x):
        return self.encoder(x)
# Example usage
in_channels = 3  # Input channels for the image (e.g., RGB)
out_channels = 64  # Output channels for the encoder block
encoder_block = UNetEncoderBlock(in_channels, out_channels)
In this example, in_channels is the number of input channels for the image, and out_channels is the number of output channels for the encoder block. The UNetEncoderBlock class defines a sequential series of convolutional and pooling layers, which create the downsampling effect while increasing the number of channels.
In contrast, the expansive path (decoder) involves up-sampling the feature maps to reconstruct the segmented output. However, what sets U-Net apart is the incorporation of skip connections. These connections bridge the gap between the contracting and expansive paths. It allows the decoder to access detailed information from earlier layers. This integration of local and global features ensures that spatial information is retained during the up-sampling process. Here’s an example of code for a decoder block in a U-Net architecture using Python and the PyTorch library:
import torch
import torch.nn as nn
class UNetDecoderBlock(nn.Module):
    def __init__(self, in_channels, out_channels):
        super(UNetDecoderBlock, self).__init__()
        self.decoder = nn.Sequential(
            nn.Conv2d(in_channels, out_channels, kernel_size=3, padding=1),
            nn.ReLU(inplace=True),
            nn.Conv2d(out_channels, out_channels, kernel_size=3, padding=1),
            nn.ReLU(inplace=True),
            nn.ConvTranspose2d(out_channels, out_channels // 2, kernel_size=2, stride=2)
        )
    def forward(self, x):
        return self.decoder(x)
# Example usage
in_channels = 64  # Input channels from the encoder block
out_channels = 32  # Output channels for the decoder block
decoder_block = UNetDecoderBlock(in_channels, out_channels)
In this example, the UNetDecoderBlock class defines a sequential series of convolutional and transposed convolution (also known as “deconvolution”) layers. The transposed convolution layers help in upsampling the feature maps to the original input resolution.
During the final layers of the expansive path, the architecture produces a high-resolution segmentation map that accurately highlights the objects of interest within the input image. U-Net operates by combining detailed feature extraction and effective context comprehension. This process, coupled with the use of skip connections, empowers U-Net to attain unmatched accuracy in image segmentation.
Prepare for interviews with this guide to data science interview questions!
Implementation of U-Net Architecture in Keras
Here’s a step-by-step implementation of the U-Net architecture in Keras for image segmentation. This example will use a simplified version of U-Net for educational purposes.
Step 1: Import Necessary Libraries and Load the Data
import numpy as np
import matplotlib.pyplot as plt
from keras.models import Model
from keras.layers import Input, Conv2D, MaxPooling2D, UpSampling2D, concatenate
from keras.datasets import mnist
from keras.utils import to_categorical
# Load and preprocess the MNIST dataset (simplified for demonstration)
(x_train, _), (x_test, _) = mnist.load_data()
x_train = x_train.reshape(x_train.shape[0], 28, 28, 1) / 255.0
x_test = x_test.reshape(x_test.shape[0], 28, 28, 1) / 255.0
Step 2: Build the U-Net Architecture
def build_unet(input_shape):
    inputs = Input(input_shape)
    # Encoder
    conv1 = Conv2D(64, 3, activation='relu', padding='same')(inputs)
    pool1 = MaxPooling2D(pool_size=(2, 2))(conv1)
    # Decoder
    up2 = UpSampling2D(size=(2, 2))(pool1)
    conv2 = Conv2D(1, 3, activation='sigmoid', padding='same')(up2)
    model = Model(inputs=inputs, outputs=conv2)
    model.compile(optimizer='adam', loss='binary_crossentropy')
    return model
# Build the U-Net modelinput_shape = (28, 28, 1)
u_net_model = build_unet(input_shape)
Step 3: Train the Model
# Train the model
u_net_model.fit(x_train, x_train, epochs=5, batch_size=32, validation_data=(x_test, x_test))
Step 4: Test the Model and Visualize the Results
# Select a random test image
test_image_idx = np.random.randint(0, x_test.shape[0])
test_image = x_test[test_image_idx:test_image_idx+1]
# Generate predictions
predicted_image = u_net_model.predict(test_image)
# Display the original and predicted images
plt.figure(figsize=(10, 5))
plt.subplot(1, 2, 1)
plt.title("Original Image")
plt.imshow(test_image[0, :, :, 0], cmap='gray')
plt.subplot(1, 2, 2)
plt.title("Predicted Image")
plt.imshow(predicted_image[0, :, :, 0], cmap='gray')
plt.show()
When you run this code, it will train a U-Net model using the MNIST dataset for image denoising. Next, a random test image is chosen. Predictions are generated using the trained model. The original and predicted images are displayed together. This example demonstrates a basic application of U-Net architecture for image segmentation.
Difference Between U-Net and V-Net
Here’s a tabular comparison of U-Net and V-Net architectures:
| Aspect | U-Net | V-Net |
| Architecture | U-shaped with encoder and decoder paths | V-shaped with contracting and expanding paths |
| Skip Connections | Uses skip connections for feature fusion | Incorporates residual skip connections |
| Input Resolution | Well-suited for various input sizes | Primarily designed for 3D medical images |
| 3D Support | Primarily used for 2D and 2.5D tasks | Specialized for 3D medical image analysis |
| Applications | Image segmentation, biomedical imaging | Medical image segmentation and analysis |
| Residual Blocks | Not inherently based on residual blocks | Inherent use of residual blocks for feature extraction |
| Feature Fusion | Concatenates features for fusion | Uses residual connections for feature integration |
| Depth | Generally shallower due to the 2D nature | Deeper architecture suitable for 3D tasks |
Check out our blog on data science tutorial to learn more about it.
Benefits of U-Net Architecture
Here are the benefits of the U-Net architecture in brief:
- Highly Effective for Image Segmentation: U-Net’s special design helps it accurately segment objects in images. It has contracting and expansive paths, along with skip connections.
- Preserve Spatial Information: The skip connections in U-Net retain fine-grained spatial details during the up-sampling process. It ensures the accurate localization of segmented objects.
- Adaptable to Limited Data: The design of the U-Net architecture makes it particularly suitable for tasks where there is a scarcity of training data. U-Net can perform well with small datasets because of this characteristic.
- Reduces Overfitting: Skip connections help prevent overfitting by promoting the transfer of relevant features between layers.
- Versatility Across Domains: U-Net’s effectiveness extends beyond medical imaging. It finds applications in diverse fields like remote sensing, self-driving cars, and artistic style transfer.
Application of U-Net Architecture
Now, let’s delve into real-world applications of U-Net architecture to understand which domains have harnessed its potential most effectively:
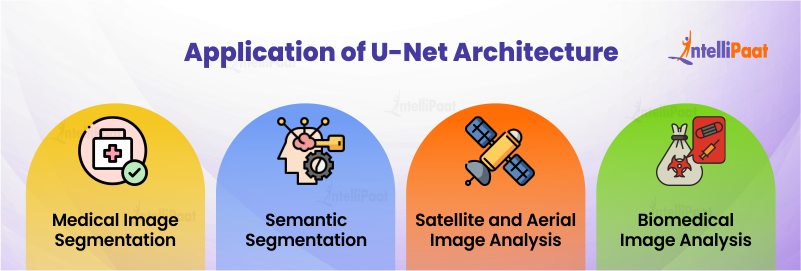
- Medical Image Segmentation: U-Net was originally developed for segmenting medical images like cell nuclei, organs, and tumors. It’s highly effective in these tasks due to its architecture’s ability to capture fine details while maintaining context.
- Semantic Segmentation: U-Net is used for pixel-level classification in computer vision tasks. The goal is to label each pixel in an image with a corresponding class label. This can be used in various applications, such as object detection, scene understanding, and more.
- Satellite and Aerial Image Analysis: U-Net can be applied to segment and classify features in satellite and aerial images, like roads, buildings, vegetation, and bodies of water. This aids in tasks such as land use classification, disaster assessment, and urban planning.
- Biomedical Image Analysis: Apart from segmentation, U-Net can be used for other biomedical tasks such as image denoising, super-resolution microscopy, and cell tracking.
Career Transition


Conclusion
As technology advances and datasets continue to expand, U-Net’s potential will extend even further. Its adaptability to new domains and tasks, along with the ongoing development of improved variations and optimizations, suggests a trajectory of continued growth. Therefore, U-Net is poised to remain a cornerstone of deep learning innovation, offering solutions to complex visual challenges that shape our data-rich world.
To discuss more, visit our data science community!
The post U-Net Architecture: A Comprehensive Guide appeared first on Intellipaat Blog.
Blog: Intellipaat - Blog
Leave a Comment
You must be logged in to post a comment.