Simple Application
Blog: Comidor Blog
Comidor platform offers you the ability to design your own apps through App Designer, with low code. Making a simple application is easier than ever, even for non-developer users. Comidor guides you with simple steps, in order to publish your app.
There are various types of applications provided in Comidor App Designer. You can choose the one that fits better your needs from the following options:
- Table applications:
- Sequential apps (with workflows)
- Process-enabled apps (with workflows)
- Simple non-process enabled apps (Data-driven)
- Report applications
- Kanban applications
Let’s see step-by-step how to create and run a simple application.
Simple Application
The Simple app is a table non-process-enabled application. Choose this type of table application when you want to create a table of data-driven records. No workflows can be related to this type.
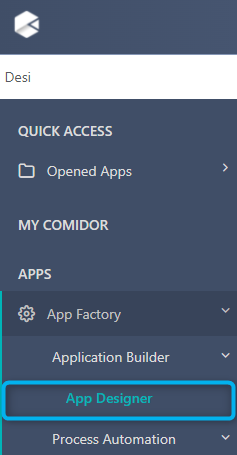
Access App Designer
In order to access App Designer go to the main menu on the left side of your screen and select the icon App Factory > Application Builder > App Designer
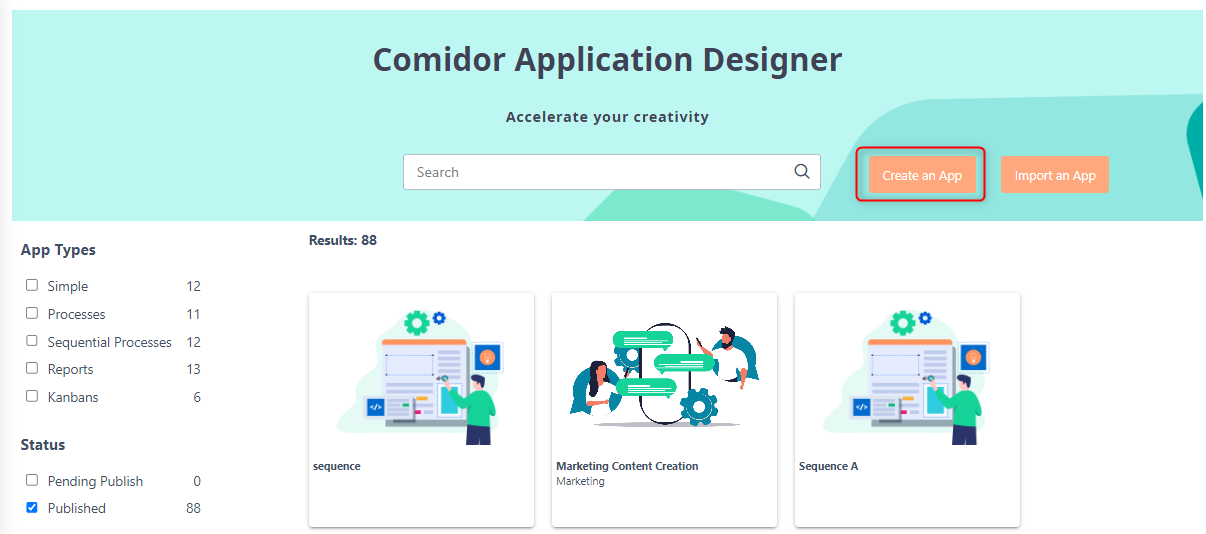
In the new unit that opens, click on the button Create an App.
Create App
- Click on the “Create an App” icon to open the creation form.
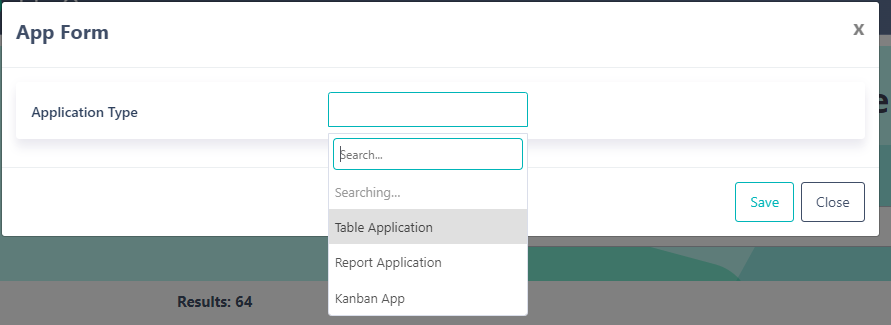
- In the Application Type select Table Application.
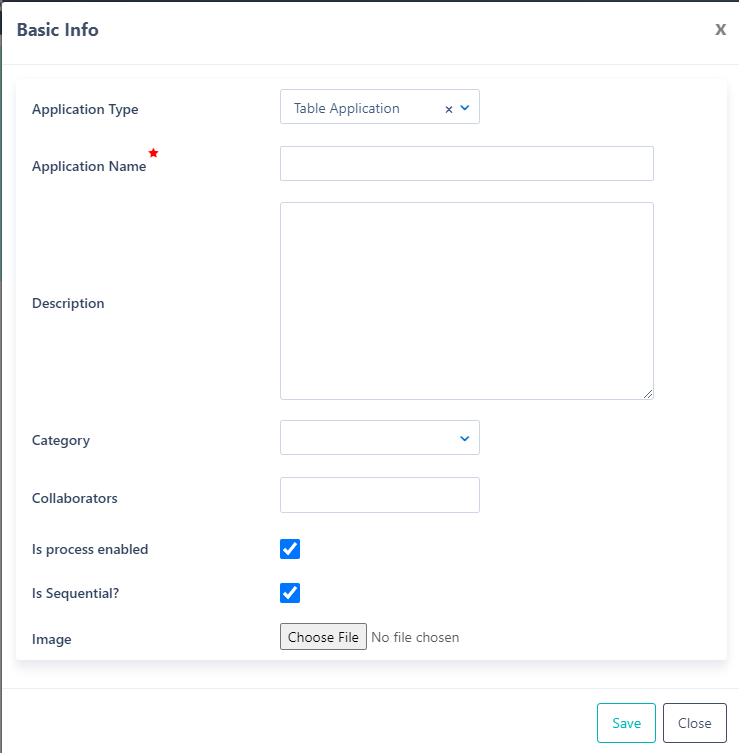
- Give the Application Name and Description.
- You can also classify your app in a proper Category. Choose one Category from the existing options, or make a new Category. Categorization will help you find easier your apps in the App Designer. Based on the category you choose, the app will be also displayed on the respective sub-menu.
- Collaborators are the users or groups that have access rights to this App. Choose one or more users(s), Group(s) from the list.
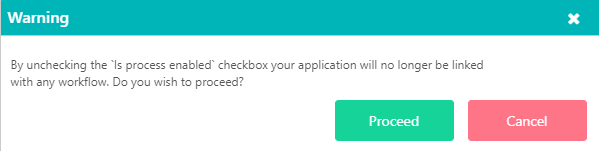
- Uncheck the option Process enabled. By doing so, you are NOT able to link a Workflow to your App. A warning pop-up will appear. Click on Proceed.
- There is an option to upload an Image for your App.
- Click Save to create your App, or Close to cancel.
Once you save your app, you will be redirected to the view form. Comidor guides you through simple steps to design your App. Steps 1-5 are available for this app type.
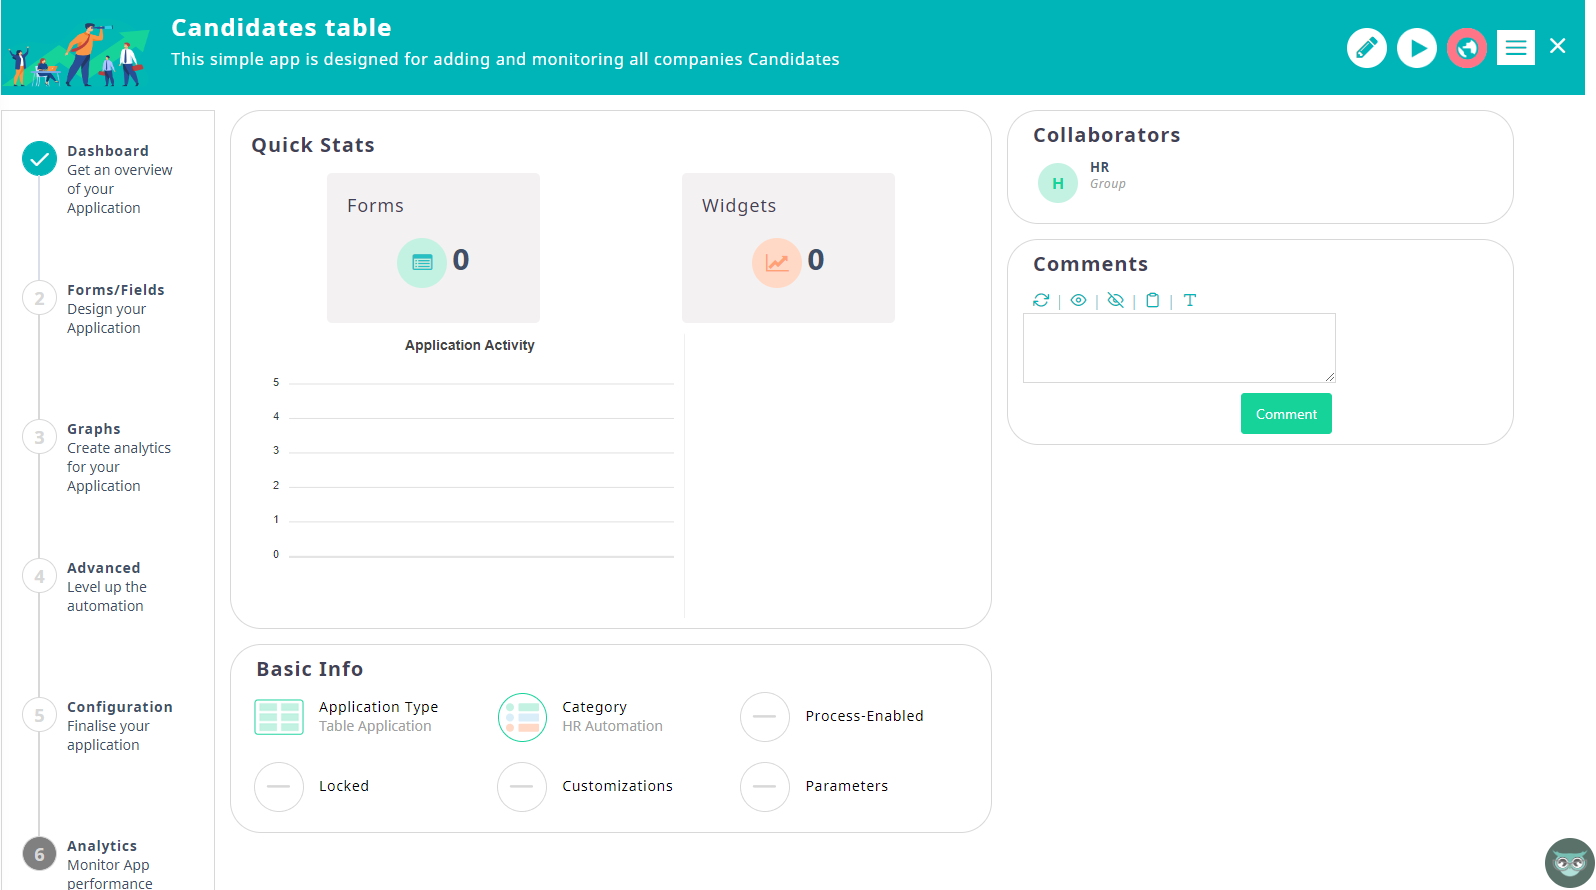
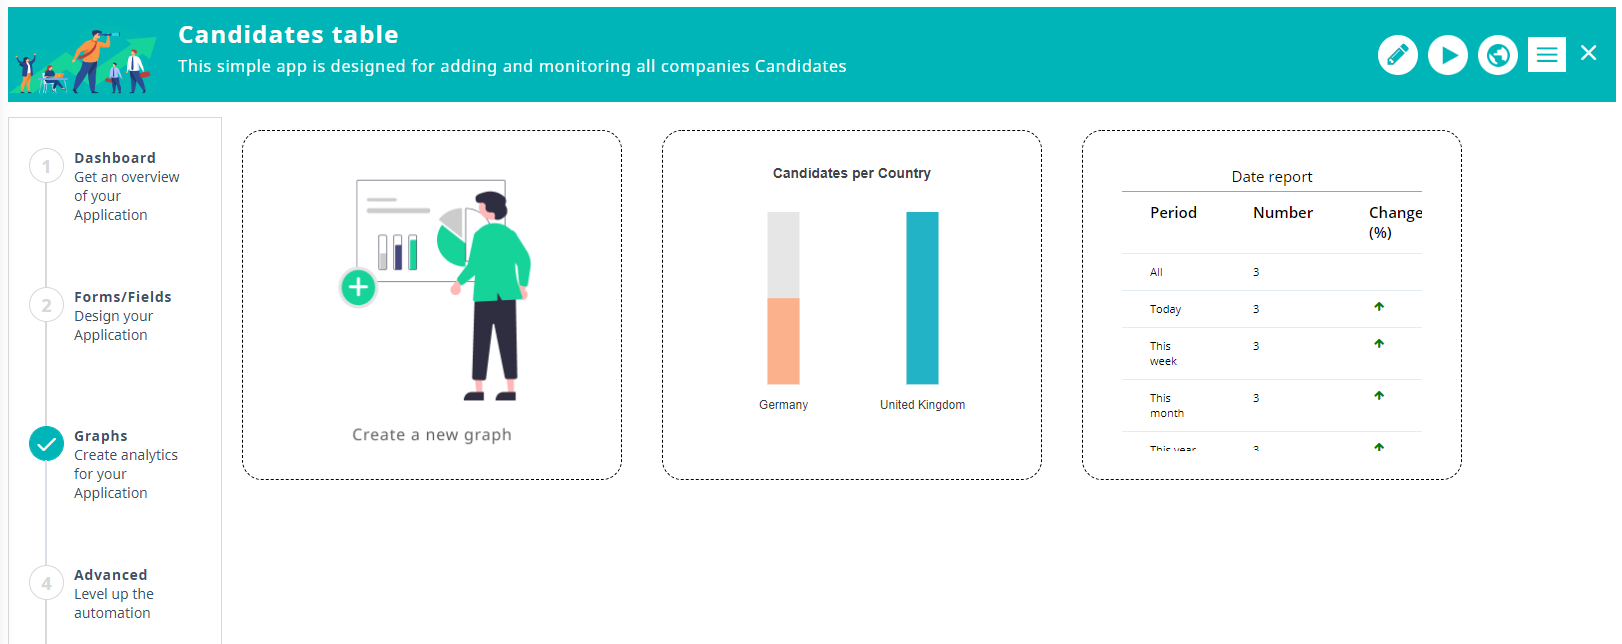
1. Dashboard
In the step Dashboard, you get an overview of your application. In particular, you are able to view:
- Quick Stats:
- Number of forms and Widgets that are created in this app
- Graphs that show the application activity timeline.
- Basic Info:
- the Type, Category, and other parameters
- You can click on the pencil button to edit the above info
- You can lock your app by checking on the Locked option. With this option, only the user that locks the app will be able to edit the app (in all steps). All the rest users will just be able to view the app, but can not edit it.

- By checking the Has customizations option, the application will not be exportable.
- Put a flag to remember if this application
- Collaborators: the users or groups that have access rights in this App.
- Comments: an area where users that have access can write and view comments.
2. Process
In the second step, you can fully design your process in terms of the number and the looks of the process steps, your Data model, Table View and User forms.
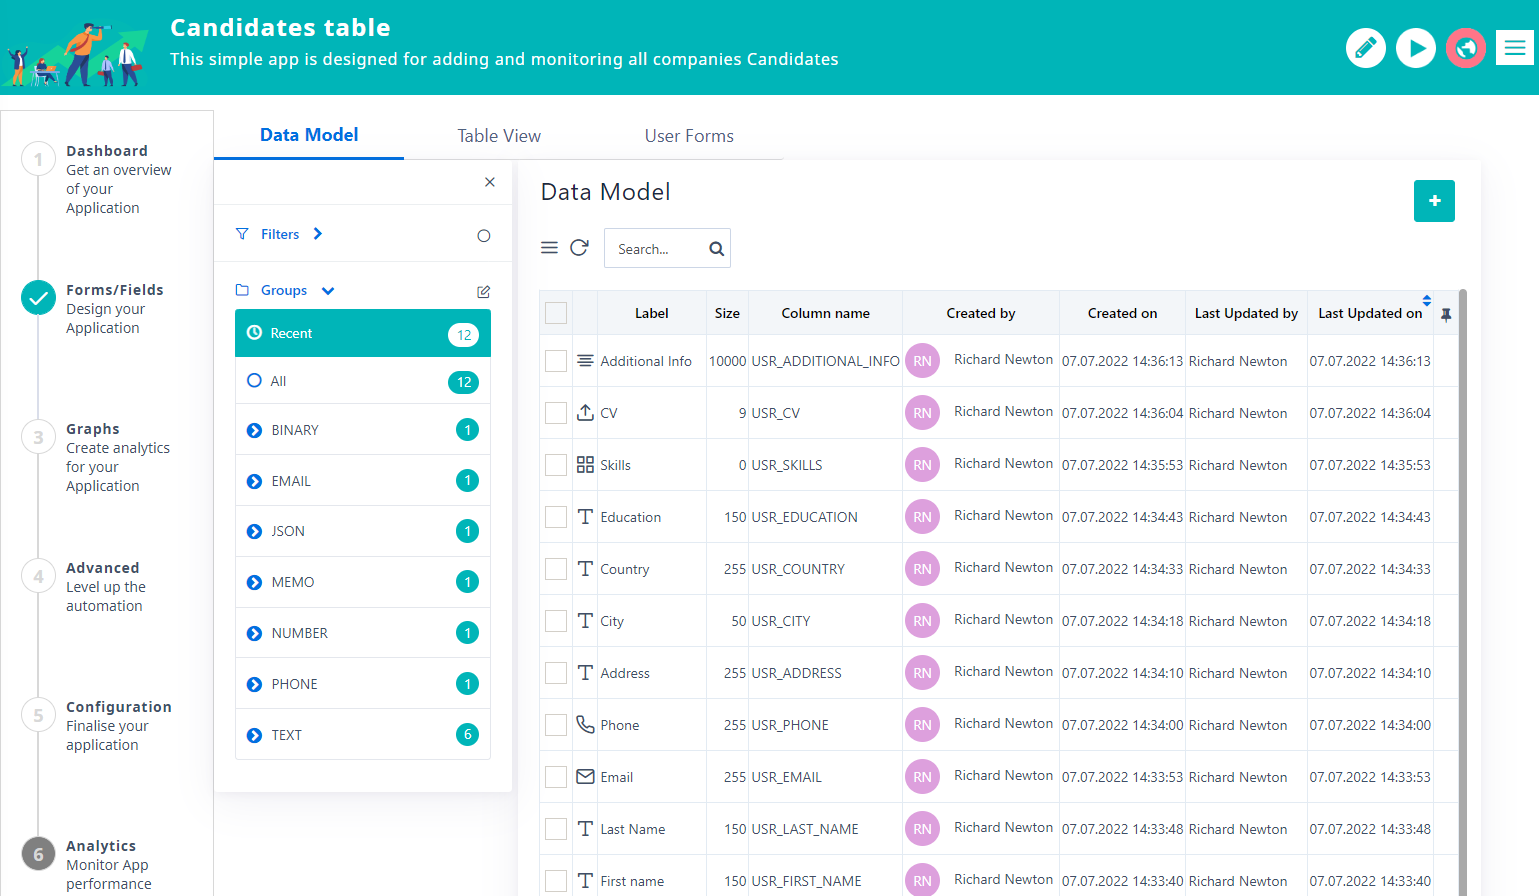
Data Model
- Once you save a step, a new form is stored in the tab User Forms, and all fields can be found in the tab Data Model.
- When you open the Data model tab, you will see a sub-table with the following columns icon, size, column name, created by, created on, last updated by, last updated on, the pin and multi checkboxes.
- You can add all fields that you want to be used in the App here. You can click on the “+” to create your own custom fields. Do not forget to reload the DB once you have added all your fields.
- Click on the refresh icon, and the table should be updated.
- Type a keyword in the search area, click enter and the table should refresh displaying results that match the keyword.
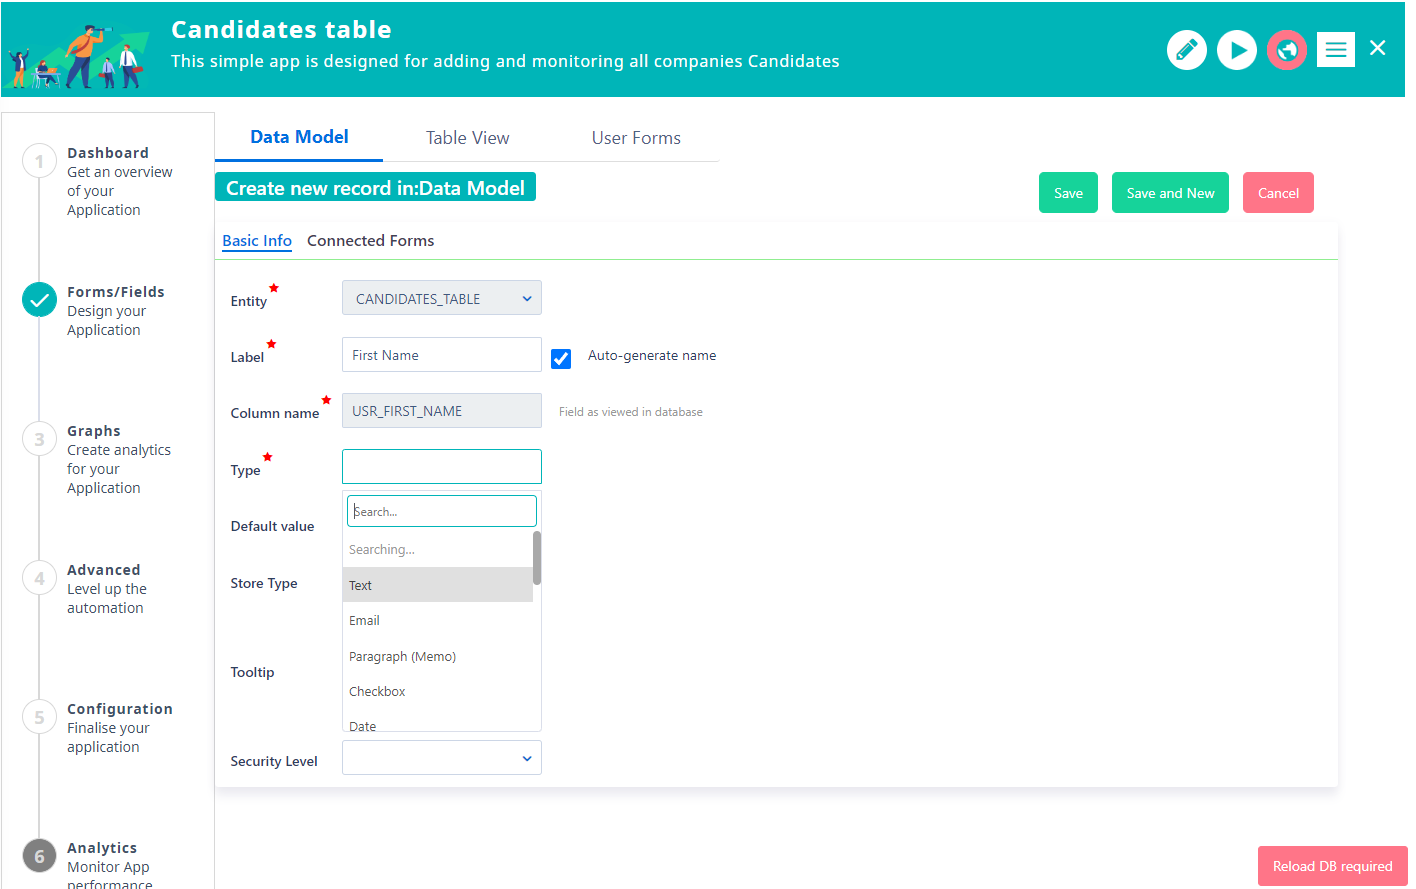
- Click on an existing field, to view its basic info: By default, you will see Entity, Label, Auto-generate name, Column name, Type, Default Value, Store Type, Tooltip and Security Level. Connected Forms tab: you will view the list of forms this field is used.
Table View
- Determine which columns you wish your App to have in the main table. By default, you should see all the table fields you have created in the Data Model and will be added ad columns in your application table. Each field has pencil and x buttons.
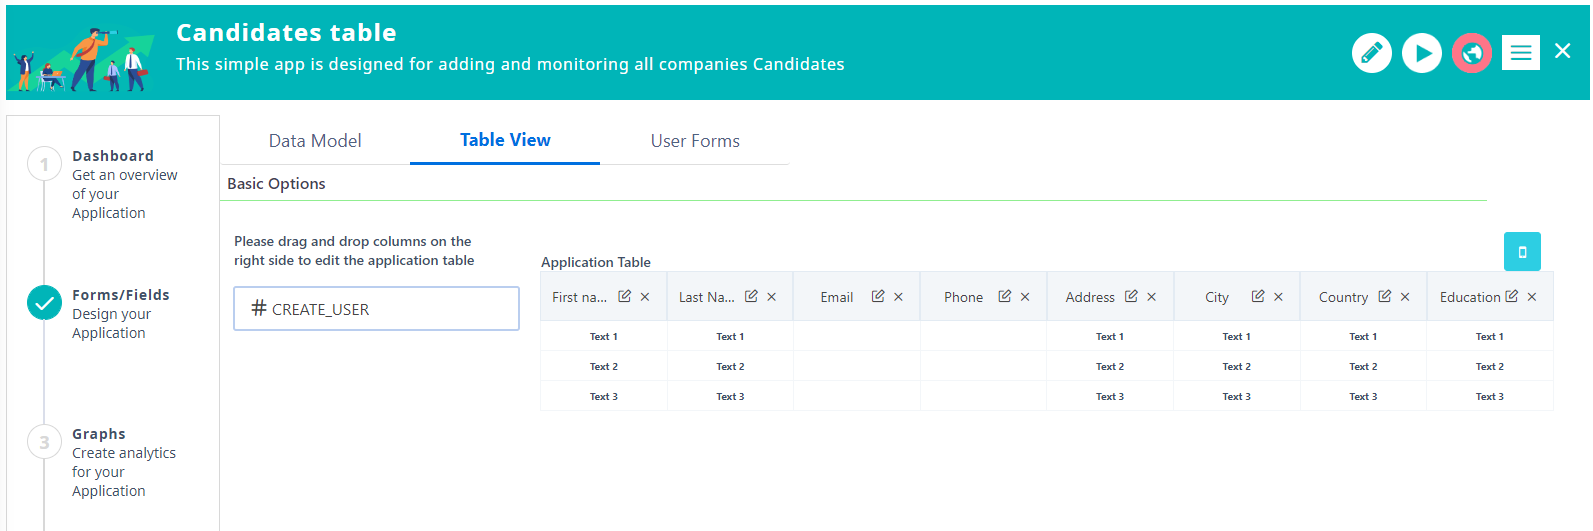
- You can add more Columns with drag-n-drop from the list of the available fields.
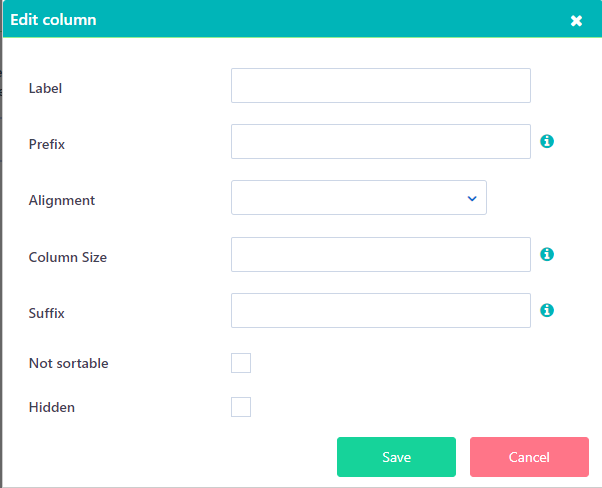
- Click on the edit button to make any changes you need to each column.
- Add a label name. If left empty the column will get the field name.
- Prefix or Suffix to be displayed before or after the value of each entry
- Select the preferred alignment
- Define the preferred width in percentage to be displayed as default in the summary table
- Other options like set as Not sortable and Hidden are available, too.
- Click save to update this column to your table, or cancel.
- Drag and drop the field columns, in order to re-arrange their position in the Table View.
- Click on the x button to remove this field from the Application table.
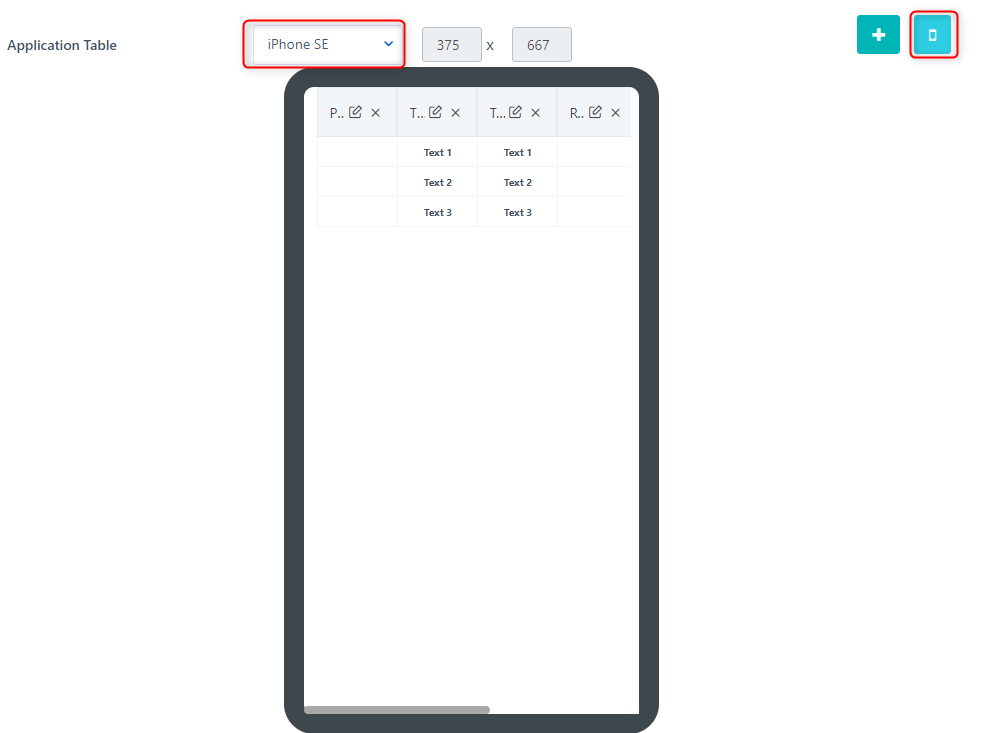
- Switch to mobile view, to get a preview of your Application table in a browser of a mobile device. Choose a preferred device (mobile, tablet)
Forms
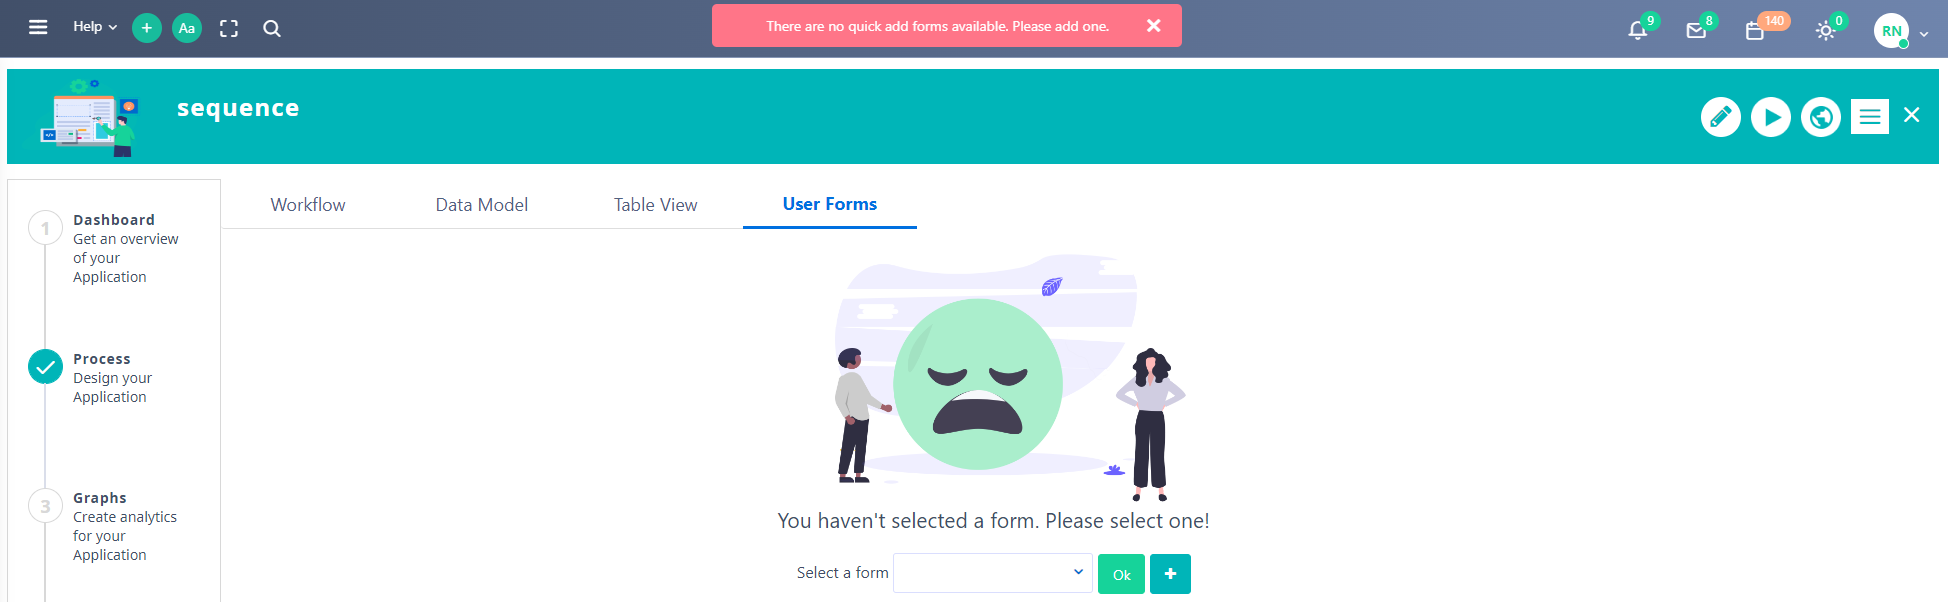
All forms included in this App will be visible in the tab User Forms. Create new or edit the existing forms here.
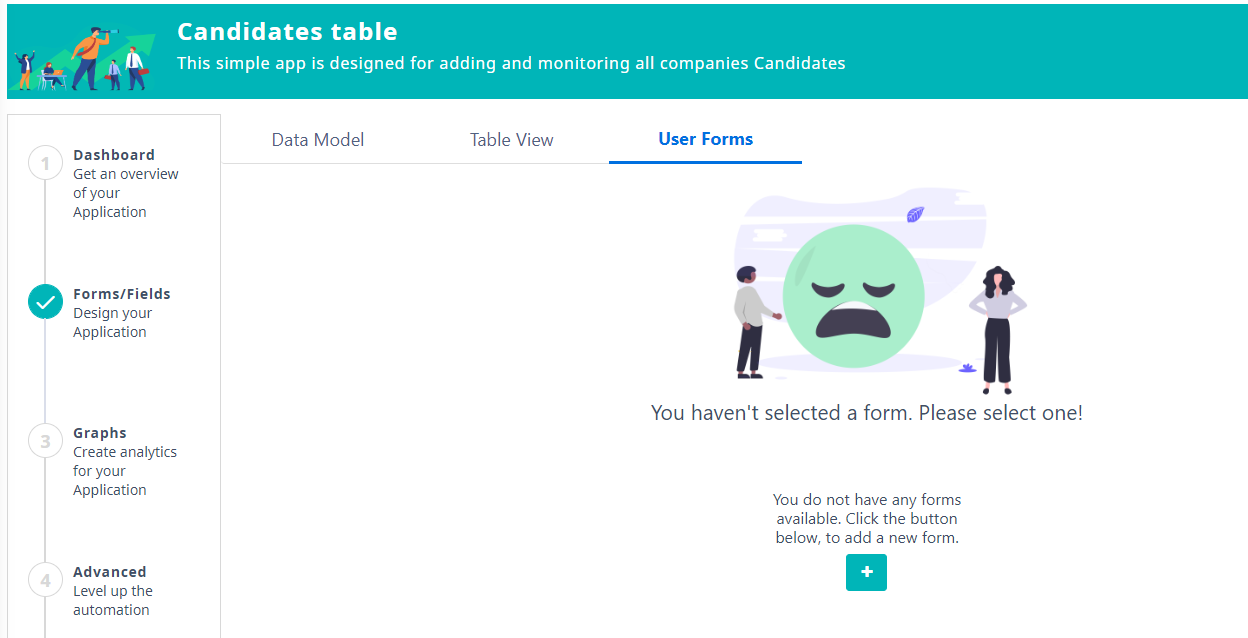
- By default no form is created, you will see the message” You haven’t selected a form. Please select one!”. Select a form, ok and plus buttons are available.
- Click on the “+” icon. A pop-up window will appear to define the title of your new form. Click on Save to save your form and you will be directed to the form designer.
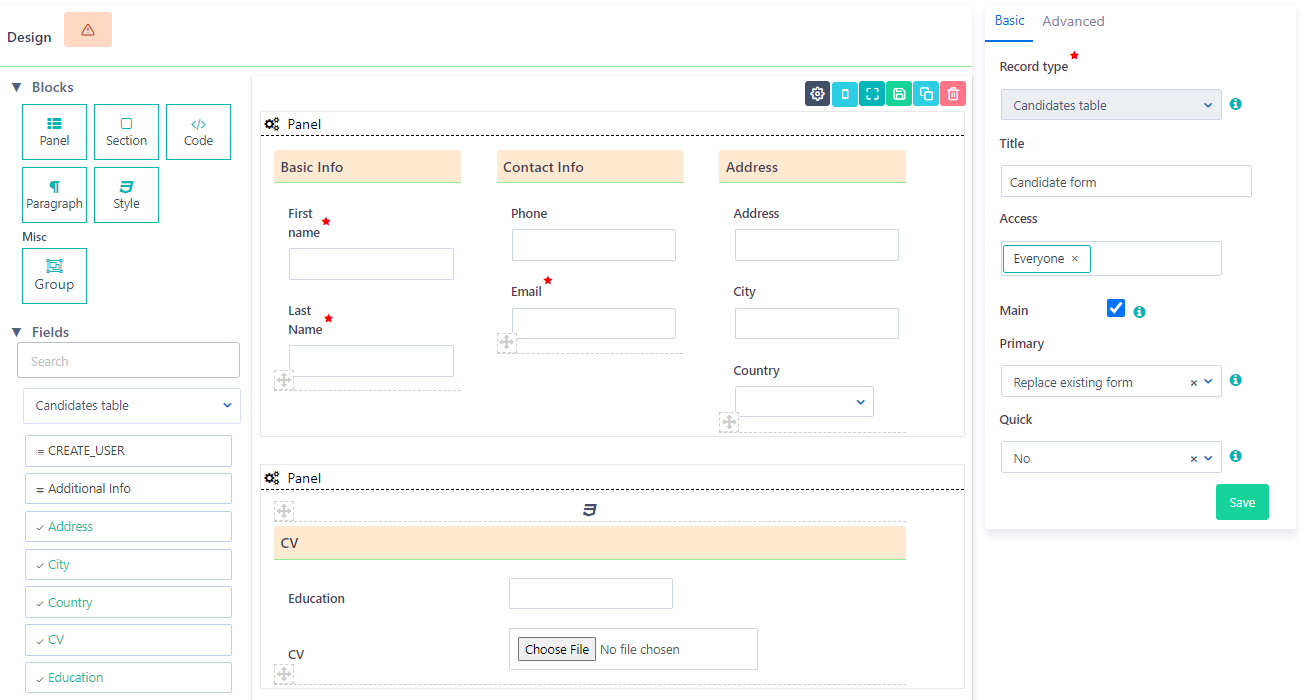
- On the left side of your screen, you can see the Blocks(panel, section, code, paragraph, style, group), a list of fields available to be included in your form and a preview of the form. Search fields and add them easily to your form with drag-n-drop.
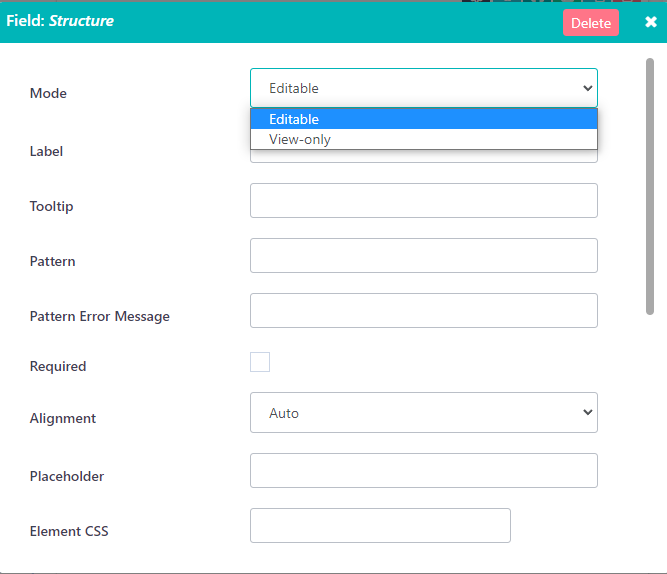
- Click on a field and a pop-up will appear where you can add properties for each field. You can define mode, label, tooltip, pattern, pattern error message, required, alignment, placeholder, element CSS, Element CSS Class, label position, size, hidden, Trigger event scripts on user entry, Disable changes by scripts on this field, is Area, and Area Size.
- On the right side of the screen, you should see the following fields in the Basic tab: Record type Title Access Main Primary Quick. And in the Advanced tab: Position, Form Division, Script before open, Script before edit, Script before save, Template File, Mobile Form, Approve/ Reject form.
- The following buttons are available also in the form designer: Add tabs, mobile view, toggle fullscreen, publish, copy and delete.
- You can also make a form Main, which means it will be visible in the main record as a tab. State the position of each form that you want to display.
- For the form, you want to start the App with, select the option “Replace existing form” in the field Primary, if you wish to initiate your app from the “+” icon of the summary table of the App.
- In the Quick field, you can choose the form to be visible in the quick add menu or in the process templates list, if you wish to initiate your app from the Quick add menu.
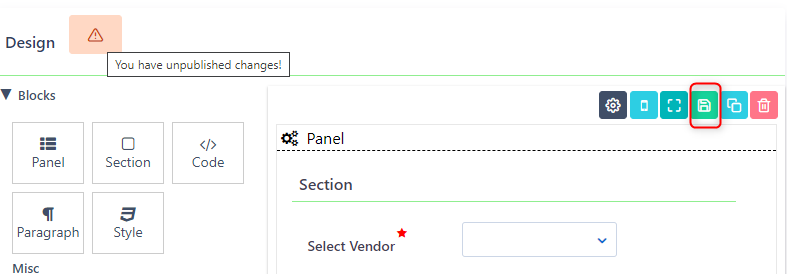
- Don’t forget to Publish your form after finishing your design.
- Furthermore, you can edit the existing forms from the tab Forms. You can select one form from the list and click OK.
3. Graphs
In step 3, you can design your app Graphs or Widgets. Comidor Widgets are the ideal choice for data visualization. Get the most updated data on the visualization format you define.
- Create your own personalized dashboard in seconds.
- Combine multiple views of data to get richer insight.
You can easily create a new Graph, by clicking on the “+” icon.
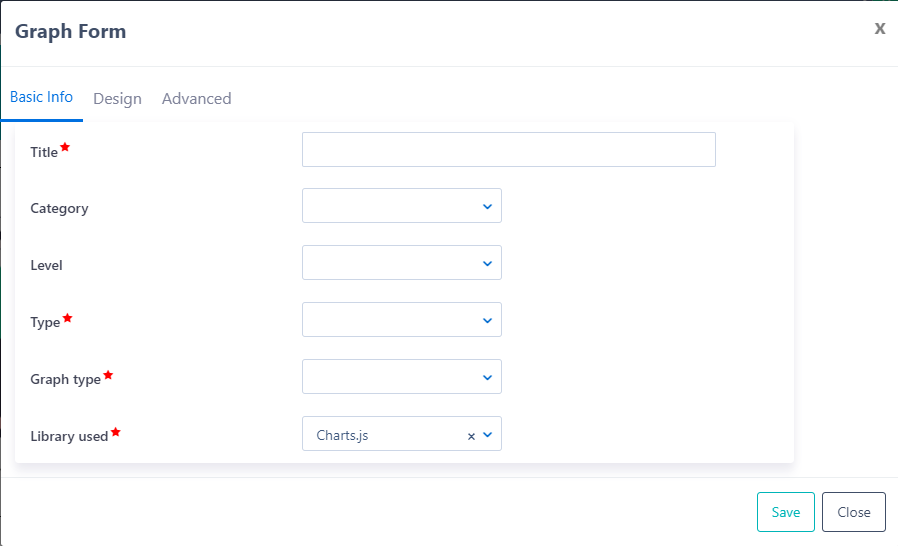
Find out more about all types of Widgets and how to create them.
4. Advanced
Get the most out of the App Builder with this advanced options step by including user tabs in your records or the table of your app, event scripts and field rules to show or hide fields, sections or tabs in forms when specific conditions are met. This step is available only to Table applications (non-process & process enabled).
User Tabs
Use tabs to have complete control over the accessibility of your application.
- The tabs appear inside records (as a tab at the left part of the record) or at the summary table of the application.
- A tab can be a table from any Comidor entity, HTML, or widget.
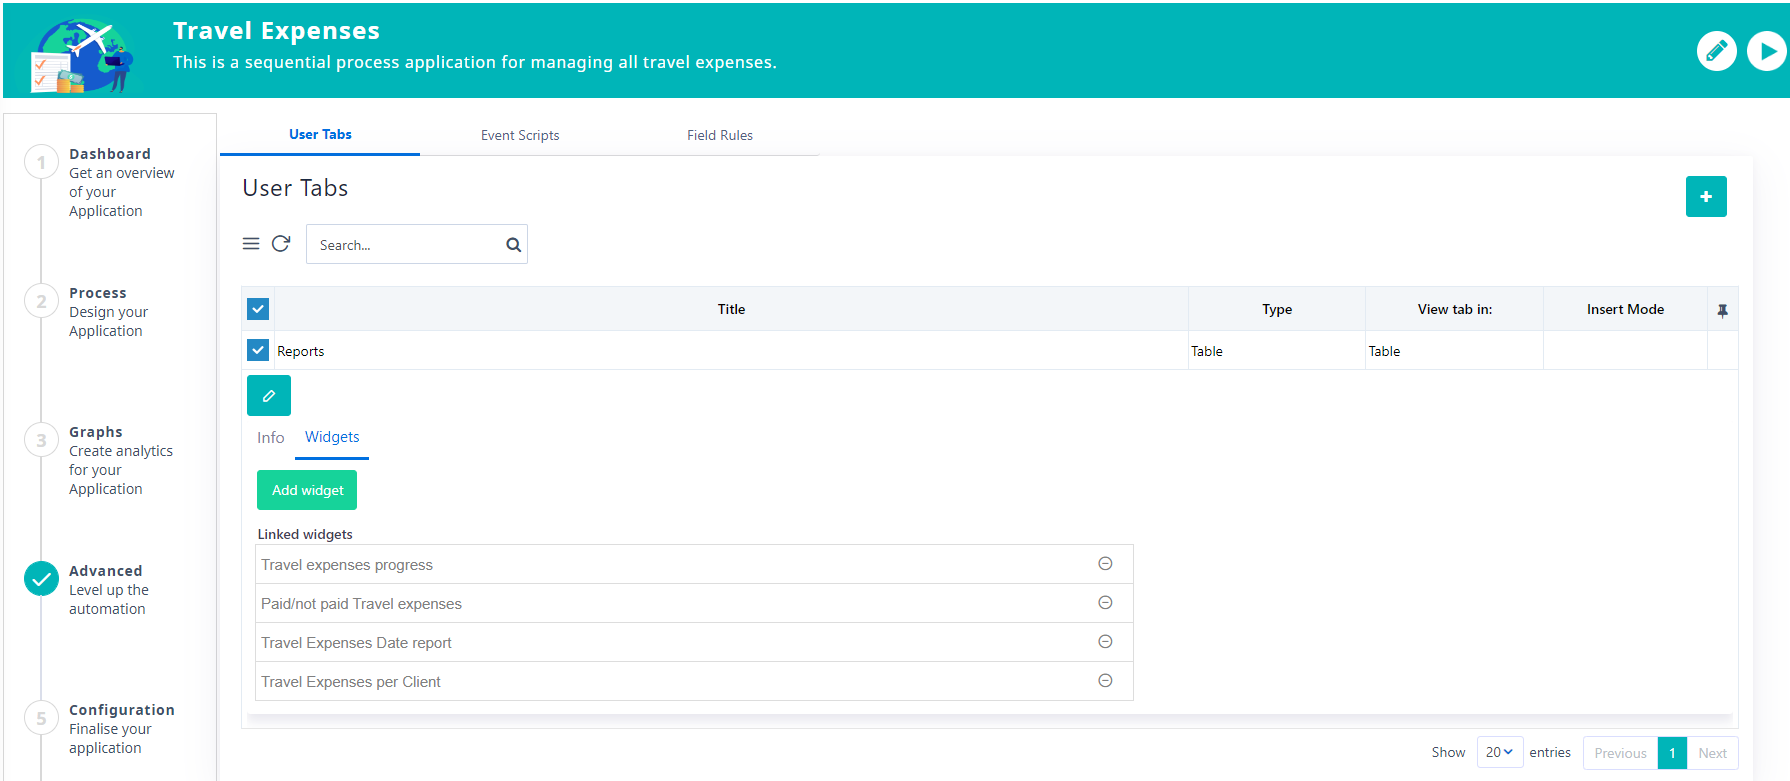
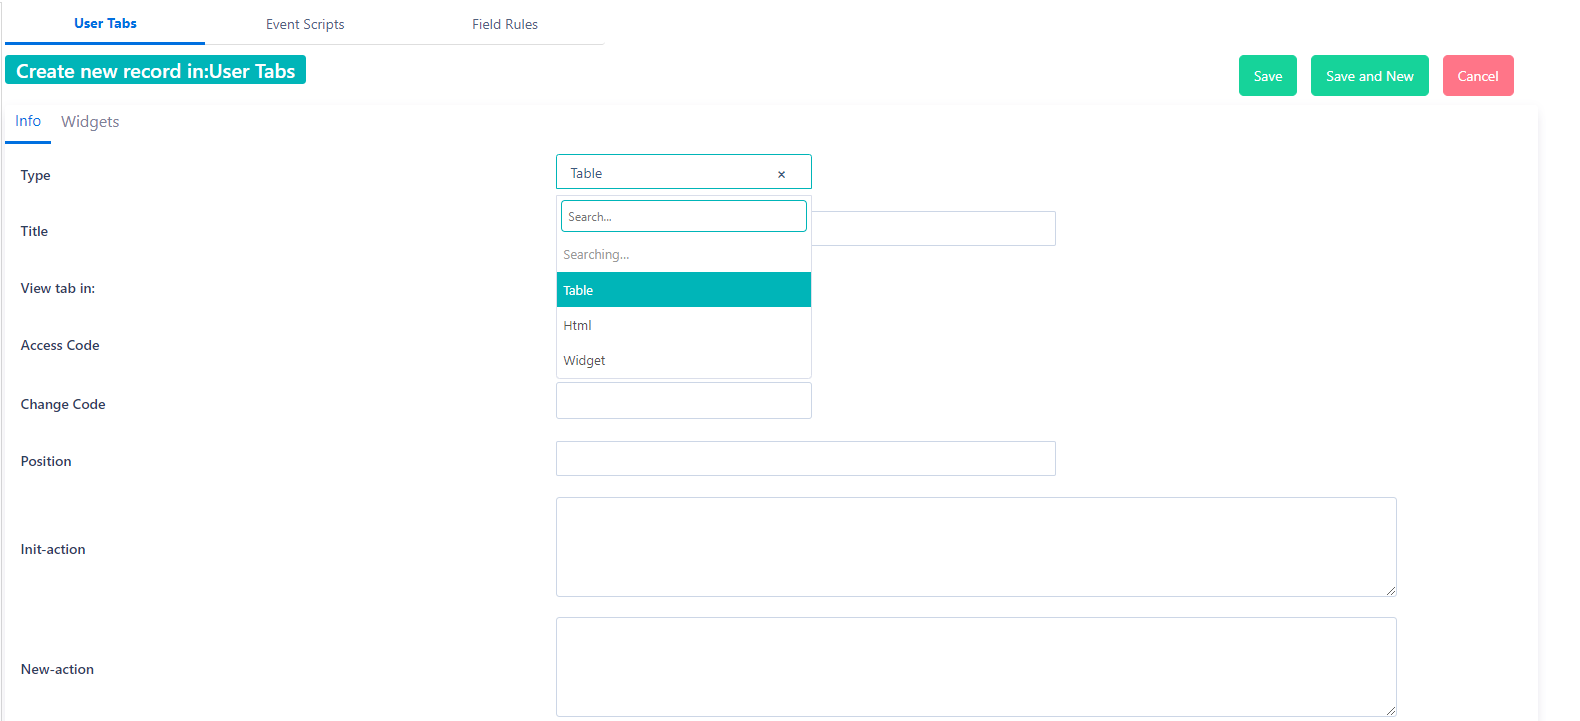
- You can easily create a new Tab, by clicking on the “+” icon
- The Record type is by default the name of the App and disabled
- Select the Type of Tab you wish to create (Table, HTML, or Widget)
- In Type Table:
- Give a Title to the Tab
- In the View Tab in: choose record.
- Select Query: the query to define which fields to be fetched as columns from which tables
- Where Clause: type a specific condition to be met
- Access Code defines who can access this tab
- Select Type HTML when you want to add guidelines or other important information for a specific app:
- Give a Title to the Tab
- In the View Tab in: choose record or table.
- Access Code defines who can access this tab
- Unit-action – insert the HTML here
- In Type Table:
-
- Type Widget: a tab to monitor all the widgets (general or application widgets)
- Give a Title of the Tab
- In the View Tab in: choose the table option.
- Access Code defines who can access this tab
- After saving this tab, click on Add widget button to Select the widget you would like to be display
- All added widgets will be displayed on Linked widgets. You can click on the ‘-‘ to remove a widget from this tab.
- Type Widget: a tab to monitor all the widgets (general or application widgets)
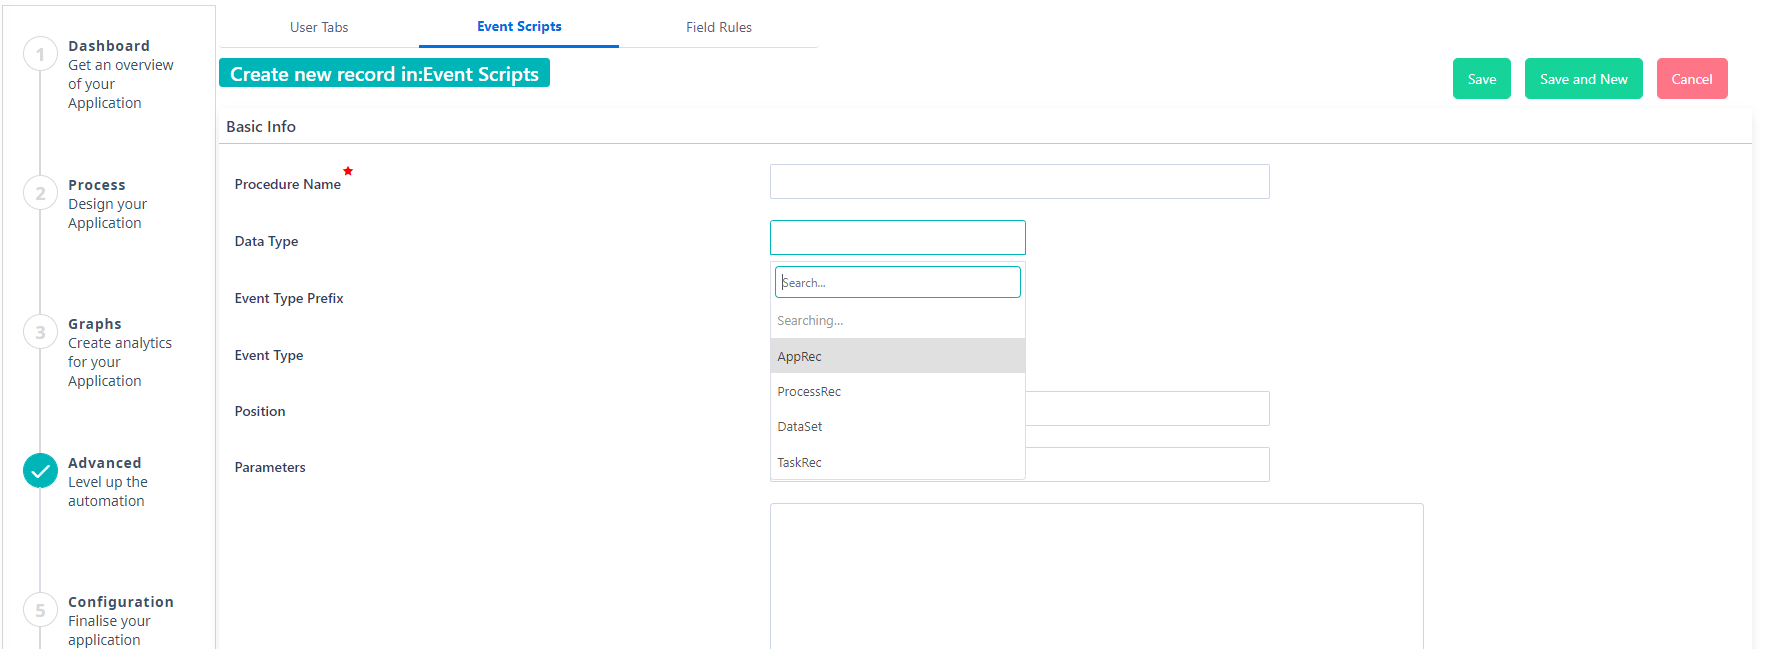
Event Scripts
In this tab, you are able to write scripts for a certain Data Type to be executed before/after/on a specific event.
Click on the “+” icon to create a new Event script:
- Add the Procedure Name.
- Choose the Data Type (apprec, task, process, dataset) and define where you want the script to be applied.
- An Event Type can be inserted, updated, deleted, etc.
- In the Procedure Body add your code.
- This is for advanced users to write their procedures.
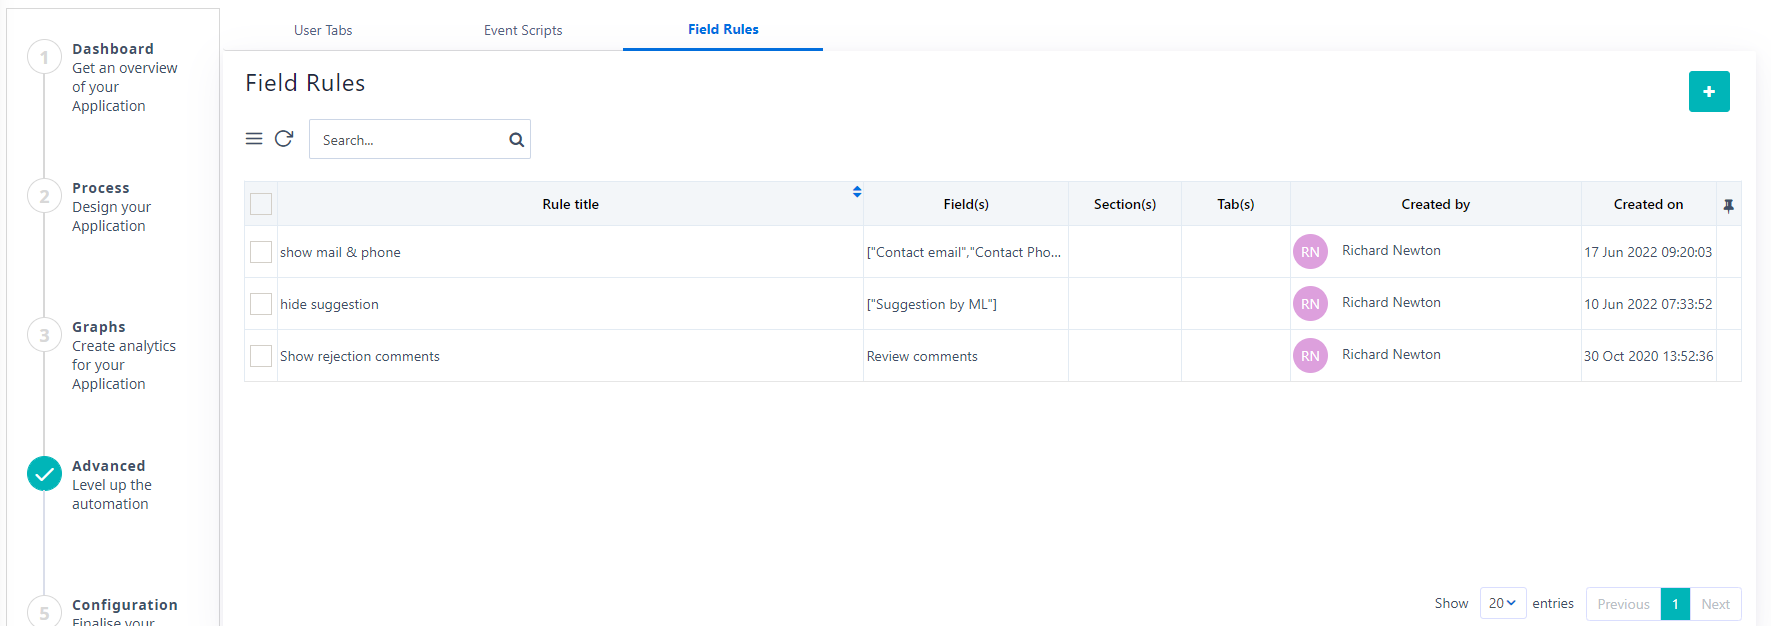
Field Rules
The field rules functionality enables you to hide or show fields/sections/tabs inside forms when certain conditions are met.
Click on the Field Rules tab and you will be able to see the sub-table of all field rules, with the following columns: Rule title, Field(s), Section(s), Tab(s), Created by, Created on, and the pin button.
- Refresh button: Internal refresh in the table/all updated records will be presented
- Search option: type a keyword and press enter; respective field rules will appear.
- Pagination:
To create a new Field Rule press on the “+” button, and a creation form opens.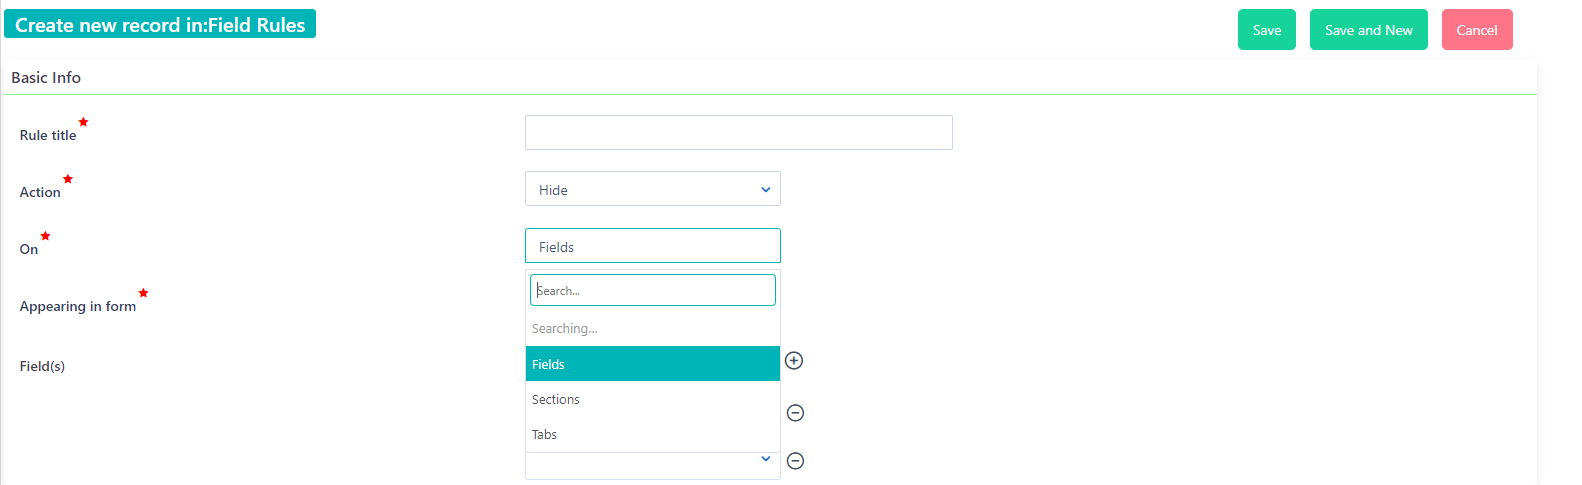
- Give a Rule title
- Select the Action to be performed: you can either Hide or Show
- On: choose between fields, sections or tabs, depending on what you want to show or hide. Depending on the option you choose on the “ON” respective lists will appear.
- Set in which Form you wish this rule to be applied (from the user forms that the selected field is displayed)
- Choose the name of the Field(s)/Section(s)/Tab(s) that you wish to perform the above action. Click on the + icon to add more rows. – to remove a row.
- Select the desired Save option (refer to Quick Reference Guide)
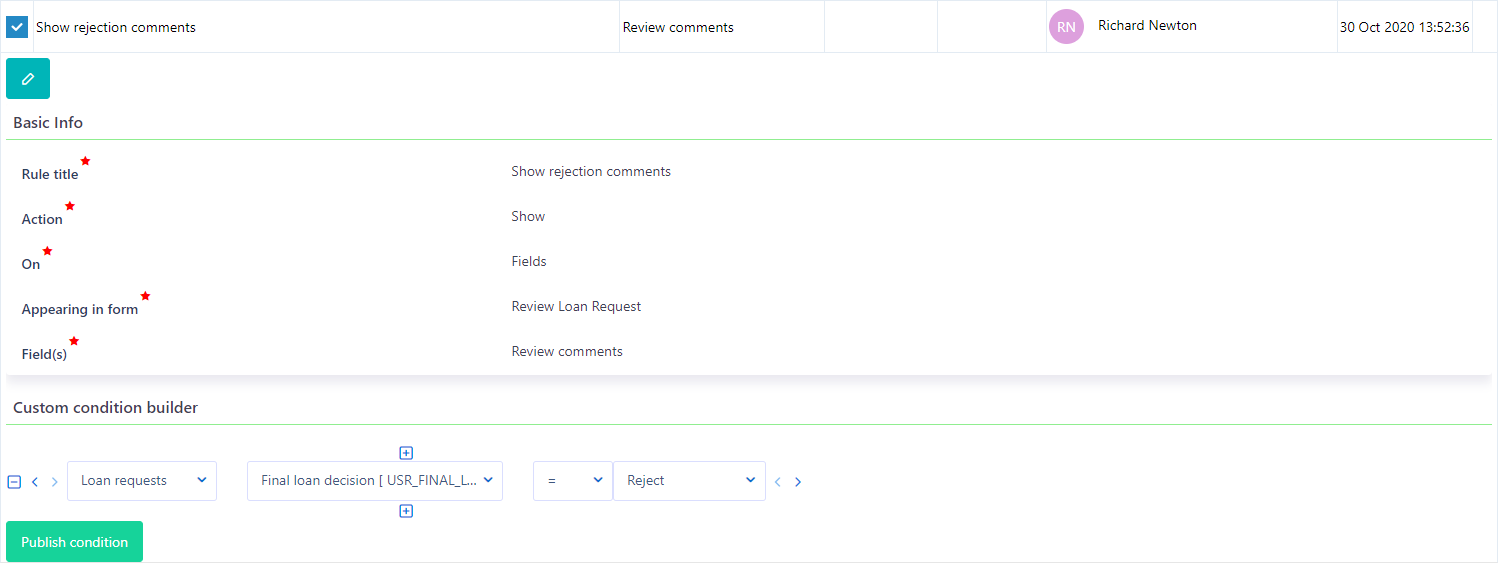
Custom Condition Builder
After saving the Field Rule in your sequential app, and while being at the view form, you can add conditions.
- Click on the ‘+’ icon to insert a new row
- Select the unit that the field comes from (Process, Application name, etc.)
- Choose the Name of the Field and its value
- Use AND, OR, and parenthesis to form your conditions
- After adding all the rows of conditions you need, click on the Publish condition button.
Manage Field Rules
- If you want to make any changes to a Field Rule, simply select the respective Field Rule and click on the pencil icon.
- After making any changes click on Save.
- In order to change the conditions, simply make the changes you wish in the view form of the Field Rule, and then, press the Publish condition.
- You can Delete one or more Field Rules, by multi-checking them in the Field Rules table and then clicking on Delete.
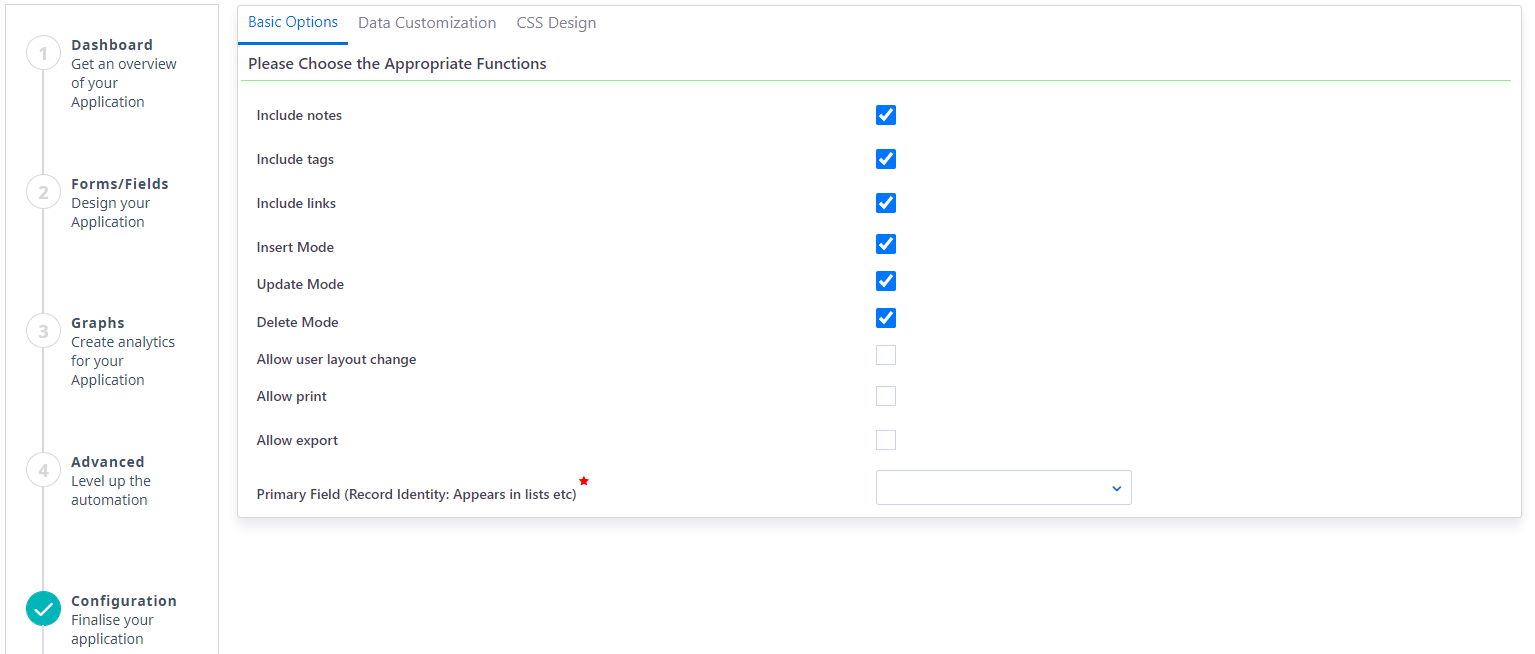
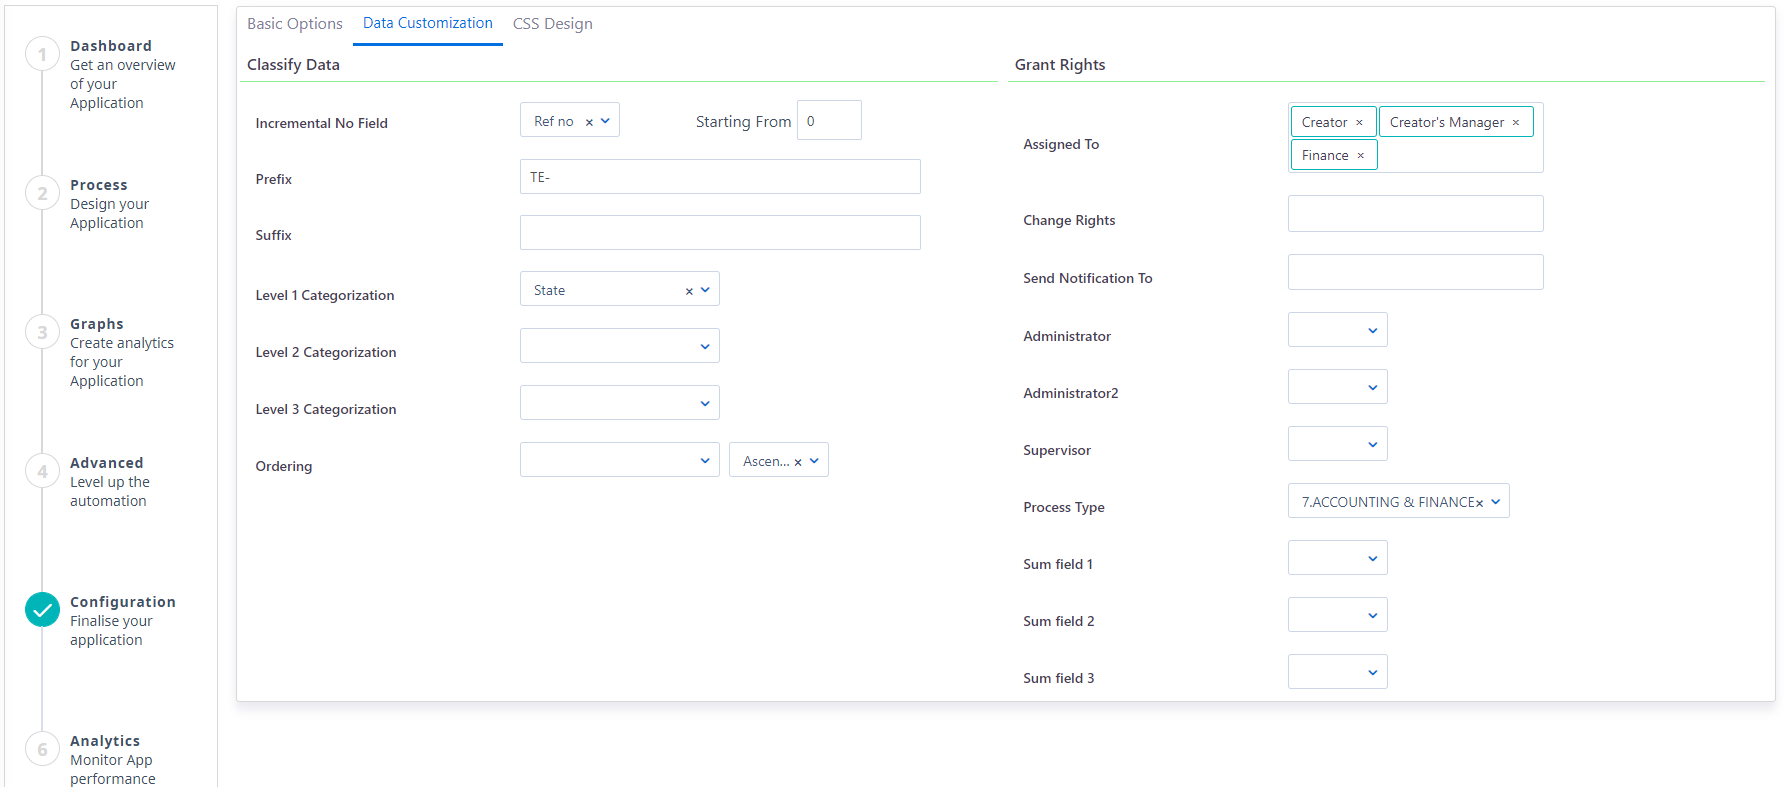
5. Configuration
In this step, you can make the configuration of the sequential application.
- Decide what you would like to include from the Basic options
- Notes, Tags, and Links
- The ability to create, edit and/or delete an entry
- Decide if you want to have the print/export options in the summary table of this app
- Allow user layout change; the ability to change the categorization of the table, and the pin button to remove columns in the table.
- Define a Primary Field (Record Identity: Appears in lists, etc). From the drop-down list, choose one of the fields you created in step 2.
- Customise your data by:
- Define a Numeric field as Incremental, and in every new record, it will get automatically increased by one. You can also specify from which number to start from.
- Setting a Prefix and Suffix to the app and a Text Primary Field; select a text field from Data Model for which you want to auto-populate a number. eg. for this app the requests will get SR.1, SR.2, etc.
- Add the same text field also as Primary Field (Record Identity).
- Selecting a default categorization for the table view based on a specific field (Title, Priority, etc.) – up to level 3.
- Choosing a specific field to display the Summary table ordered by ascending or descending order.
- Setting up to 3 numeric fields, to be displayed in the table as Totals (Sum fields 1, 2, 3).
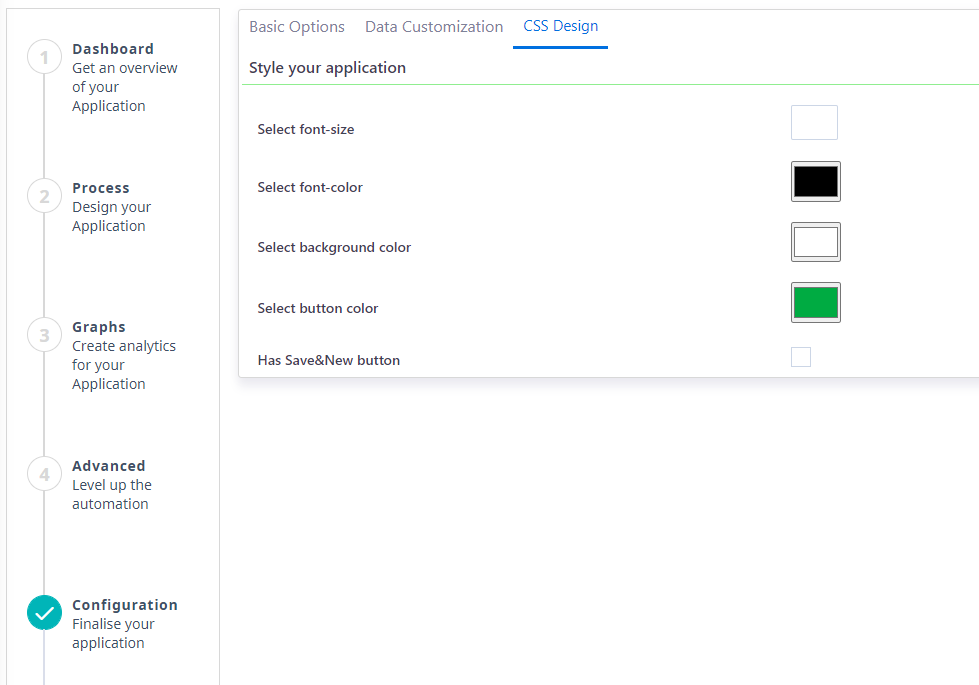
- You can fully customise the app layout, by selecting font sizes and colours in CSS Design options.
Publish
Finally, click on the Publish button in order to Publish your app.
Your app is ready to use!
Note that you can also create an Application with NLP in just 4 steps. Find out more here.
Edit Apps
If you want to edit an existing User App, go to the main menu on the left side of your screen and select the icon App Factory > Application Builder > App Designer. From the list of applications, select the one you wish to edit.
- You can navigate through steps 1-6 by clicking on the respective step and applying any change you wish. Do not forget to publish your changes.
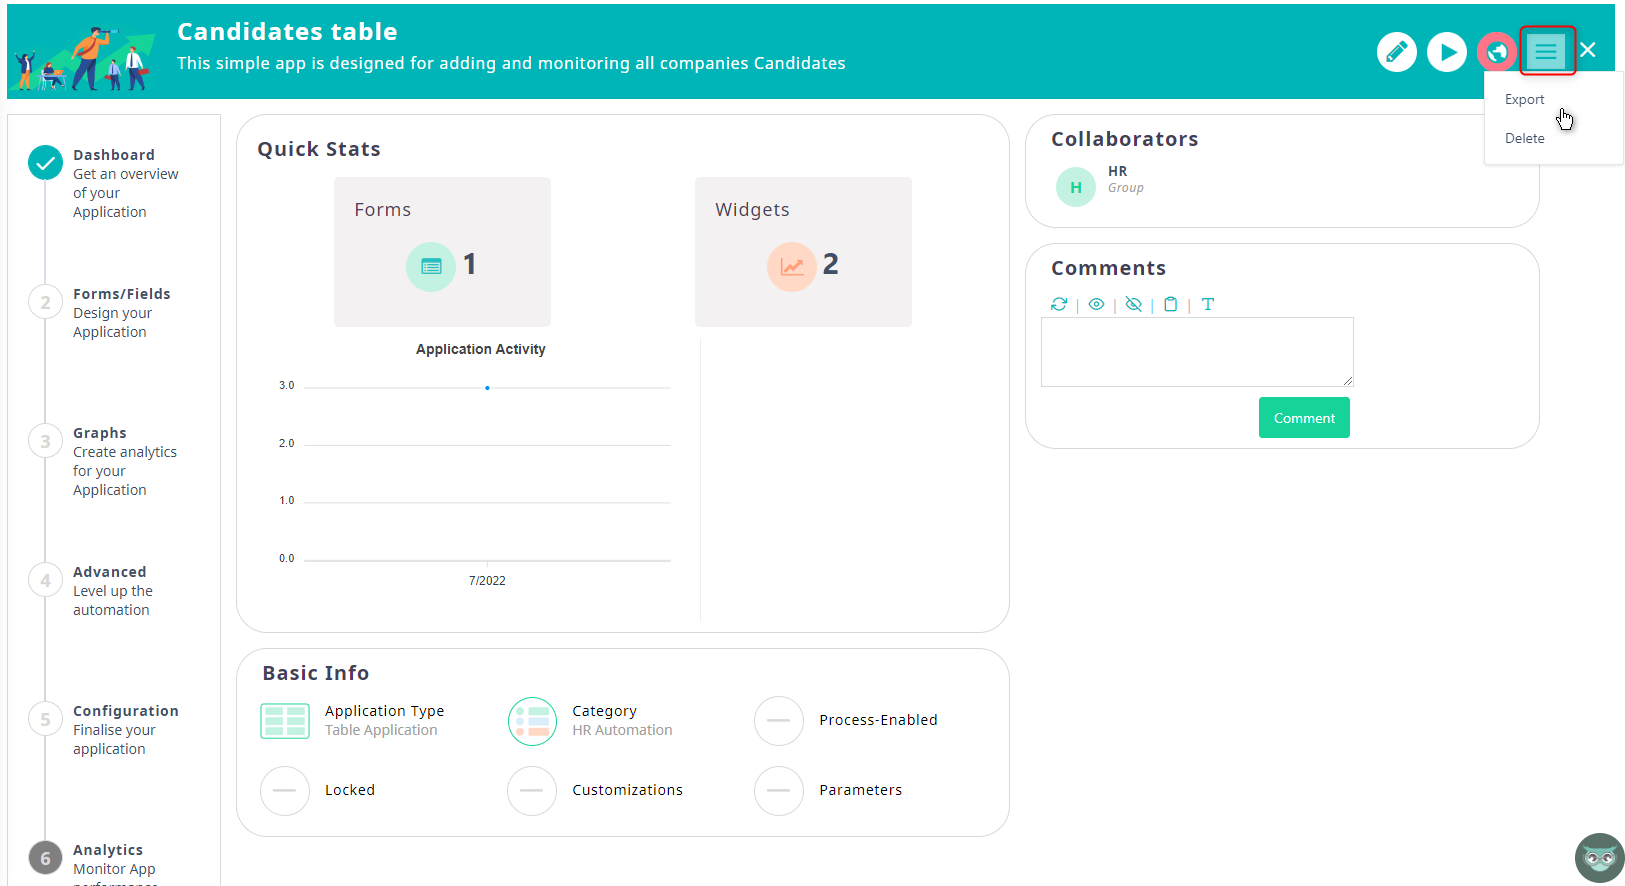
- You can delete a User App if you wish. Open the App you want to delete, and from the actions button, click on the Delete option.
- A confirmation pop-up will appear. Click Confirm to proceed with the deletion or cancel.
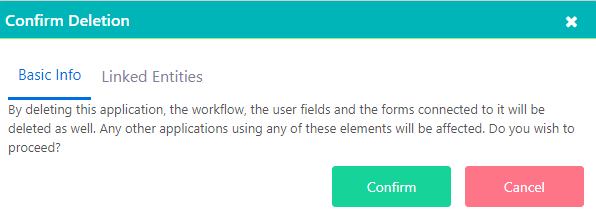
- You can also check the Linked Entities that will be affected in the respective tab.
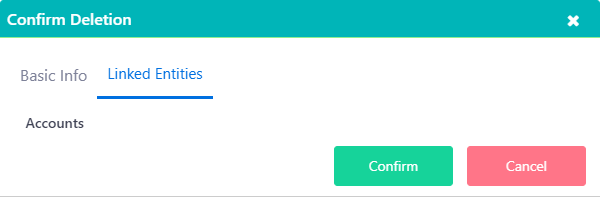
- A confirmation pop-up will appear. Click Confirm to proceed with the deletion or cancel.
Run App
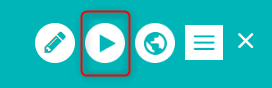
- While viewing an app in the App Designer, you can easily run it! Click on the Play button on the top right of your screen and the quick add form of this app will be populated.
- In case there is no quick add form, a respective message will appear and you will be directed to step 2, in User forms to create a new quick add form.
See the Table
Users can apply the following actions in the table applications:
- Access the table (based on the access rights that are specified by the designer)
- Print or export the table results
- Apply filters, categorize and search within each table
- Access, edit or delete each record
- View records in table or graph views
- In the graph view, pie, bar, or stack charts can be easily created with real-time data and the desired filtering.
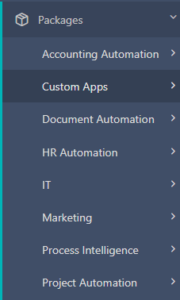
- In order to view the User Apps you created and published through App Designer, go to the menu on the left side of your screen, and select the Packages Icon. A list of all the published apps will be displayed here under the category you chose in Step 1 of App designer. In case no Category is chosen, the app will be shown below Custom Apps.
- Select the one you wish to access and it will open in a new tab.
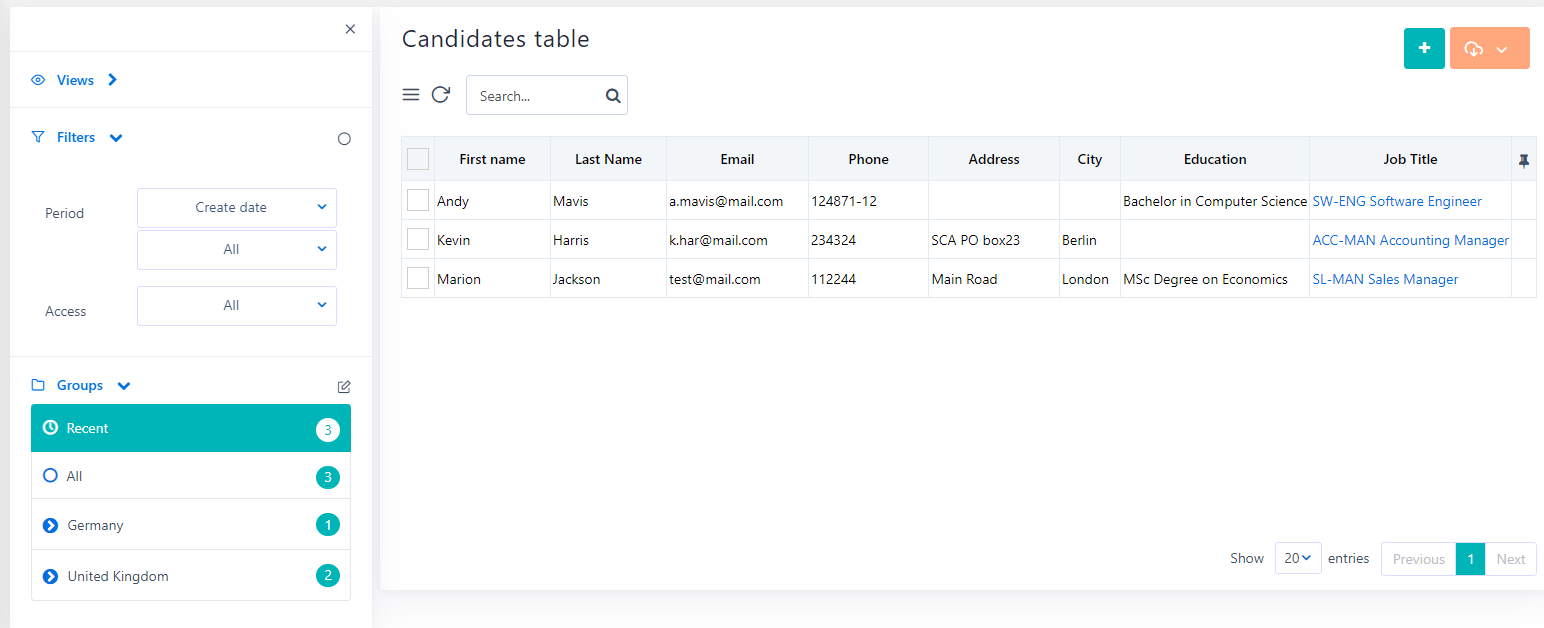
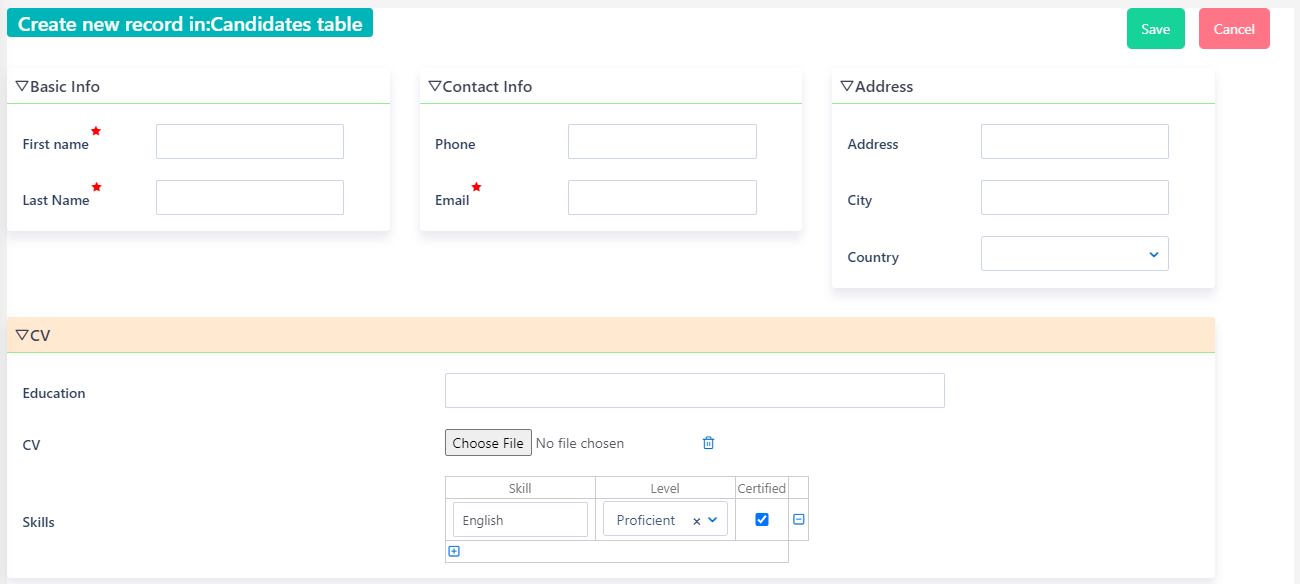
By clicking on the “+” icon you can create a new entry of this app. (In order to see the “+” icon, you should have checked first the respective option in the Configuration step of App Designer). A new tab will open with the form that was created in the App Designer. Fill in the fields and click on Save to add this entry.
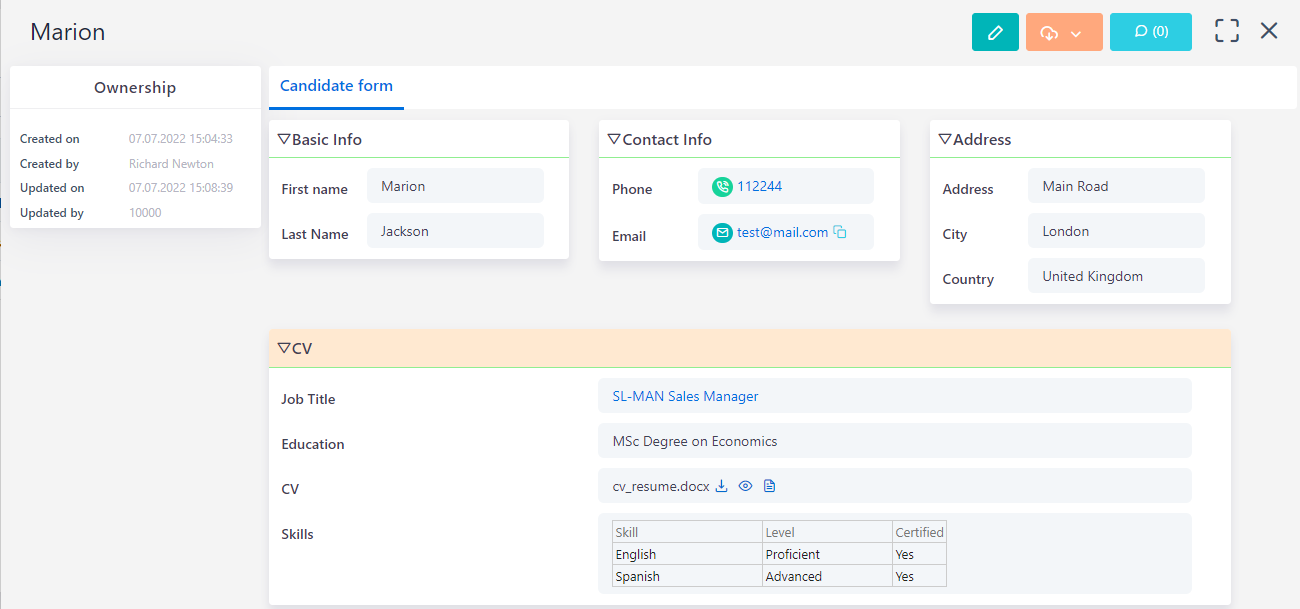
See the Record
In a simple app, the record will look as below:
- You will be able to see the main forms you have created. The primary form is the form you chose to replace the existing form.
- Click on the pencil button to edit any field of your record.
- The comments area and the actions button depend on the configuration options of your app, in the App designer.
Find out more on App Designer and how to create other app types here.
The post Simple Application appeared first on Comidor Low-code Automation Platform.
Leave a Comment
You must be logged in to post a comment.