
UiPath Workflow Designer: Seeing is Believing
Blog: UIPath.com
Exceptional robotic process automation (RPA) products deliver terrific user experiences by making visual workflow automation straightforward and intuitive. Without a way for business users to easily design automated workflows without IT or coding knowledge, it will be difficult for any organization to fully reap process automation benefits. UiPath has been refining its RPA product features for over ten years. Take a look at what we’ve achieved. As the saying goes: seeing is believing.
.
This video and the accompanying screenshots below demonstrate exactly how a user designs a process to extract email addresses from a legacy system expense report and paste them into a Salesforce.com email text field.
A Close Look at the Video’s First 70 Seconds
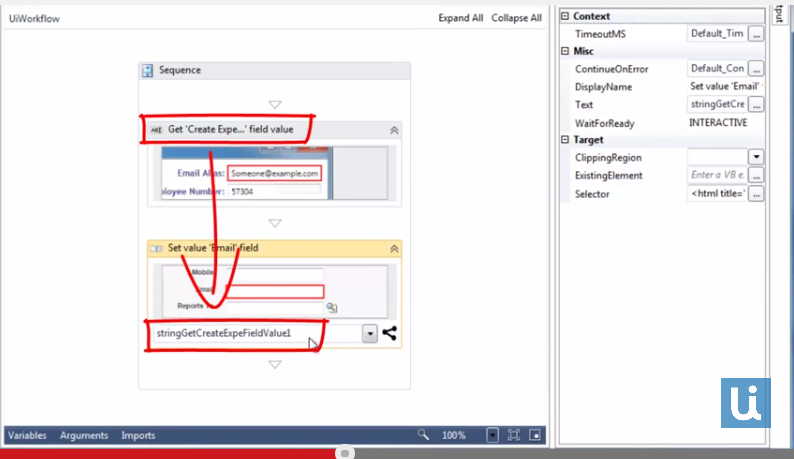
(Video Time: :00 to :15) “On the desktop, UiPath Workflow Designer is opened.” What this means: Opening UiPath’s visual workflow automation software provides the user with a drag & drop, visual process modelling tool. <em>More details</em>.
(Video Time: :16 to :26) “It lets you visually assemble the activities that make up the workflow sequence. In this example, I chose “Get Text” Wizard because email is shown in an editable text box on the legacy system.” What this means: Just by choosing to click this Wizard, the user is telling Workflow Designer it is about to extract text (often referred to as screen-scraping). <em>More details.</em>
(Video Time: :27 to :44) “As soon as I click the button, I am asked to visually point to where on the screen the email editable text box is located. As I hover the mouse, you can see the UI elements under the cursor are highlighted.” Notice that an important feature is invoked here: When the user clicks “Get Text” Wizard button, two things happen: 1) UiPath’s RPA product software makes the proper legacy screen appear; 2) the user is able to ‘show’ the process design software the correct “Get Text” field (email, in this case) by simply navigating the cursor to that field (upper right-hand corner of screen) and clicking. What this means: This Point & Click feature simultaneously learns the path to the proper source field (email) while process code is automatically created ‘under the hood’. <em>More Details</em>.
(Video Time: :45 to :55) ” I click to select employee email control, a workflow activity that retrieves email has been automatically placed on designer surface” When the user selects and clicks the email text field on the legacy screen, the “Get Text” Wizard visually & automatically places this process step on the Designer surface. What this means: the Wizard is doing its job. The user is creating the process step by pointing and clicking while the Wizard is automatically producing the process code ‘under the hood’.
(Video Time: :56 to 1:01) “**Now, let’s add an activity that will set the employee email in salesforce. I am dragging it from Activities toolbox to designer surface.” The Activities Toolbox can be seen in the panel to the left of the Designer surface – and the “Set Value” has been ‘grayed’. An important feature is used here (Drag & Drop). The user has clicked on “Set Value”, then dragged and dropped it onto the Designer surface. What this means: Drag & Drop is doing its job. The user is creating the visual process step by easily dragging and dropping** his choice from the Activities Toolbox onto the Designer surface. Meanwhile, the process code behind the drag and drop action is being created ‘under the hood’.
(Video Time: 1:02 to 1:06) “Then I am visually selecting the target element on Salesforce.” Once the “Set Value” process step has been placed on the Workflow Designer surface, the user navigates the cursor to the visible Salesforce.com screen and provides the desired destination for the text already screen-scraped by the earlier “Get Text” process step. The user points and clicks on the Salesforce.com email text field. What this means: the Point & Click feature is doing its job. The user is creating the process step by pointing and clicking while the process code is produced ‘under the hood’.
(Video Time: 1:07 to 1:10) “I choose to use the value retrieved by the previous activity.” The user clicks and links the value extracted by the “Get Text” step (scraped email text) with the value needed by the “Set Value” step (Salesforce.com email field). What this means: the user and all the Wizards have done their job. The Workflow Designer has all the process steps and activities needed to place scraped email addresses into the Salesforce.email field.
(Video Time: 1:11 to 1:14) “ And I am all set!**“** Yes, you are. Workflow Designer has successfully created an automated workflow that transfer screen-scraped legacy email addresses into Salesforce.com.
Leave a Comment
You must be logged in to post a comment.