Training neural network with image sequence, an example with video as input
Blog: Smile - Le blog des consultants
Training a neural network with an image sequence — example with a video as input
How can we classify actions that happen on video? How to use Time Distributed layers with image sequence? How to manage the input shapes?
Last time, we explain how works Time Distributed layers in Keras and we introduced the usage of transfer learning with that kind of neural network. We can prepare a little network to apply what we learned.
If you didn’t read our last article, you may do it now:
How to work with Time Distributed data in a neural network
What could we do?
Discover an “action” in videos can be very interesting — let’s imagine the possibilities: detecting someone in danger, a characteristic movement in space to detect asteroids, meteorologic events from satellite images, sign language, and many more.
Detecting an action is possible by analyzing a series of images (that we name “frames”) that are taken in time. The Time Distributed layer provided by Keras helps a lot to make it easy to try. Our previous article explained how that works.
Let’s remind the “Time Distributed layer” concept, here with a ConvNet :
Now let’s practice 🏄.
Get Data then practice
In the earlier article, I got several comments of people wondering how to send the “sequence” to the model, as Keras only offers an Image Data Generator that flows “one” image batches. The answer is, we need to create our generator that can produce batches of N frames.
For this example, I will use the HMDB data set that provides several videos classified per action. It’s free to download and use.
HMDB: a large human motion database
This data set provides several .rar files named with the action that happens in the video.
The videos are short and with good resolution, enough to play with machine learning.
The Data generator
Usually, if you’re using Keras, you like to use ImageDataGenerator that will “flow” images from classified directories. That’s very easy to use and you can quickly make data augmentation (image manipulation to have more train samples). That’s OK for “single” image recognition, but not for our work.
Why?
The image generator yields (N, W, H, C) data, where N is the batch size, W and H are width and height, and C is the number of channels (3 for RGB, 1 for grayscaled images).
But we need to send a sequence, we need to send several frames. The needed shape is (N, F, W, H, C) — where F is the number of frames for our sequence. For example, if we train a sequence of 5 images that are RBG and with 112×112 size, the shape should be (N, 5, 112, 112, 3). See?
The image data generator from Keras cannot produce such a format.
The second thing to manage is that each video hasn’t got the same number of frames. If the video is 5 seconds long and encoded with 24 frames per second, so there are 5 x 24 = 120 images for the entire video. But the other videos can be 10 seconds long, or 2 seconds… 😱
So, what can we do?
The first method is to get 5 first images from 0, then from 1, and so on…
That’s only possible if you’re certain that the “action” you want to predict happens in those 5 frames. But that’s rarely the case. Each video dataset I used has got a little (or big) time at the beginning and the end of the video where “no action” happens. So, should we ask the generator to edit the entire set of videos to remove those parts? Waste of time, isn’t it?
The second possibility is to pick 5 distributed images from the entire video.
It’s more efficient because if the first or last frames of the video have got no action, I’m sure to avoid them. The second benefit is that I now have the entire movement in the sequence.
The only thing to do is to prepare a custom Generator (that extends Sequence) that can:
- read the video (let’s use OpenCV)
- pick N frames
- return batches
OK, go, I give you a couple of minutes to create it…
Just kidding — I give you mine! 😋
My generator can extract some frames, resize them, create a batch… It respects what Keras needs to “fit” the model for training time. It also creates validation data by splitting the input data set.
It uses OpenCV to capture video from files. And since we don’t need to train with the entire frameset, it knows how to extract a portion of frames from the video.
The VideoFrameGenerator I created can be installed via pip command:
pip install keras-video-generators
You can check sources on my Github page:
metal3d/keras-video-generators
My video frame generator can take ImageDataGenerator to produce data augmented frameset from the input videos.
You can say I’m nice, say it! 😜
Truly, there are 3 different generators included. But for now, let’s stick with the simple keras_video.VideoFrameGenerator which is very easy to use.
Finally, it can also keep the not-augmented original frames in a cache, and it tries to pick frames by avoiding the firsts ones to be sure that “something happens” in frames.
⚠️ About memory, if you’ve got a huge data set, so leave use_frame_cache to False
About the frame cache, it’s populated when you run the first epoch of training. Then, when the generator has proceeded the entire video, it will pick frames from memory instead of reading the video file again. OK, that’s sufficient to work I presume.
Use the Video generator 🎬
ℹ️ Be sure you’ve installed keras-video-generators package.
Let’s create the dataset from the HMDB database, with only 3 classes from the provided rar files:
- golf
- dribble
- kicking ball
Why only 3 classes?
Because there are not enough videos to get good accuracy, and because we are only testing the idea. If the training is very long, and you’ll get bad results, you will be disappointed and probably you will hate me 😇 — so let’s stick with 3 classes, please.
On my computer, I created a directory named “videos” with 3 sub-directories named with class names.
I can now try my generator included in keras_generator package:
import os
import glob
import keras
from keras_video import VideoFrameGenerator
# use sub directories names as classes
classes = [i.split(os.path.sep)[1] for i in glob.glob('videos/*')]
classes.sort()
# some global params
SIZE = (112, 112)
CHANNELS = 3
NBFRAME = 5
BS = 8
# pattern to get videos and classes
glob_pattern='videos/{classname}/*.avi'
# for data augmentation
data_aug = keras.preprocessing.image.ImageDataGenerator(
    zoom_range=.1,
    horizontal_flip=True,
    rotation_range=8,
    width_shift_range=.2,
    height_shift_range=.2)
# Create video frame generator
train = VideoFrameGenerator(
    classes=classes,
    glob_pattern=glob_pattern,
    nb_frames=NBFRAME,
    split=.33,
    shuffle=True,
    batch_size=BS,
    target_shape=SIZE,
    nb_channel=CHANNELS,
    transformation=data_aug,
    use_frame_cache=True)
As you can see:
- the generator can make data augmentation
- it creates validation dataset — here 33% of videos sampled from the dataset
- it can use a “frame cache” that you must deactivate if you’ve got not huge RAM size (I’ve got 32 Go RAM, the frame cache took 16 Go for some tests…)
To get the validation data:
valid = train.get_validation_generator()
After that, we can see something like this:
get 3 classes for 255 files for train
get 3 classes for 123 files for validation
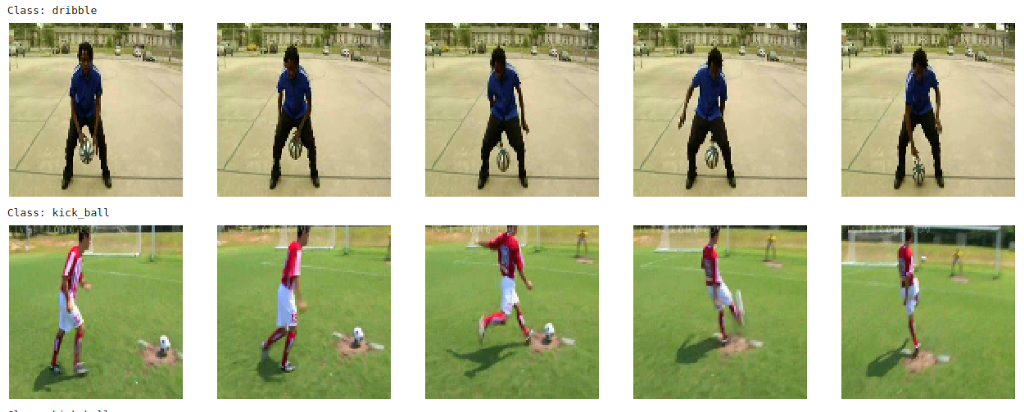
train and valid generators can now generate frame sequences. Here, I use 5 frames with batch size to 8. That means the generator produces 8 sequences of 5 frames picked from videos.
Here are samples from train generator — you can use:
import keras_video.utils
keras_video.utils.show_sample(train)
Well, it’s now time to build the network!
Create the neural network
We’ve got several ways to build the model. We can use a well-known model that we inject in time distributed layer, or we can build our own.
To have more understanding of how that works, I will show you how to make everything from scratch. Then how to use a standard model as input.
With custom ConvNet
Each input image of the sequence must pass to a convolutional network. The goal is to train that model for each frame and then decide the class to infer.
The concept is more or less :
- A ConvNet is created and Time distributed to detect “features”
- The Time distributed output is injected to GRU or LSTM to treat “time series”
- A DenseNet is then applied to take the decision, to “classify”
It’s interesting to have that concept in mind:
The ConvNet gets “features” in time, DenseNet decides .
So, we need to create that ConvNet. I recommend creating a function that returns the model. Here, I’m using a simple model. I made several convolutions with batch normalization.
from keras.layers import Conv2D, BatchNormalization,
    MaxPool2D, GlobalMaxPool2D
def build_convnet(shape=(112, 112, 3)):
    momentum = .9
    model = keras.Sequential()
    model.add(Conv2D(64, (3,3), input_shape=shape,
        padding='same', activation='relu'))
    model.add(Conv2D(64, (3,3), padding='same', activation='relu'))
    model.add(BatchNormalization(momentum=momentum))

    model.add(MaxPool2D())

    model.add(Conv2D(128, (3,3), padding='same', activation='relu'))
    model.add(Conv2D(128, (3,3), padding='same', activation='relu'))
    model.add(BatchNormalization(momentum=momentum))

    model.add(MaxPool2D())

    model.add(Conv2D(256, (3,3), padding='same', activation='relu'))
    model.add(Conv2D(256, (3,3), padding='same', activation='relu'))
    model.add(BatchNormalization(momentum=momentum))

    model.add(MaxPool2D())

    model.add(Conv2D(512, (3,3), padding='same', activation='relu'))
    model.add(Conv2D(512, (3,3), padding='same', activation='relu'))
    model.add(BatchNormalization(momentum=momentum))

    # flatten...
    model.add(GlobalMaxPool2D())
    return model
This simple model is enough to make feature detection. As you can see, the last layer produces one dimension for output, you can also use Flatten but GlobalMaxPool2D will reduce the number of outputs (getting only maximum values from the last convolution).
OK, it’s now time to build the time distributed model. I was using LSTM that is very efficient, but I finally use GRU that is conceptually the same but using less memory, but the cost is that it is less efficient. But one more time, we’re testing…
from keras.layers import TimeDistributed, GRU, Dense, Dropout
def action_model(shape=(5, 112, 112, 3), nbout=3):
    # Create our convnet with (112, 112, 3) input shape
    convnet = build_convnet(shape[1:])

    # then create our final model
    model = keras.Sequential()
    # add the convnet with (5, 112, 112, 3) shape
    model.add(TimeDistributed(convnet, input_shape=shape))
    # here, you can also use GRU or LSTM
    model.add(GRU(64))
    # and finally, we make a decision network
    model.add(Dense(1024, activation='relu'))
    model.add(Dropout(.5))
    model.add(Dense(512, activation='relu'))
    model.add(Dropout(.5))
    model.add(Dense(128, activation='relu'))
    model.add(Dropout(.5))
    model.add(Dense(64, activation='relu'))
    model.add(Dense(nbout, activation='softmax'))
    return model
The action model builds the ConvNet first with only the (112, 112, 3) shape ( shape[1:]removes the “5” dimension index) — then it injects it in the TimeDistributed layer. This layer needs the full shape (5, 112, 112, 3) as input. That means that the “model” input wants 5 images of 112×112 with 3 channels (RGB).
Because the dataset is not very large, I recommend using Dropout to avoid overfitting (it will happen anyway… but at least we reduce the problem)
Let’s create the model:
INSHAPE=(NBFRAME,) + SIZE + (CHANNELS,) # (5, 112, 112, 3)
model = action_model(INSHAPE, len(classes))
optimizer = keras.optimizers.Adam(0.001)
model.compile(
    optimizer,
    'categorical_crossentropy',
    metrics=['acc']
)
I tried several optimizers such as SGD or AdaDelta. Adam seems to give a better train curve.
There we are. We can train!
OK, just to resume:
- we’ve got train and valid generators
- validators respect the Sequence class, so we can use them with fit_generator method from Keras
- we’ve got a model that is time distributed
So now, we will fit the generator:
EPOCHS=50
# create a "chkp" directory before to run that
# because ModelCheckpoint will write models inside
callbacks = [
    keras.callbacks.ReduceLROnPlateau(verbose=1),
    keras.callbacks.ModelCheckpoint(
        'chkp/weights.{epoch:02d}-{val_loss:.2f}.hdf5',
        verbose=1),
]
model.fit_generator(
    train,
    validation_data=valid,
    verbose=1,
    epochs=EPOCHS,
    callbacks=callbacks
)
🤓 On my 1060Ti with 3Go RAM (+32Go on computer) — it takes 20 minutes to train the model.
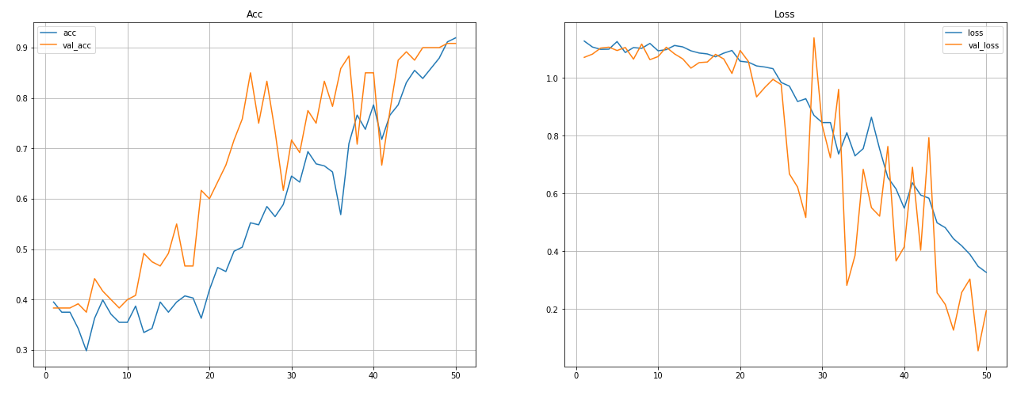
I made also a callback that produces graphs to check how the model evolves. Let’s take a look (and keep calm!)
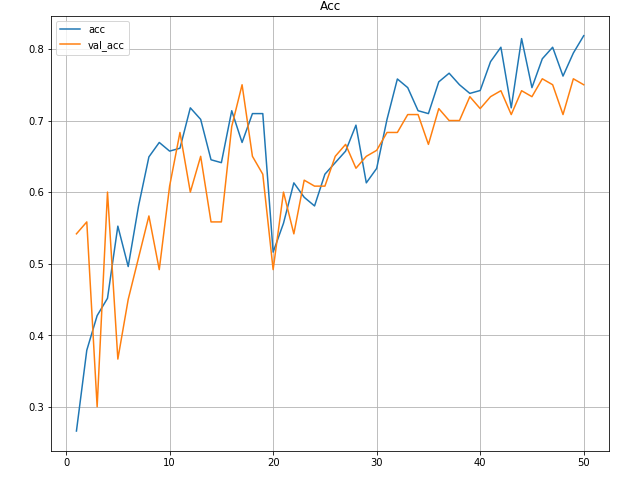
Accuracy seems to… grow, it’s not very “clean” but that seems to work… Let’s take a look at “loss” now.
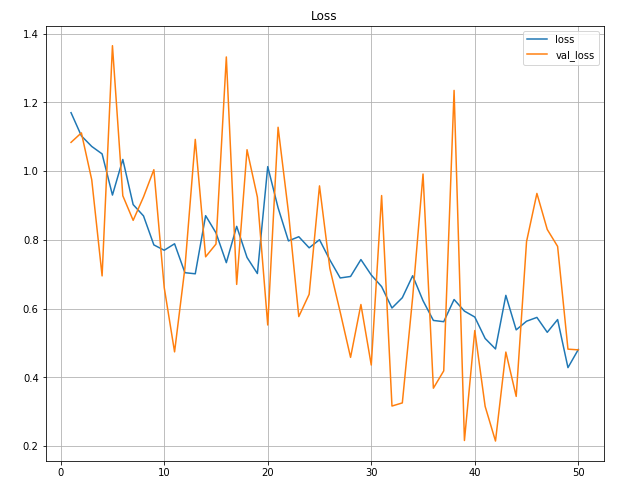
😶 Oh my… god… what happens? The training loss seems to be OK but what’s the problem with validation loss?
Well, that’s a well-known problem… Those are the cause:
- I’ve got not enough data for validation
- I’ve got not enough data to train, so the model may overfit
- The model is probably not good enough 😡
But… that’s finally not so bad.
Check twice, the loss is going down 📉, accuracy for validation increases 📈just like train accuracy. Keep in mind we’re testing for now. So, well yeah, the model is not so bad after all.
OK, so let’s make some checks.
I kept some videos outside the training data set to make some tests. Here are some results:
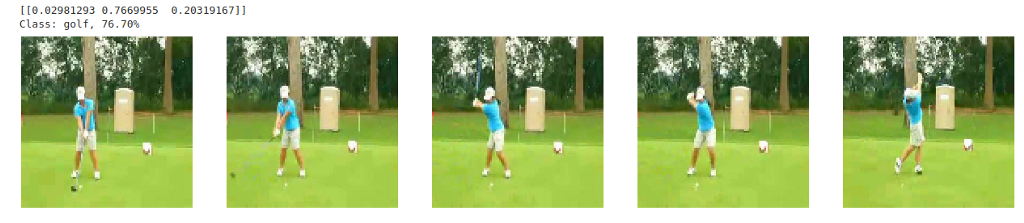
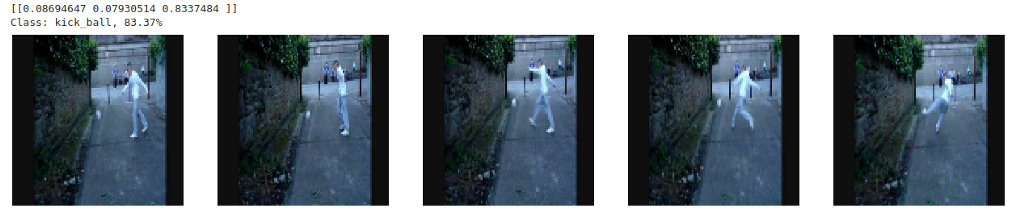
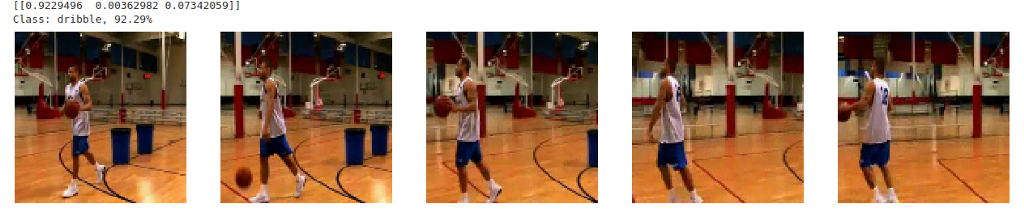
Not that bad, don’t you think?
Now, let’s use a standard model
We built our ConvNet, that’s fine. But what about using a well-known model, and why not a “pre-trained” model?
OK, let’s use… MobileNet. It is quick and well trained.
Our GRU model (or LSTM) needs one dimension, but if you get MobileNetV2 without “top layers” (that is the category outputs, we don’t need them) so you’ll have a “Convolution” layer. We need to add one layer to have the one dimension shape compatible with GRU.
Also, MobileNet is not initially meant to detect “actions”, but only to make image recognition. So, if you tweak the entire layers as not “trainable”, you will not have accuracy improvements or “loss ” enhancement. For example, I make the last 9 layers trainable. You can try with 6 or 12 for as well.
That’s the function to try it:
def build_mobilenet(shape=(224, 224, 3), nbout=3):
    model = keras.applications.mobilenet.MobileNet(
        include_top=False,
        input_shape=shape,
        weights='imagenet')
    # Keep 9 layers to train
    trainable = 9
    for layer in model.layers[:-trainable]:
        layer.trainable = False
    for layer in model.layers[-trainable:]:
        layer.trainable = True
output = keras.GlobalMaxPool2D()
return keras.Sequential([model, output])
Because we’re using a pre-trained model, we need to use the required (224, 224, 3) shape.
ℹ️ If you want to use a non-trained model (setting theweights parameter to None ) so you will change shape. But you will need to leave all the layers to be “trainable”.
⚠️ If you already have an opened notebook where you trained the previous model, please kill the kernel first.
So, let’s change our parameters:
# Set size to 224, 224
SIZE = (224, 224)
CHANNELS = 3
NBFRAME = 5
BS = 8
And for our function that builds the action model, now use build_mobilenet :
def action_model(shape=(5, 112, 112, 3), nbout=3):
    # Create our convnet with (112, 112, 3) input shape
    convnet = build_mobilenet(shape[1:])

    # then create our final model
    model = keras.Sequential()
    # ...
And create the model with new parameters — note that after several tests, SGD gave me better results:
INSHAPE=(NBFRAME,) + SIZE + (CHANNELS,) # (5, 224, 224, 3)
model = action_model(INSHAPE, len(classes))
optimizer = keras.optimizers.SGD()
model.compile(
    optimizer,
    'categorical_crossentropy',
    metrics=['acc']
)
Then, launch the training as usual.
This gives me the following training curves on my computer:
Ditto, validation loss is not great, but good enough for experimentation.
Then, you can now try to pick video frames, retry, and see that the results are correct as for our custom ConvNet.
Others Generators approach
The generator that we used for that article is adequate to train a model for testing purposes. But, if you want to go better in accuracy, there is an even better generator to use (from the package I provided before).
Actually, the showcased generator picks frames for the entire file, whatever the length of the video.
Instead of taking frames from zero to end, we can define the “time of movement” and get N frames in that time, and this, following the FPS. Then glides the cursor to get more and more samples. In the below animation, that’s what you can do for a movement that is 1 seconds long, for example.
This is what does the keras_video.SlidingFrameGenerator. You can try it! It should give you more samples 👍 — because we can get shifted frames. And if you are sure about the movement time, you can set sequence_time value in seconds to force sequence to be fixed to that timeframe.
Summing-up
Time Distributed layer can be a bit “confusing” — I had uncertainty about it for a while. For example, I was wrong by thinking that the “input network” is duplicated for each frame. I spent a long time before I realized that it uses the same network for each input image.
The real challenge is to get a large enough data set of videos to make good training. Then to find the right ConvNet to use as input. Sometimes, it’s nice to use VGG, MobileNet (V1 or V2) — for some other cases a “basic” ConvNet was very efficient contrasted to others.
Pre-trained models for image recognition are finally not so “good”. After a few experimentations, I infer (😆) that a simple ConvNet is enough. The main reason is that we finally don’t want to have accurate recognition, but a good accuracy on frames variation.
I’m now trying to implement the following article technique to use time distributed frames + optical flow:
[1711.04161] End-to-end Video-level Representation Learning for Action Recognition
I will probably present the results in the next article. The main idea is to use OpenCV to make absolute differences or with Farneback OpticalFlow. I’ve already built the extended generator (included in the keras-video-generators package), I now need to make the model training process to work.
Not so bad for a first try? Please, don’t hesitate to comment and challenge my assumptions here, always glad to exchange about the topic.
Did you enjoy it? If so don’t hesitate to 👏 our article or subscribe to our Innovation watch newsletter! You can follow Smile on Facebook, Twitter & Youtube.
Training neural network with image sequence, an example with video as input was originally published in Smile Innovation on Medium, where people are continuing the conversation by highlighting and responding to this story.
Leave a Comment
You must be logged in to post a comment.