The ins and outs of process loops
Blog: Process-Modeling.com - Rick Geneva
There are many ways to accomplish loops in the BPMN specification. Flowcharts only offer one way to cause a loop back, but BPMN offers 4 explicit ways, and potentially dozens of ways to create a loop implicitly. Often my students ask the question “so, aren’t they all the same thing?” Technically, yes, and no. Sorry to say it, but there is no right answer according to the specification. This is up to you to figure out. The specification does however offer many options that can be used to express certain situations. But to a newcomer to BPMN, the challenge is always which one should you use, when, and why.
The simple answer to which loop method to use is to express yourself. The specification leaves room for subtle differences, that when combined with some experience in process modeling and some modeling style, BPMN can be very expressive. In some cases there is definitely an incorrect choice for the process at hand, but somehow there never seems to be an absolutely correct one. So here is my style guide on how to pick the best expression for activities that loop.
Style 1: Upstream Loop-back Flow
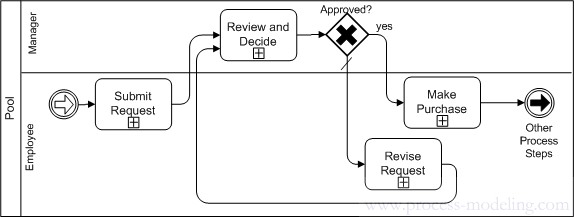
Example:
Style expression: Use when you want to do something over again (redo), but not when you want to repeat activities and preserve the previous results. If you want to preserve the previous results I would recommend using the looping subprocess instead.
Upstream flow is also very useful in high-level diagrams where you don’t wish to show all of the intricate details of process flow. I’ve found that if you are using a high-level view, it’s best to stick with subprocess shapes rather than using tasks. A task implies an atomic single activity where something is done. The subprocess expresses that there are several steps to complete a task, which can include the points of communication (message events, signals, or anything else required to complete the activity). I’m not saying that the subprocess is required here. But it might be a better option because it’s more likely to accurately depict the true nature of the process.
Advantages:
- Simple to model and most people with no BPMN training can easily understand it.
- Great for showing high-level sequence flows across multiple participants (roles, systems, etc).
- Easily shows the loopback condition as part of the gateway, without using annotations.
- Allows you you to do a loop across multiple swimlanes, but be cautioned that this is not always a good idea (see my other post about swimlanes).
Disadvantages:
- Doesn’t always capture the detail of a process flow (see my other post about swimlanes) and limits ability to show explicit message interaction between participants.
- Not very easy to introduce exception conditions into the flow without adding a lot of extra shapes.
- Implicit way of showing multiple iterations of an activity might lead to inaccurate interpretation.
Style 2: Looping subprocess
Style Expression: Use when you need to repeat one or more activities while preserving the data/results of the activities for future reference. Also very useful when you need to deal with multiple exceptional conditions that might interrupt the loop iterations.
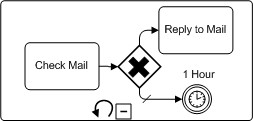
In the following example I am using the simple “check mail” process. Every hour I check the mail, and if there is something in the mailbox I reply to the mail. When I’m done replying to the new mail the cycle repeats. Immediately after replying to mail I go back to check for new mail. This starts to optimize the process because if new mail arrives while I’m replying to other mail, as soon as I’m finished replying there is no wait state.
Dealing with exceptional conditions in a subprocess is much easier to do than with straight-through linear flow. This is because you can place one or more exception handlers on the subprocess border. For example, I can catch an error condition if it occurs, but I’m not really expecting this to happen all the time. Or I can cause an alternate flow to occur when the activities don’t complete within a specified time period. Or, I can watch for all of the above conditions and deal with them accordingly. In contrast, the linear flowchart style diagram gets extremely complicated and difficult to read without the capability to “dynamically” create exception flow.
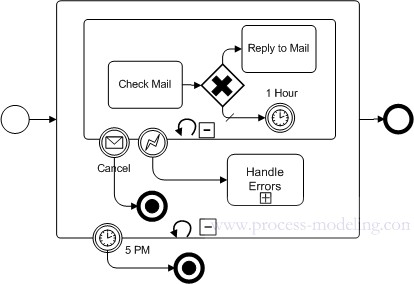
In a linear flowchart style, many conditional gateways or flows are used to check for current state. In the BPMN style, intermediate handler events are used on the subprocess border instead. In the following diagram I add a few layers that handle the exceptional conditions that could potentially occur. I’m not going to explicitly check for the errors all the time. It’s more of a passive monitoring for things that might occur.
First I can receive the intermediate message labeled “cancel”. This is here because instead of watching for mail all day someone might give me a more meaningful way to spend my time. So maybe my boss sends me a message to go out for coffee or something. When this occurs I terminate this process and go do something else.
Next there is an intermediate event that catches any errors that might occur in my process. This error handler will catch anything that might occur on the check mail or reply to mail. Note that this is not necessarily a technical step geared toward the geek crowd. This gives me a “catch all” way of dealing with exceptional conditions, regardless of what the condition is. Most likely I’ll have to interrupt the normal pattern and do some improvising to get the process back on track. For example, one day someone plays mailbox baseball. For those of you who don’t know what this means, it’s when someone takes a baseball bat and smashed the box where I receive my mail. So I can’t receive mail. Sounds like an exceptional condition, right? I’m not planning for this specific event to happen, but anything can happen. So I don’t want to stop my process dead in its tracks just because I don’t have a way to deal with anything that might come up. The error handler is most likely a generic manual step.
Note the outer looping subprocess. This ensures that if an error condition occurs that I can easily jump back directly into a new instance of my inner loop, which is the main normal flow.
An finally, at 5 PM I’m going home, so I terminate the process. Because I’m a “clock puncher” type of person (How I wish this were true instead of me writing this post past midnight for three days now) it doesn’t matter what I’m doing. When the whistle blows at 5 PM (the timer event) I’m going home. Forget about replying, forget about checking for new mail.
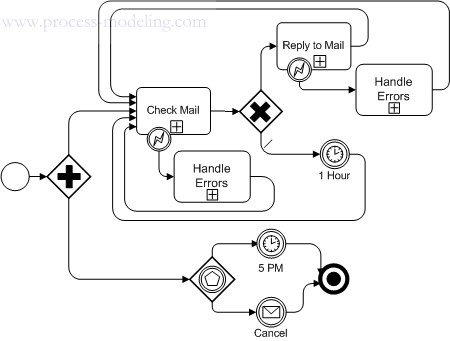
So that’s the process. Now what would this same process look like if I didn’t have a subprocess and used upstream flow instead? Here is the equivalent diagram without using subprocesses, or should I say as close as you can get to the equivalent behavior.
To achieve 100% of the same process flow behavior using upstream flow it’s incredibly difficult. In fact, this small example took several tries for me to get it right, and I’m still not totally convinced its the same. Feel free to comment and tell me how I did. The point is, when you start handling errors (as you should be doing in all processes anyway) in the upstream flow style, the diagram gets very complex to create, and even more difficult to read. Now just imagine this upstream flow example using swimlanes across multiple participants. You will probably end up with lines going all over the place and it’s a real eye sore to look at.
Just to put some context around this, all we are doing here is checking for mail and it’s already getting hard to read. Imagine if we were to model a real process! So for detailed process design including proper exception handling, the upstream flow doesn’t work so well.
Looping Subprocess Advantages:
- Explicit loop control
- Focus on a single process participant, which frequently yields a more accurate/detailed process diagram (see my other posting about swimlanes).
- Ability to easily deal with multiple exceptional conditions without complicating the normal flow.
Looping Subprocess Disadvantages:
- Slightly more difficult to understand for people that have not been trained on BPMN syntax. Note however that this can easily be explained to the BPMN newcomer in about two minutes, or you can just as easily add a text annotation to explain the loop.
- No way to determine what the loop condition is without annoations.
Style 3: Multiple Instance
The multiple instance has two use cases. This sometimes happens in the BPMN specification. It’s not always clear in the diagram which use case is actually occuring. I suspect this will be cleared up in the 2.0 or later specification (or at least I hope so). Because of this current issue in the BPMN specification I recommend using a text annotation externally explain the sequence behavior. Note that the external text annotation is also a good practice for the looping subprocess as well.
Use case 1: Serial Execution
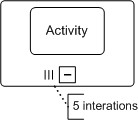
Use when you want to repeat some activities for a fixed number of times. There is no condition on breaking the loop. For example, “do this five times”. Each instance of the activity is performed in an iteration, meaning that each after the first iteration the subsequent iterations will not occur until the previous has completed. Essentially this is the same as the looping subprocess, except that there is no need to specify a condition that will cause the loop to break it’s loop. Only a number of iterations is provided.
The same diagram can be expressed using only task shapes, but requires many more shapes to accomplish the same expression.
Style expression for Serial Execution: Use in a “for each” loop when the number of iterations is known prior to execution. Not applicable to a “do while” or “do until”. Don’t use in any loop where a condition or normal flow might exist that would cause the loop to break before the number of iterations is complete. The usage of exception handlers is acceptable (and most often encouraged).
An important consideration for using this expression is whether or not you know in advance the number of iterations you will perform (If I am repeating myself here it must be because this is important). Otherwise you should use the looping subprocess instead. Conditions such as “do until the color is sufficient” or “keep checking the temperature every 5 minutes until the inner temperature is 200 degrees” is not a candidate for a multiple instance loop. Instead, a good example for a multiple instance loop is “Get 100 people to sign the petition”. Another example could be “take exactly 10 steps forward before turning left” if each step is an iteration of the looping activity. But then again, if you want to get very technical here one could argue that each step has a dependency on the other leg (left leg/right leg) to perform its duty, so this would disqualify the multiple instance for each step. Instead I could either hop 10 times or take 5 pairs of steps forward.
Use case 2: Parallel Execution
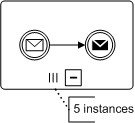
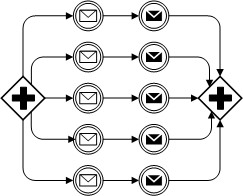
The basic use case is the similar to the serial execution use case, except that instead of iterations, X number of instances will instantly be launched, all running in parallel. Like the serial execution, there is no need to break the loop. In fact, it’s not really a loop at all. You are simply showing a different form of parallel flow in which you are launching X number of identical activities simultaneously.
The same diagram using parallel gateway looks like this
Style expression for parallel Execution: Another way to word this notation is “do something X number of times, right now, and don’t wait for anyone else to complete”. Use when you want to perform the same activity a fixed number of times, and each activity can be performed independent of the other with no dependencies of any other instances of the same activity to complete. Never use the parallel execution in situations where one activity might depend on another completing. Never use this expression when the activities in each instance might contain a different sub-sequence.
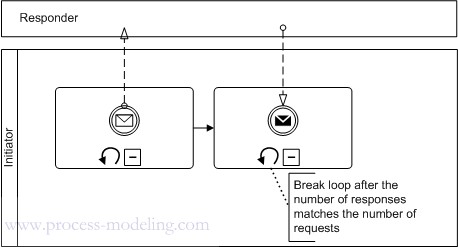
In the example above referring to “Get 100 people to sign the petition” we could apply the multiple instance. However, there is a subtle difference that occurs. We would have to get 100 people in action simultaneously. So in the serial execution example we are likely a single person going door to door for signatures. In the case of the parallel, it’s more likely that we blasted 100 emails out to people and we are awaiting 100 responses. So it might not be possible to actually receive 100 positive responses out of 100 emails sent unless the response is unanimous. Instead you might want to express that out of 1000 sent emails we want to count at least 100 positive responses, which causes a break of some sort. Normally I would suggest that you use the looping subprocess for this example. But in this case you have a unique problem that is very difficult to resolve with a normal loop; you have to correlate each response with the preceding request that is unique for each instance.
It’s important to note that the serial execution and parallel execution appear identically in BPMN. According to the specification the execution mode is determined by the “attributes”. Now you see, this is what happens when a perfectly good modeling notation meddles in process automation and execution. I mentioned earlier that I hope this will be fixed in an upcoming version of BPMN. For example, vertical lines for parallel execution and horizontal lines for serial execution would have been nice. But the specification simply stops short of offering a graphical solution and suggests that execution engines use the “attributes” to specify behavior. This does nothing for creating a diagram. So I ask the folks at OMG to please fix this so that people who want to just create a diagram can have an easy way of doing so without having to read “attributes”. Now that I’ve vented my frustration on this subject, might I suggest for the rest of us to use a text annotation external to the subprocess to resolve the ambiguity (as in the “multiple instance parallel mode” example).
Multiple Instance (parallel) – Advantages:
- No need to specify a loop condition based on data. You can clearly tell that the activities will occur a fixed number of times, and this number of times is known before the loop begins.
- Has the ability to dynamically generate a bunch of parallel flows without having to draw all of them explicitly (parallel execution).
Multiple Instance (parallel) – Disadvantages:
- You cannot tell if this is a parallel or serial execution without any sort of annotations externally.
- You cannot tell exactly how many parallel instance or serial iterations are actually being performed. Again, to resolve this problem you should use external annotations.
- Hardest to understand, least documentation and examples in the BPMN 1.2 specification.
Leave a Comment
You must be logged in to post a comment.


