
Starting from scratch, how to embed computer vision techniques into your project #3
Blog: Smile - Le blog des consultants
Part 3 — Model training
Open your book at chapter 1: what is a screwdriver?
We have now nearly reached the training phase. To start this phase, the only missing piece is a machine learning environment.
Each machine learning model comes with its logic to run a training and to use a trained model for inference. So to run the training, we have to refer to the model documentation to understand :
- the expected training data set format
- the training tool/API that comes with the model
- the software dependencies required by the model
Also, model training will require a lot of resources :
- storage of all the images of training data set
- computing resources during the training (CPU and/or GPU)
The training environment’s purpose is to combine and manage all these data, software, and hardware resources for the training.
A training environment can be complex to set up, maintain and scale. This is why we need abstraction :
- To make sure that each training session will benefit from the same environment (idempotent environment)
- To easily share the same environment with coworkers
- To avoid configuration/setup bugs
It is where AWS SageMaker and its SDK will help us. SageMaker is a one-stop-shop for AI projects, covering all steps from annotation, training, and trained model endpoint for inference invocation.
An exciting aspect of SageMaker is the ability to either use built-in models or to bring your model.
This is exactly what we want to do in this test: we want to train a custom model (Yolo v5) and deploy this trained model as a service endpoint to integrate into our legacy software.
To bring our model into SageMaker, we have to use an abstraction layer that comes with the SageMaker SDK and cloud services :
- In SageMaker, model training and invocation are based on docker containers: it should bring all software dependencies and the model algorithm. The context-wise information is not embedded into the container but mapped as data volume (S3 storage). This is important to reuse containers with different data sets, trained models, and invocation behaviors.
- A model algorithm (like Yolo v5) must be packaged to support its usage in the SageMaker environment by either using simple scripts inside our custom container or using the SageMaker SDK.
We will detail now this SageMaker training process with our data set and Yolo v5.
Preparing the data
We have a data set available as a GroundTruth output, and we also know that this data set contains a lot more screwdrivers (4x) than other objects.
To start the model training, we first need to adapt this data set format to something usable by Yolo and compatible with the SageMaker environment. We also need to shape a subset of this data set with an equivalent quantity of each object.
Important note for anybody who wants to investigate AI :
– Python skills for AI are mandatory
– For this project : you will need a computer with Python 3, Conda and/or Pip and Jupyter lab
And all developed script/notebook are available in this repository :
GitHub – smileinnovation/visual-search-yolov5-sagemaker
GroundTruth data set metadata are stored in one file (output.manifest ) using the JSON line format: one line, per image file, is a JSON object containing all objects label information (position, label id)
Yolo v5, for training, is expecting to parameters :
- Images folder: all data set images stored in one folder
- Labels folder: a folder with one label text file per related image (named using image file name). Each label file contains one line per object, with its category id and position.
On top of that, we need to filter the original data set to get a more balanced number of labels per object.
To produce this new data set, we developed some scripts available as a notebook ( 1-dataprep/ground-truth-to-panda) :
- we transform the GroundTruth manifest file into a Panda data frame.
- during this process, we apply a simple filter on image files to get a balanced number of object labels
- we then create a text file per image, build from the Panda data frame, and upload them into an S3 folder
Training time
We have all the required data (images, labels) correctly; we can now start the model training.
Again here, we will use a notebook (2-train/training-job) to script the required action for this training.
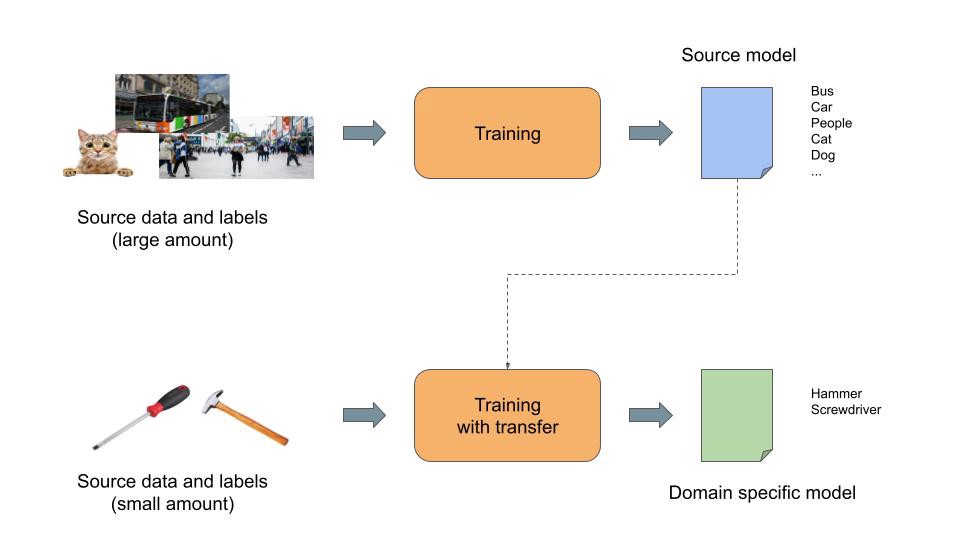
As already discussed, we want to leverage transfer learning. This means we need a pre-trained model as an input for this domain-specific training. We will also need the Yolo v5 algorithm to run the training, as we will use its specific code to compute the new model.

From the Yolo v5 repository, we can find a pre-trained model using the Coco data set. We will use it during this process.
We also reviewed that the SageMaker abstraction is based on docker images when bringing our model. So we will package the Yolo algorithm with all its dependencies inside a docker image to run the training.
So in this training notebook, we implemented the following steps :
- Step 1: Configuring the AWS Environment
- Step 2: Retrieving the pre-trained model
- Step 3: Configuring all the Yolo v5 training parameters (“Yolo inputs”)
- Step 4: Building and uploading the Yolo training docker image
- Step 5: Configuring the SageMaker training job
- Step 6: Starting the training
In steps 3 and 5, several settings are related to the data set access (images and labels) and also to the training job behavior:
- Where the data set is stored and how to access it
- Training duration (we will talk about that later)
- SageMaker resources allocated to the training: EC2 instance type (CPU/GPU etc.)
Important note for Step 6:
Using a “local” instance, you can run the training locally on your computer running the jupyter lab : this is very useful for debug purpose, and not wasting time/money on AWS when fixing scripts/docker images issues
The process is relatively straightforward, but some key parameters require some explanation: how long a training must last to get something efficient? When should we stop it?
To answer this question, we need to understand some neural network principles (especially backpropagation) :
- A neural network is a graph of mathematical functions. Specific edges of this graph are the input and output of the model (image => object detection)
- Each mathematical function is configured with parameters (coefficient, constant, etc.). These parameters are the result of the training.
- The training principle is to deduce these parameters using “backpropagation”: each item of the training data set to go through the network to generate output. As we are using input from the training data set (image), the training process can compare the output result with the expected outcome (labels of the pictures) and apply an adjustment to the function’s parameters to have the output value become close to the desired result (more details here). This process is run multiple times for each item of the training data set (each iteration is named “epoch”) until… we are happy with some indicators (loss function)
- These indicators are produced along the training process. In our case, we will focus on two indicators produced by Yolo: training and validation data loss. As a simple definition, we can compare these indicators to “error rate.” Also, during training, Yolo is automatically cherry-picking some items of the training dataset to use them to validate the model. These validation data are never used to train the model but only to test the trained model after each “epoch.”
- Also, we need to understand two other words: under-fitting and over-fitting. Under-fitting describes a model unable to adapt to its training data. Over-fitting describes a model that is too suited to its training data.
- The training process goal is to target a model state where the loss function is low, and the model is not over-fitting.
So to know when to stop training, we need to monitor these two indicators following a few rules :
- Lower is better
- Validation loss must follow the training loss trend and should never pass over the training loss. If this is happening, you have to stop the training (the model is reaching an over-fitting state)
I will stop the explanation here and let you read these articles that explain all these theoretical principles in detail.
- The Million-Dollar Question: When to Stop Training your Deep Learning Model
- How to use Learning Curves to Diagnose Machine Learning Model Performance – Machine Learning Mastery
During this project, we will also follow the best practices described by the Yolo team.
Tips for Best Training Results · ultralytics/yolov5 Wiki
Following these best practices, we trained our model for 50 epochs. This training lasts 4 hours and 30 minutes, with an “ml.p3.2xlarge” SageMaker instance (entry model with one dedicated 16Gb GPU).
GPU is important for training as they accelerate the computation time drastically. Their memory size (GPU memory) is also essential to fit the training data of each “epoch”: the more memory you have, the more you optimize the computation of each “epoch.”
And here to the “loss” monitoring of this training :
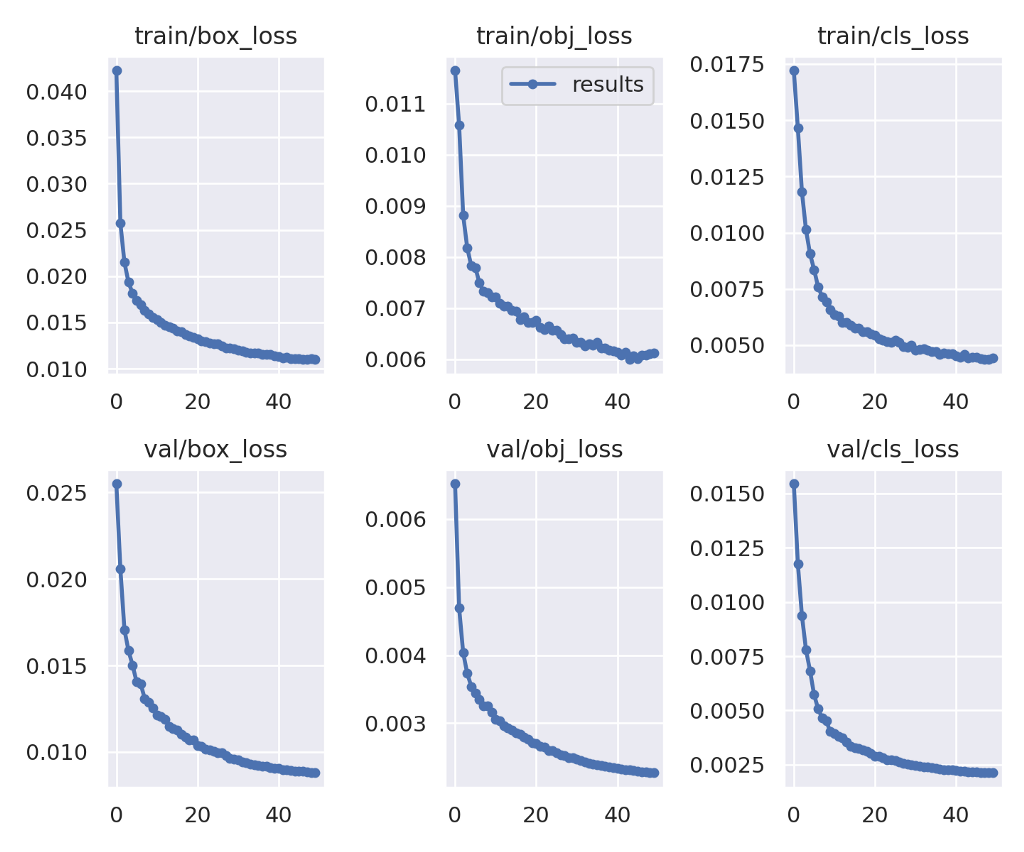
We can observe that the validation loss follows the training loss, and both are going down quickly until about 30 epochs and then stabilize. The validation loss trend seems to become flat and not to pass over the training loss.
So far, we are good at 50 epochs, but we could have tried to run the training longer as the validation loss function seems to continue down.
We decided to stop the training at 50 epochs, as again, we are not trying to get fully optimized right now. We want to test the entire process.
At the end of the training, SageMaker saves the Yolo training outcome in the “results” folder of the training inputs. This outcome is saved as a tarball archive and contains the trained model and other information about the training process.
“I can see tools.”
Our trained model is now ready. We can now test it in real life.
This model can be used anywhere the Yolo algorithm can run. This means you can run it on-premise or in SageMaker. Again a good abstraction layer is a docker image.
For our use case, we want to deploy an API that the ElasticSuite product will use.
As a first step, we want to rely on a SageMaker endpoint. This endpoint is an AWS-managed server that will run the docker image. The lifecycle of this endpoint is controlled and monitored by the SageMaker service.
When this endpoint is deployed, we can use the SageMaker SDK to send images and get the result in a response.
To do so, again, we will use a notebook to setup this endpoint (3-predict/deploy) :
- Step 1: Configuring the AWS Environment
- Step 2: We build and upload the docker image dedicated to the Yolo runtime
- Step 3: We define a SageMaker model (PyTorch model). This step also includes the custom code that will be downloaded by SageMaker, to be used by the docker image on the endpoint instance. This custom code loads the trained model, manages each inference request received, and builds a JSON response. This means we can customize an endpoint behavior using the same trained model and a runtime docker image.
- Step 4: we deploy the endpoint. The deployment output is the endpoint name that we must use to request inference with the SageMaker SDK/CLI.
The instance type used for inference requires a small amount of resources compared to training, GPU is not needed, and response time has to be tested to adjust the resources to your need. SageMaker also allows the setup of auto-scaling rules for the endpoint.
Important note for Step 4 :
Using a “local” instance, you can run the inference locally on your computer. This is helpful for debug purpose, and a simple curl request against the local endpoint is enough to test it
Now it is time to check the results of this long work. To test our model, I just wanted to use real-life images. So I took some photos of tools I have on my workbench at home.
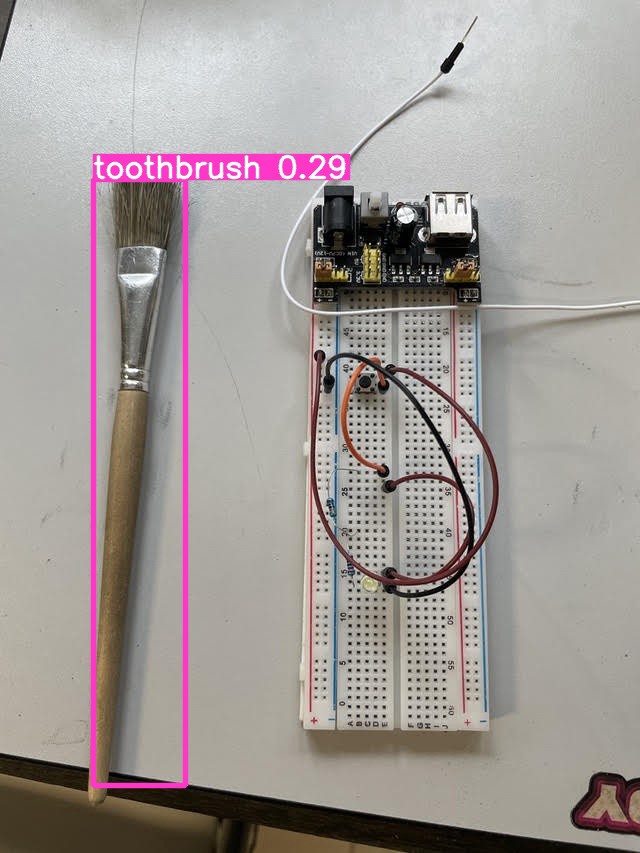
On this first photo of a small paintbrush, I tested the behavior of the Yolo pre-trained model with the Coco data set. And no surprise here, the Coco data set does not contain any paintbrush labels but a toothbrush. So it recognizes the object like a toothbrush, with a low probability (29%)
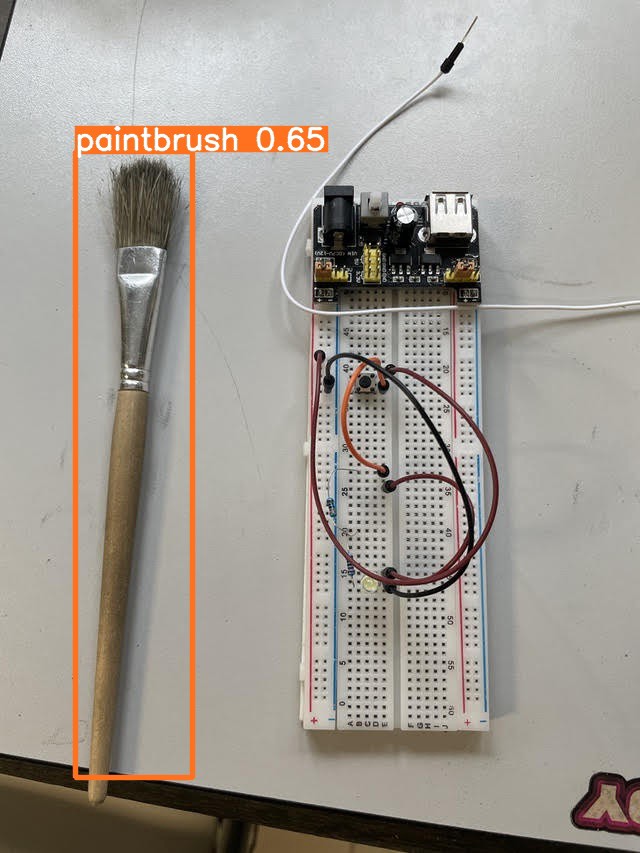
Now the same photo but with our model, trained with transfer learning and our data set. We get something better: a paintbrush at 65%.
Our model used two other photos as examples, with a broad set of objects and a driller box.
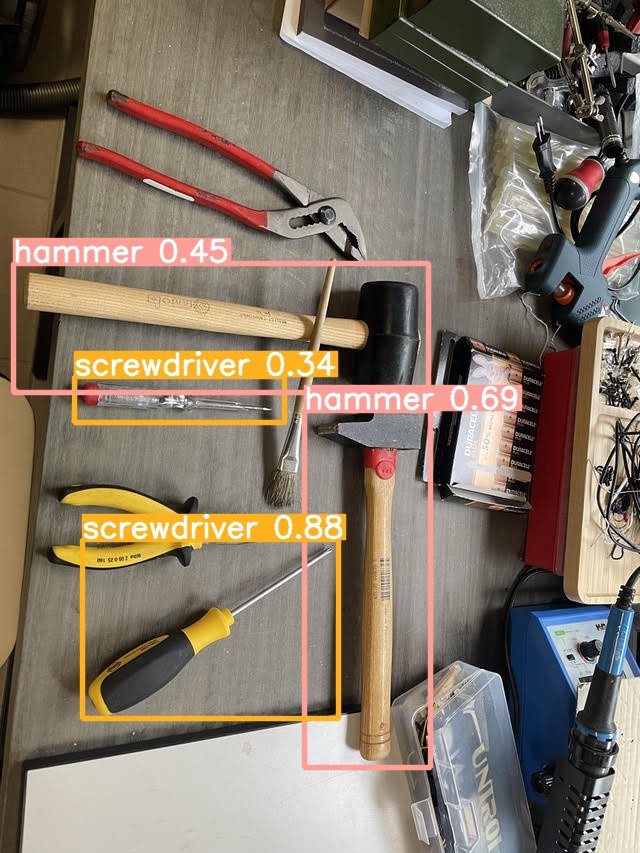
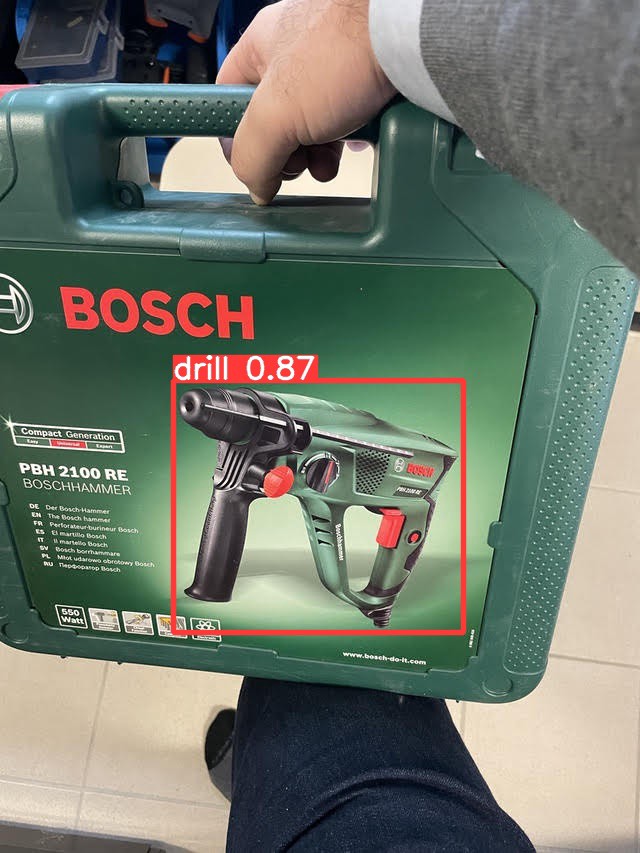
It is not perfect, more training would undoubtedly increase the accuracy (lower loss function), and object photos are perhaps too homogeneous (i.e., not enough kind of screwdrivers)
But it works.
Coming next :
- Part 1 — Use case and what you need to know
- Part 2 — Training data set
- You are here — Part 3 — Model training
- Part 4 — Integration and conclusion
Smile is the proud editor of ElasticSuite, a great Magento open-source extension, with more than a million downloads on Github and trusted by more than 1500 top retailers worldwide. It’s the leading solution for intelligent search and merchandising on Magento.
As part of this product road map, we have to test and experiment with new features.
That’s all, folks!
Did you enjoy it? If so, don’t hesitate to 👏 our article or subscribe to our Innovation watch newsletter! You can follow Smile on Facebook, Twitter & Youtube.
Starting from scratch, how to embed computer vision techniques into your project #3 was originally published in Smile Innovation on Medium, where people are continuing the conversation by highlighting and responding to this story.
Leave a Comment
You must be logged in to post a comment.