
Starting from scratch, how to embed computer vision techniques into your project #2
Blog: Smile - Le blog des consultants
Part 2 — Training data set
Ok, let’s do it
A lot of Screwdrivers
First, we need a significant amount of screwdrivers (and hammer, paintbrush, etc.) images. And to teach our student correctly, we need to explain to him where, in the pictures, the tools are.
To do so, we must draw bounding boxes around each object of interest and assign them an object label on each image. These bounding boxes/label information are stored as meta-information for each image file (“annotation”). This task is done through a dedicated tool (“annotation tool”).
As we are speaking about a significant amount of images, this process is highly time-consuming. We found sufficient accuracy from 1000 images per object category when using transfer learning on the selected models. This means at least (1000 x number of things to recognize) images :
- to collect pictures from any public data sources (an image may contain several objects of the same or different category)
- To annotate: let’s say an annotation task duration can take up to 10 seconds, with five object categories. In total, we would end up with at least 14 hours of continuous human work. That’s a lot.
Retrieving the images
To retrieve a real-life image that contains the objects, two kinds of data sources are obvious :
- common data sets used by machine learning model creators to measure their accuracy/efficiency (i.e., coco data set)
- search engine with an image database (i.e., Google images)
Common data sets are handy as they come with images that are already annotated. We need to filter out the kind of objects we want. And that’s where we will reach the limitation of these data sets: they do not contain all possible objects we are interested in, and when they have them, the number of available images can be too small.
On the other hand, public search engines, like Google, contain a massive amount of images. It is easy to find the objects we want, with the quantity we want. But then image quality is not guaranteed (content, format, etc.) and is not annotated.
First-round
So it is easier to start with the common data sets, to check if the objects we want are available or not, before crawling the public search engines. We did that with these sources :
Each of these databases has its data format and constraints. So the first task is to build some scripts to extract the information we need, collect the relevant images and then merge all the meta-data into one single database, using a common format.
A quick check on the website of each data source can also be helpful to know if the objects we want exists or not in the data source: in our case, the Coco data source was eliminated quickly as it does not contain any objects we are looking for. So we focused on the three remainings and finally got these numbers :
https://medium.com/media/8c1f5a7beba86b505c6b547df2d305fc/href
As a common output format, we choose to use the Coco annotation format. Here is a good article explaining in detail how to use it.
The scripts we used to collect the meta-data, images and to build the final dataset are available here :
GitHub – smileinnovation/visual-search-dataset
As a conclusion for this step: we could start a learning process with the first version of the training data set. Still, as the quantity of the available images is small, we cannot expect any good accuracy from a trained model. We need more photos.
Second round: getting more images
To get more images, we now have to focus on public search engines. A simple tool can help us to crawl several search engines with the same query: searx. You can run this meta-search-engine locally (i.e., with a docker container) and extract a uniform search result (a JSON file) from it. Then, thanks to a simple script written in your favorite language, download the images from URLs included in this result.
The outcome, targeting Google Image and Bing Image, looking for the objects of this use case, we can grab this quantity of images :
driller: 1764
hammer: 1425
paintbrush: 546
screwdriver: 2156
wheelbarrow: 2737
If we add the last number of images extracted from common data sets, we can say we now have at least 1000 images of paintbrushes and 2000 for each other objects. “at least” because each image can contain more than one object in it.
By doing so, we can quickly grow the number of images of our data set. But these additional images are not annotated: this means we will need extra work to produce the objects annotations required to include these images in the training data set.
Annotation job
Annotation is a critical step for machine learning, as the quality of the annotations directly impacts learning accuracy: incorrect annotations can decrease the model accuracy.
And as this job is time-consuming, it is essential to control and streamline it: you need a tool to standardize this human activity.
Many annotation tools are available, but we also need to consider the human workload for this task to choose it wisely.
We have more than 8600 images to review, with annotation task duration to a minimum of 10 seconds; we have at least 24 hours of continuous human work.
This means we have to schedule this workload, find people capable of doing this task precisely to avoid incorrect annotation.
So here we have two possibilities :
- Either we have the workforce available
- Either we do not have the workforce available, and we need to outsource this activity
Regarding the annotation tooling, we have also to consider the annotation format produced by the tool: it must be easily used by any other software/scripts to run the training.
Our choice went to AWS SageMaker GroundTruth for this annotation job :
- As we will detail later, we wanted to use AWS SageMaker to run our training job and inference, so GroundTruth is a logical choice as it is integrated into the SageMaker toolchain, but the SageMaker annotations can also be easily exported to any other toolchain.
- We did not have any human workload available, and we wanted to go fast for this task. Here GroundTruth offers an outstanding feature with Mechanical Turk: you can hire a workforce by clicking on the AWS console. AWS is managing a worldwide workforce of independent contractors
We can note that GroundTruth also allows you to pick up a 3rd party vendor in the AWS Marketplace, specialized in machine learning annotation. So you are free to choose within this list a preferred vendor. This option is essential when :
- you want to outsource, but you want a specific contract with a 3rd party company
- you want to manage labeling on confidential or sensitive data, so you will be able to define some kind of NDA with this 3rd party company
- you want a predefined SLA for the annotation job, where Mechanical Turk can not enforce any SLA: it works in best-effort mode.
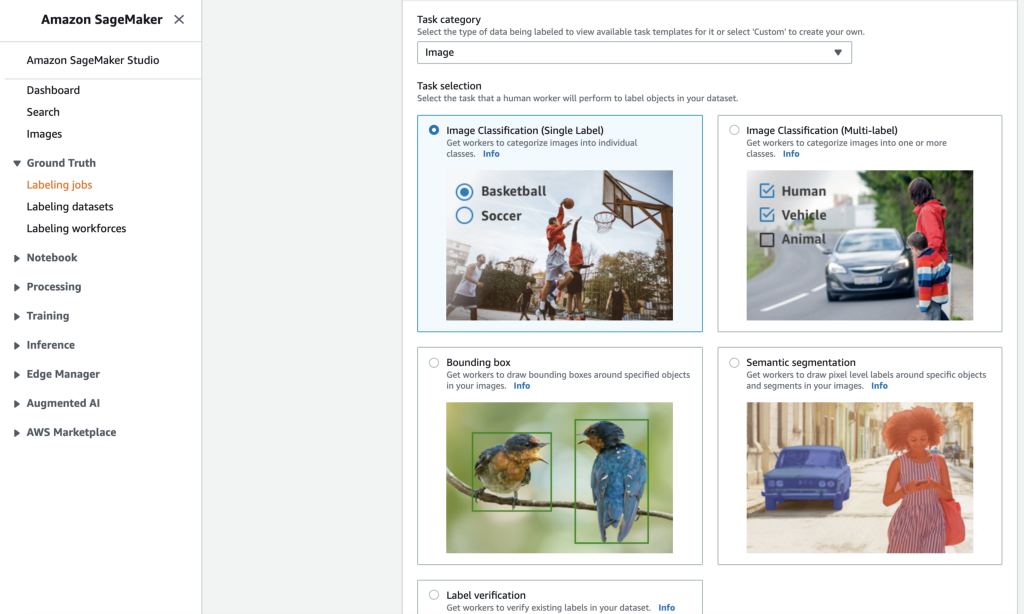
To set up a GroundTruth labeling job, you need to go through a few steps :
- Make sure all your images are stored in a dedicated S3 bucket
- Define the labeling job type: the tool manage a broad set of annotation type, depending on the kind of medium (image, video, text, point cloud, custom, etc.). Here, since we are dealing with images, we choose the “bounding box.”
- Define some labeling examples: a good labeling example and a lousy labeling example
- Choose a workforce type: private or public. Private means you have to define user access and share the workload through your private workforce. Public means you will ask AWS to share this labeling job within their Mechanical Turk service to execute the job.

GroundTruth labeling job pricing is based on the number of images included in the job. The pricing is decreasing with the volume.
If you want to use a public workforce, Mechanical Turk pricing is based on the number of objects to annotate. If there are three hammers in an image, this counts for three objects.
You can also ask for several reviews per object to increase the annotation accuracy. Still, of course, this increases the labor cost (by default, it is set to 5, meaning that five distinct workers will perform the same task on a dataset object). The Mechanical Turk pricing starts at $0.036 per object (for an 8s job), but you can increase the budget for more complex tasks that require more time.
So yes, we chose to give a try to Mechanical Turk, with a minimal budget. Workers had to go through this interface to annotate each image (drawing a bounding box for each object, applying the correct label)
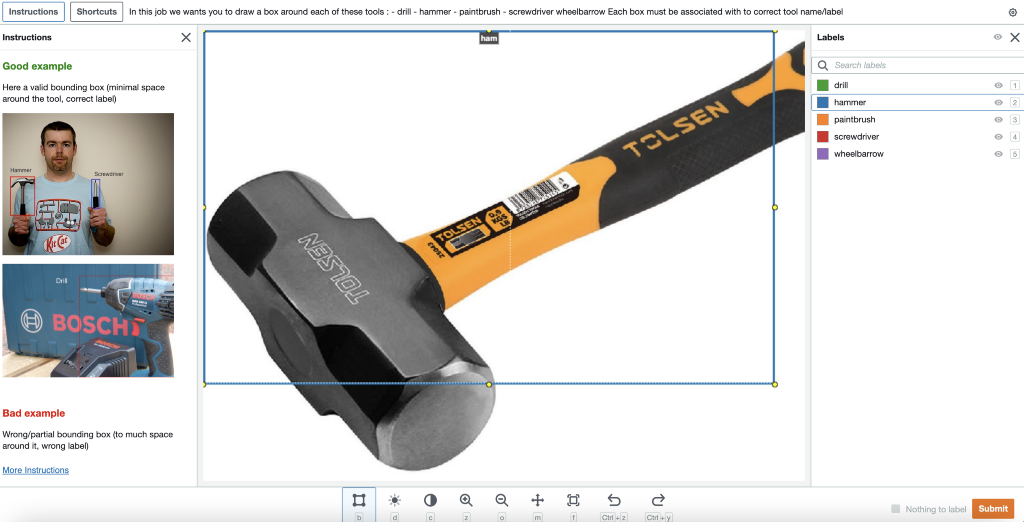
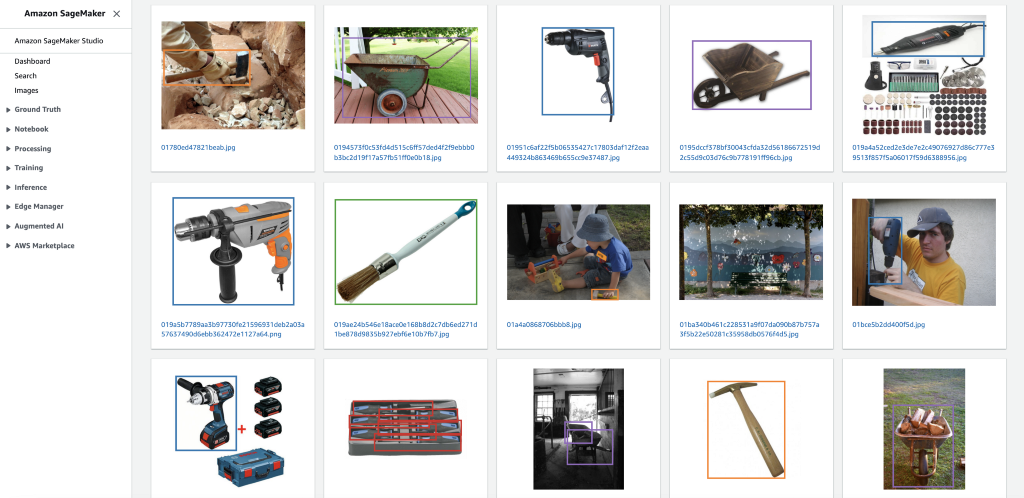
It took about ten days for the Mechanical Turk workforce to complete the review of all images. Here is a sample of the annotation result.
And finally, we have a data set ready to be used for training :
Total images : 11669
Total bounding boxes : 21363
Bounding boxes per object :
- driller : 3236
- hammer: 3217
- paintbrush: 2413
- screwdriver: 8591
- wheelbarrow: 3906
All annotations are available, in GroundTruth format, in our S3 bucket as an outcome of the labeling job.
We have a lot of screwdrivers, as we have a lot of screwdriver images that contain multiple objects, as on this sample image :
This could be a problem, as this object will be over-represented compared to others in our training data: this will create a bias in our training data, as the model will get more trained on screwdrivers than on other objects.
We will have to fine-tune this data set before starting the training, and we will investigate that in our next chapter.
Coming next :
- Part 1 — Use case and what you need to know
- You are here — Part 2 — Training data set
- Part 3 — Model training
- Part 4 — Integration and conclusion
Smile is the proud editor of ElasticSuite, a great Magento open-source extension, with more than a million downloads on Github and trusted by more than 1500 top retailers worldwide. It’s the leading solution for intelligent search and merchandising on Magento.
As part of this product road map, we have to test and experiment with new features.
That’s all, folks!
Did you enjoy it? If so, don’t hesitate to 👏 our article or subscribe to our Innovation watch newsletter! You can follow Smile on Facebook, Twitter & Youtube.
Starting from scratch, how to embed computer vision techniques into your project #2 was originally published in Smile Innovation on Medium, where people are continuing the conversation by highlighting and responding to this story.
Leave a Comment
You must be logged in to post a comment.