Introduction to Web Integrator on TIBCO Cloud Integration
Blog: The Tibco Blog
TIBCO just released an exciting new update to TIBCO Cloud Integration (TCI) with a Web Integrator. This adds to the current functionality of API Modeler, Node.js, and TIBCO Business Studio Cloud Edition. So what is this shiny new thing? Let’s find out.
Fortunately, I know a few people who work on Web Integrator and have been able to find out a bit more on where the current iteration of the service stands. As of now, Web Integrator can be used to create API’s and integration between SAAS services. I will be writing a series of posts for Web Integrator. Let’s do a quick overview and walkthrough, shall we?
After you login to the TCI screen, click on the big orange Create button. It should bring up this screen:
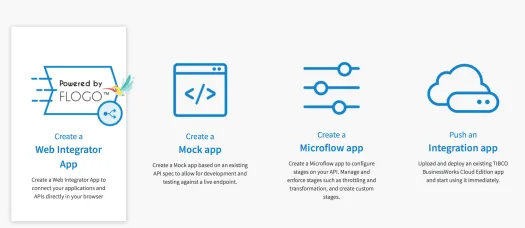
Click on Create a Web Integrator App. If you don’t already know, Web Integrator is powered by Flogo, an open source project which is a ridiculously lightweight integration engine. Clicking on the Create a Web Integrator will take you to what I would call the Flow Development IDE (If anyone from the WI team is reading this, I just coined this term  ). Here’s a screen capture of what it looks like when you don’t have any Flows. Since Flogo is an integration engine which builds Flows, you need to create your first flow. Read more about Flows here.
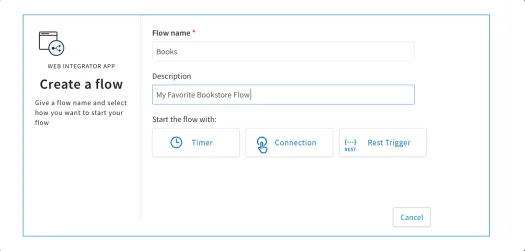
Flows being simple process like structures need something to trigger it. As of now, WI supports Timer, REST, and Connection (we’ll talk about this later) as triggers to start the Flow. A timer is basically a timer which starts the flow on deployment—if you are familiar with the BusinessWorks timer activity, it’s very similar. A REST trigger is a REST endpoint with methods for GET, POST, PUT, and DELETE.
Let’s create a simple GET method on endpoints/books. For now, we’ll return back a string.
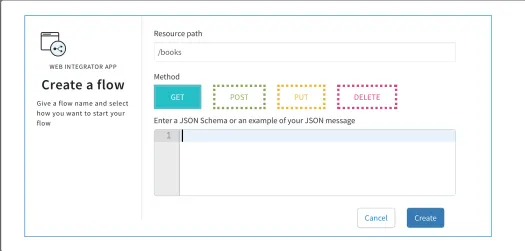
Note that you can also enter a JSON Schema for structured JSON output. Me being lazy will resort to a string output. Clicking on the blue Create button will now take you to what I call the Flow Designer. Since our trigger is REST, it will show us a Receive HTTP message activity followed by the response activity as so:
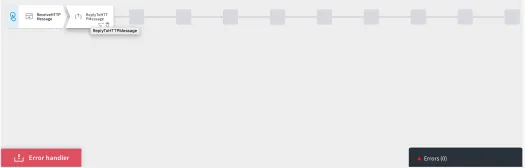
The red Error Handler button that you see to the bottom left is for error correction. Think of these as catch blocks. If there is an error in the main flow, this error handler will be trigger. The black Errors(0) button is a validation provider which will show any validation errors in our flow.
You can easily move activities by clicking and dragging them along the line. In the screenshot below I have moved my Reply activity to the right so that I can add a log activity.

Let’s add a log activity to log some header information before sending the response. After clicking the + button that’s shown up in the diagram, the following screen will allow you to add more activities:
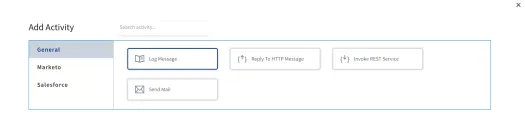
The palettes (as we call them in BW world) show up on the left with the activities on the right. Since we are adding the Log Message activity I have selected it. Here’s a screenshot of what the page will show after you select the log activity. It’s takes you to the activity configuration. Read more about tiles and activities here.

Just as in TIBCO’s other integration products there are different tabs. For the log activity there is a Configuration tab and an Input tab to provide the actual log message. Let’s keep the Log Level to Info and add something in the Input.
The Input screen is where things start getting interesting.

There’s a lot going on here. On the left side of the data mapper, you see the only input required for the activity called message. On the right hand side you see several things:
- The Previous Activity or Trigger output (the green markup)
- JSON manipulation functions
- The text field where the formula is save (the red markup)
I can now use some of the functions and the data. This is a drag-and-drop ready mapper. I created the following formula to log the accept header:
string.concat("Accept Header Value is ", $TriggerData.headers.Accept)
As you can see, I am using all the elements of the mapper. The input field also provides content assist for JSON functions. The great part here is everything is autosaved. This means I don’t need to go about hitting the save button and worry about losing my changes.
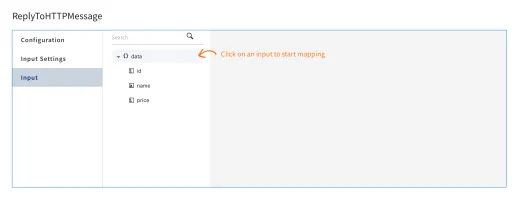
Now to configure my HTTP Response activity. In the Input Settings I defined a JSON schema as:
{
"$schema": "http://json-schema.org/draft-04/schema#",
"definitions": {},
"id": "http://example.com/example.json",
"properties": {
"id": {
"id": "/properties/id",
"type": "integer"
},
"name": {
"id": "/properties/name",
"type": "string"
},
"price": {
"id": "/properties/price",
"type": "number"
}
},
"type": "object"
}
I used this editor online to generate my schema.
And voila! I now see my objects in the Input to the Response activity.
That’s it. Clicking on the blue Push App button will automatically push the application to the cloud. You’ll be taken to the main screen with the app deploying to the cloud.

Now, I can view the endpoint like any other TCI endpoint and test it out in the Swagger UI.


After invoking it once, I get the desired response which was hard coded:
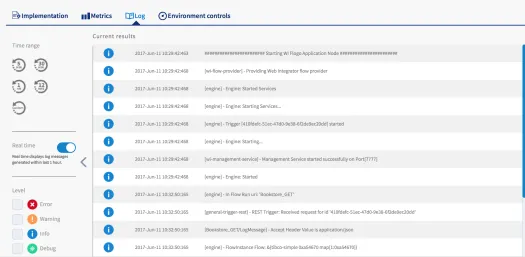
{ "id": "10", "name": "Aditya's Book", "price": "12.5" }Now, let’s go back to the log file to see the Accept headers. Clicking on the app and then clicking on the log tab will take you to the log file. I can now see that the log activity was executed.
This is just an introduction to Web Integrator. In future posts, we’ll see how you can connect to Salesforce data and also cover some more process design concepts like branching flows and designing error handlers. To try out TIBCO Cloud Integration, access the free trial here. Learn more about Web Integrator by reading the documentation here.