

Cardano and Joget: Building No-Code, Composable Blockchain Apps
Blog: Joget Unplugged

- Validation and verification
- Metadata can be used to validate and verify external physical products. This requires pairing with a physical identifier, such as a QR-code for supply chain tracking of fast-moving consumer goods at low cost.
- Authentication and attribution
- Metadata can be paired with a physical identifier to prove authenticity of an educational institution. This is especially useful for digital courses and accreditations.
- Secure record of information
- Since metadata attached to a transaction and confirmed on the Cardano blockchain is immutable, no one can tamper with its values nor its existence. You can use this as a method of secure record to store an invoice ID to prove the purchase of goods and services for example.
- Timestamping
- Metadata can be used to create a timestamp within a transaction, allowing anyone to verify the time and date at which something was bought, sold, or transferred.

- Cardano Generate Account Tool
- A Process Tool plugin that allows you to generate an account on the Cardano blockchain, and store the account data into a form and/or workflow variables.
- Cardano Send Transaction Tool
- A Process Tool plugin that allows you to send ADA from one account to another on the Cardano blockchain, with the option to also embed form data into the transaction metadata.
- Cardano Account Form Load Binder
- A Form Load Binder plugin that allows you to load account data directly from the Cardano blockchain into a form.
- The first step is to design a new Joget app. In the Joget App Center, login as an administrator and click on the Design New App button.
Key in the relevant details, e.g.:
App ID : cardanoSample
App Name : Cardano Blockchain Sample
- Before we can perform ADA transactions or read the relevant account data, first we need a form to store account data to. Now that we have a blank app design, create a new form with the following details:
Form ID : accountDetails
Form Name : Account Details
Table Name : cardano_accounts - After creating the form, using the Joget Form Builder, let’s add a few text fields to store details of a Cardano account:
– Account Base Address (with “id” as the field’s ID)
– Account Mnemonic Phrase
– Account Owner
– Is Test Account
– Account Enterprise AddressThe minimum basic required field to operate a Cardano account is actually just the account’s mnemonic phrase, as it is possible to derive account data solely from the mnemonic phrase or private key just like most blockchain technologies out there. But for security and/or efficiency purposes, it is common to also locally store additional safe & immutable details of an account.As a note, the Cardano Generate Account Tool plugin will store the account’s base address as the record ID of a form record, and store the account’s mnemonic phrase as an encrypted value in the database. -
As there is no need for end users to modify any values in this form, we can set this entire section as read-only. Go to Advanced Tools, Permission tab, and set the one-and-only section as “readonly“.
-
Now save the form.
-
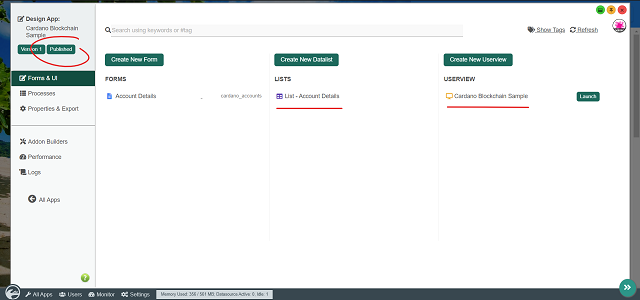
Once the form is saved, click on the Generate App button to use the App Generator.Check the option for Generate CRUD, then click Generate.Do note that the App Generator is a Joget Enterprise Edition feature, but you can manually create the list, process, and UI in the Community Edition as well.Upon completing the generation, coming back to the app design page, we can see that a datalist and userview for the CRUD has been generated accordingly, and the app is now published.
-
In order for the generated Account Details datalist to show meaningful information, edit the datalist in the Datalist Builder and add/arrange/sort the columns according to your preference.Example as below:
Remember to save the datalist after editing it.
-
At this point, now that we have the form, list, and UI to display account data, we are ready to incorporate the Cardano Generate Account Tool plugin into the app. On the app design page, go to the Processes tab, and click on Design Processes.
-
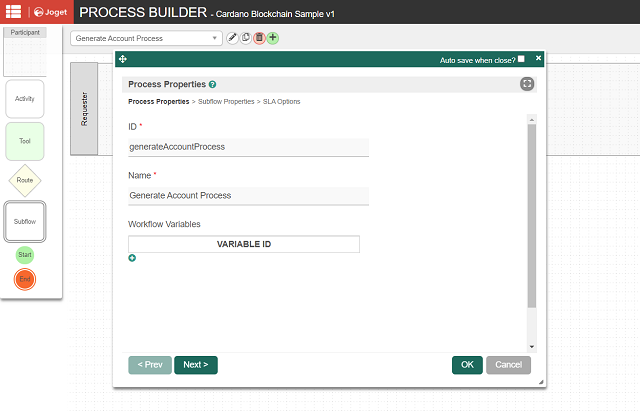
Now in the Process Builder, change the process properties accordingly:ID : generateAccountProcessName : Generate Account Process
-
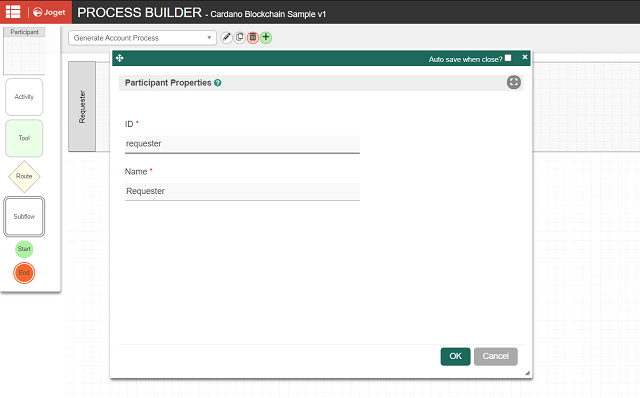
Edit the one-and-only participant and give it a meaningful name (e.g.: Requester).
-
Now within the process design, simply drag in a process tool and use such design as below. Rename the process tool with a meaningful name (e.g.: Generate Account).
-
We are done with the process design. Click on Deploy at the top right corner to deploy the process.
-
Coming back to the app design page, go to Map Tools to Plugins tab, and add a plugin to the Generate Account tool.Select Cardano Generate Account Tool.
-
Configure the Cardano Generate Account Tool accordingly by selecting the Testnet network and mapping the form fields of the Account Details form to store to.You can also refer to the plugin’s documentation.
Configure Cardano Generate Account Tool
Store Account Data to Form
Save the plugin configuration.
-
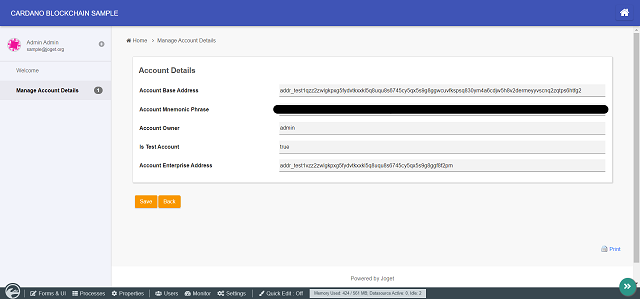
And that’s it! To quickly test Cardano account generation, click on Run Process.Upon doing so, a valid account should be generated successfully. To check this, simply launch the app and navigate to the CRUD menu that was generated earlier.We can see that there is now 1 record available.
And upon viewing the record, we can see details about the particular account.
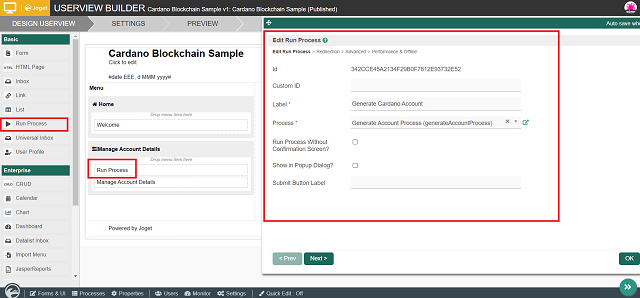
Optionally, if you wish to make this function available for end users in runtime, you can edit the userview in the Userview Builder and drag in a Run Process Menu. Configure the Run Process Menu by pointing it to the Generate Account Process that we have created.Remember to save the userview after editing it.


- After funding your test account, edit the Account Details form.
- Add a new form section. Rename the new form section accordingly (e.g.: Account Details From Blockchain).
Then, add a few more text fields to this new form section:
– Account Balance
– Account Type
Upon doing so, it should look like this: - Edit this new form section, go to Data Binder tab, and select the Cardano Account Load Binder plugin for the Load Binder property.
- Configure the Cardano Account Load Binder accordingly by selecting the Testnet network, and keying in your Blockfrost testnet project’s API Key that you have generated earlier, along with the necessary configurations.
You can also refer to the plugin’s documentation.
Configure Cardano Account Load Binder
Map Value To Form Fields
Save the form section configuration.
- As there is no need for end users to modify any values in this new form section, we can set this section as read-only. Go to Advanced Tools, Permission tab, and set this section as “readonly“.
- Save the form.
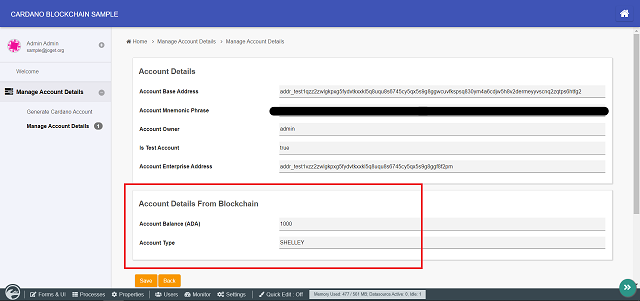
- And that’s it! Upon navigating back to the Account Details CRUD menu, we can now see these additional account details as such:


- To test out sending from one account to another, do generate another account in the sample app by running the Generate Account Process.
We should end up with 2 accounts now.
- In the app design page, create a new form with the following details:
Form ID : sendTransaction
Form Name : Send Transaction
Table Name : cardano_send_test - After creating the form, using the Joget Form Builder, let’s add a few necessary fields that a Cardano transaction requires:
a) Sender Account
Use a select box. Edit the element. For the Options Binder, select the Default Form Options Binder. For Form property, select the Account Details form. For Label Column property, simply select the “id” field.b) Amount To Send (ADA)
Use a text field. Edit the element and go to Advanced Options tab, and select the Default Validator for the Validator property. Check the Mandatory property and select the Type property as Numeric.c) Receiver Account
Use a select box. Edit the element. For the Options Binder, select the Default Form Options Binder. For Form property, select the Account Details form. For Label Column property, simply select the “id” field. - Save the form.
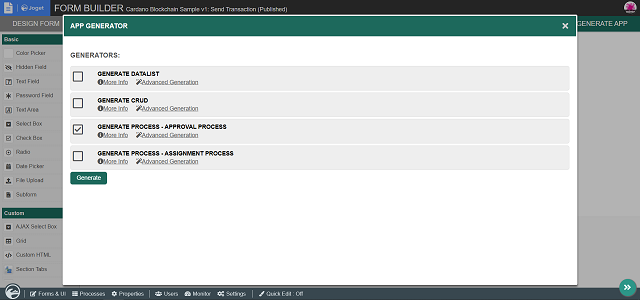
- Once the form is saved, click on the Generate App button to use the App Generator.
Check the option for Generate Process – Approval Process, then click Generate.Upon completing the generation, coming back to the app design page, we can see that the relevant components for an approval-type process have been generated accordingly, with a Send Transaction Approval Process automatically deployed for us.
- Now we just need to slightly modify the generated process design to incorporate the Cardano Send Transaction Tool plugin into the app. On the app design page, go to the Processes tab, select the Send Transaction Approval Process in the dropdown, and click on Design Process.
- Now that we are in the Process Builder, edit the process properties, and add these additional workflow variables:
– txValidated
– txExplorerUrl
These workflow variables will be used by the Cardano Send Transaction Tool plugin later on to update the transaction validation status and store an auto-generated Cardano transaction explorer URL. - For the process tool that is after the “Status == Approved” path, rename it to Send Transaction.
- We are done with the process design. Click on Deploy at the top right corner to deploy this modified process.
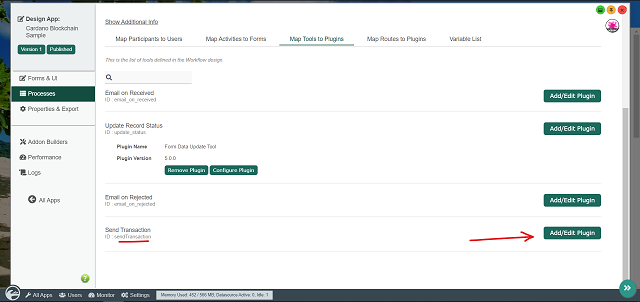
- Coming back to the app design page, go to Map Tools to Plugins tab, and remove all the unneeded email tools that were automatically mapped during the approval process generation just now.
- Add a plugin to the Send Transaction tool. Select Cardano Send Transaction Tool.
- Configure the Cardano Send Transaction Tool accordingly by selecting the Testnet network, and keying in your Blockfrost testnet project’s API Key that you have generated earlier, along with the necessary configurations.
To demonstrate the ability to embed form data into the transaction metadata, we will also check the Enable Transaction Metadata property and add these fields from the Send Transaction form:
– id
– dateCreated
– createdBy
You can also refer to the plugin’s documentation.Configure Cardano Send Transaction Tool
Transaction Details
Store Response to Workflow Variable
Save the plugin configuration.
- And that’s it! To try sending transactions, launch the app. Due to the approval process generation done earlier, we should see a new userview category that contains an Inbox Menu & Run Process Menu for the Send Transaction Approval Process.


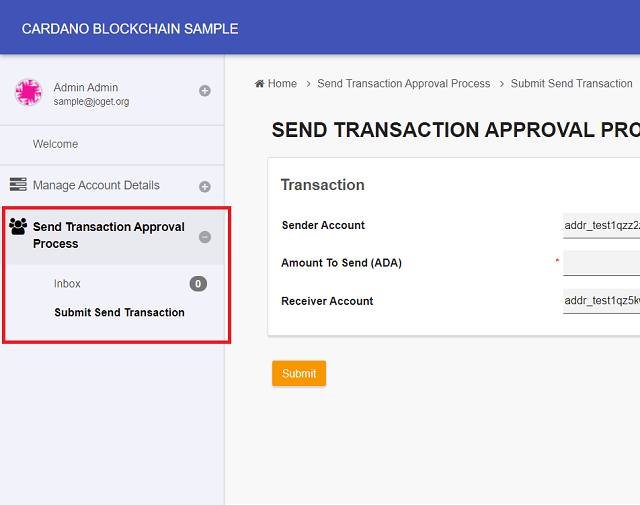

After submitting this activity, the process will flow to the Approval activity. Navigate to the Inbox Menu, select the Status as Approved, and submit this approval activity.

After doing so, the Cardano Send Transaction Tool will pick up these form field values and perform the transaction accordingly. To observe this, click on Monitor in the admin bar, and navigate to Completed Processes tab.
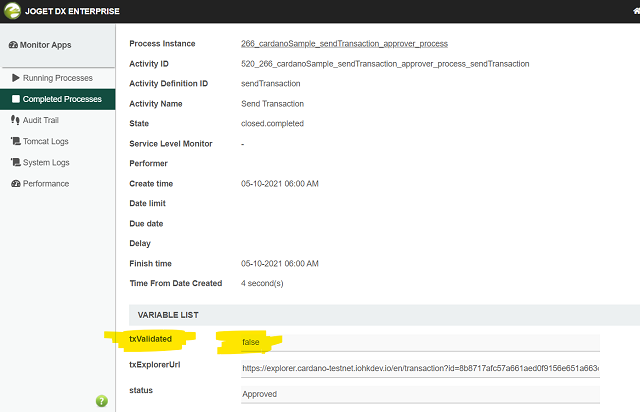
Once the transaction is confirmed, it is considered confirmed and validated, and thus will later on be automatically set to true by the Cardano Send Transaction Tool.


6. Customizing the Cardano Blockchain Plugin Pack
- Fast-Paced Supply Chain & Logistics Tracking
- Authenticity Token/Non-Fungible Token Generation & Management
- Real-World Asset Tokenization & Management
- Certificate Issuance & Verification
- Fully-customizable and UI-friendly Stake Pool Management
- And many more…
- https://github.com/bloxbean/cardano-client-lib – Java library used for this plugin pack
- https://blockfrost.io/ – APIs used by Java client library to interact with Cardano blockchain
- Get Started – On-premise, on-demand, public/private cloud, cloud native, and more.
- Joget DX Video Tutorials – Quick overview and build your first app.
- Joget DX Knowledge Base – User and developer reference, samples and other documentation.
- Community Q&A – Ask questions, get answers, and help others.
- Language Translations – Translations for more than 20 languages.
- Joget Academy – Self-paced online learning and certification.
- Joget Marketplace – Download ready made apps, plugins, templates and more.
- Joget Events – Upcoming and past Joget events & webinars.
- Joget Press – Joget press releases.
- Joget Reviews – Joget reviews and customer testimonials.
Leave a Comment
You must be logged in to post a comment.