Blog Posts Process Management

Cardano and Joget: Building No-Code, Composable Blockchain Apps

Blog: Joget Unplugged

Cardano and Joget: Building No-Code, Composable Blockchain Apps
1. Introduction
Joget is an open source low-code/no-code application platform for faster, simpler digital transformation. Previously, we have seen how we can integrate Hyperledger Fabric with Joget. So in this article, we will look at a no-code approach to integrate another popular blockchain technology, specifically the Cardano blockchain, into a full-fledged web application.
2. What is Cardano?
Cardano is a third-generation, open source, decentralized proof-of-stake (PoS) public blockchain platform, that aims to be a decentralized application (DApp) development platform with a multi-asset ledger and smart contracts. It is also home for the cryptocurrency ADA.
The blockchain operates on the Ouroboros proof-of-stake consensus protocol. Compared to first-generation proof-of-work mechanisms like Bitcoin, instead of relying on powerful machines solving complex cryptographic equations to achieve consensus and compete for block rewards, the proof-of stake mechanism relies on end users staking or delegating their own coins in a staking pool in order to be elected the rights for validation and earn transaction rewards. This modern mechanism allows Cardano to scale the network more efficiently and eliminate the need for large consumptions of energy to achieve consensus, along with the benefits of rewarding stakers in a more fair and linear manner, and many more.
The platform began development in 2015 and was launched in 2017 by Charles Hoskinson, a co-founder of Ethereum. He co-founded IOHK, a blockchain-engineering company, whose primary business is the development of Cardano, alongside the Cardano Foundation and Emurgo.
3. What can Joget do with Cardano?
Most blockchain technologies available today have their own native coin that is able to transfer real-world value. For Cardano specifically, its native coin is ADA. Despite this fact, it is the aspects of a blockchain’s security, speed, scalability, and its features that will be factored in for feasibility for enterprise applications.
Now in relation to Joget’s extensive plugin architecture, not only will we be able to design Joget apps that are able to transfer real-world value, but we can also take advantage of certain unique features of Cardano. Specifically for this proof-of-concept, it is the ability to simply embed form data into the transaction’s metadata and ultimately storing it into the blockchain to serve as an immutable and always-accessible proof-of-existence. This feature alone can serve a wide variety of enterprise applications. The 4 major applications are and not limited to:
  • Validation and verification
    • Metadata can be used to validate and verify external physical products. This requires pairing with a physical identifier, such as a QR-code for supply chain tracking of fast-moving consumer goods at low cost.
  • Authentication and attribution
    • Metadata can be paired with a physical identifier to prove authenticity of an educational institution. This is especially useful for digital courses and accreditations.
  • Secure record of information
    • Since metadata attached to a transaction and confirmed on the Cardano blockchain is immutable, no one can tamper with its values nor its existence. You can use this as a method of secure record to store an invoice ID to prove the purchase of goods and services for example.
  • Timestamping
    • Metadata can be used to create a timestamp within a transaction, allowing anyone to verify the time and date at which something was bought, sold, or transferred.
4. Preparing your environment
The plugin pack’s current implementation uses Bloxbean‘s Cardano client Java library, which out-of-the-box integrates with Blockfrost through the backend API. What this means for Joget app designers is, there is NO need to setup any additional infrastructure (e.g.: Cardano node) of any sorts to start leveraging Cardano’s features in your Joget apps.
Hence, the only prerequisite needed to run the plugin pack is to register an account at https://blockfrost.io/. For testing purposes, you can sign up for a free account and add a “testnet” project. Simply provide a meaningful project name & select the correct network.
Blockfrost Dashboard
After doing so, in your Blockfrost’s Dashboard, you should see a screen as shown above. And that’s it! 
Here onwards, all you need is the project’s “API Key” to key into the plugins configuration later on.
After then, simply download the Cardano Blockchain Pack JAR file, and upload the downloaded JAR file into Joget via Manage Plugins under System Settings.
5. Designing your first Cardano-integrated Joget app
This proof-of-concept is accomplished with a set of Cardano plugins developed for the Joget platform. There are 3 plugins bundled in this plugin pack:
  • Cardano Generate Account Tool
    • A Process Tool plugin that allows you to generate an account on the Cardano blockchain, and store the account data into a form and/or workflow variables.
  • Cardano Send Transaction Tool
    • A Process Tool plugin that allows you to send ADA from one account to another on the Cardano blockchain, with the option to also embed form data into the transaction metadata.
  • Cardano Account Form Load Binder
    • A Form Load Binder plugin that allows you to load account data directly from the Cardano blockchain into a form.
With just these plugins alone, Joget app designers can already develop a blockchain app that can perform basic Cardano blockchain functions without writing any code. Integrating a Joget app with Cardano is accomplished simply by configuring this set of Cardano plugins.
With that said, let’s design a simple sample app to demonstrate reading from and writing to the Cardano blockchain. We can use Joget to visually design the necessary forms, after which the App Generator is used to quickly create a fully working app with a simple approval-type process. After that, we can start incorporating these 3 blockchain features into the app.
5.1 Creating the Base App
  1. The first step is to design a new Joget app. In the Joget App Center, login as an administrator and click on the Design New App button.
    Key in the relevant details, e.g.:
    App ID : cardanoSample
    App Name : Cardano Blockchain Sample
5.2 Generating Cardano Account
  1. Before we can perform ADA transactions or read the relevant account data, first we need a form to store account data to. Now that we have a blank app design, create a new form with the following details:
    Form ID : accountDetails
    Form Name : Account Details
    Table Name : cardano_accounts
  2. After creating the form, using the Joget Form Builder, let’s add a few text fields to store details of a Cardano account:
    Account Base Address (with “id” as the field’s ID)
    Account Mnemonic Phrase
    Account Owner
    Is Test Account
    Account Enterprise Address

    Account Details - Form Design

    The minimum basic required field to operate a Cardano account is actually just the account’s mnemonic phrase, as it is possible to derive account data solely from the mnemonic phrase or private key just like most blockchain technologies out there. But for security and/or efficiency purposes, it is common to also locally store additional safe & immutable details of an account. 

    As a note, the Cardano Generate Account Tool plugin will store the account’s base address as the record ID of a form record, and store the account’s mnemonic phrase as an encrypted value in the database.

  3. As there is no need for end users to modify any values in this form, we can set this entire section as read-only. Go to Advanced Tools, Permission tab, and set the one-and-only section as “readonly“.

    Set section permission as readonly

  4. Now save the form.

  5. Once the form is saved, click on the Generate App button to use the App Generator
    Check the option for Generate CRUD, then click Generate.

    App Generator - Generate CRUD

    Do note that the App Generator is a Joget Enterprise Edition feature, but you can manually create the list, process, and UI in the Community Edition as well.
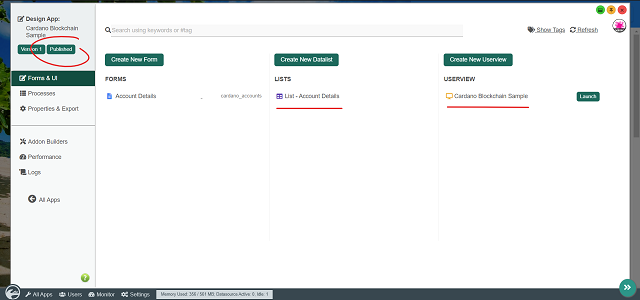
    Upon completing the generation, coming back to the app design page, we can see that a datalist and userview for the CRUD has been generated accordingly, and the app is now published.

    Result of Generate CRUD via App Generator

  6. In order for the generated Account Details datalist to show meaningful information, edit the datalist in the Datalist Builder and add/arrange/sort the columns according to your preference. 
    Example as below:

    Account Details Datalist Design

    Remember to save the datalist after editing it.

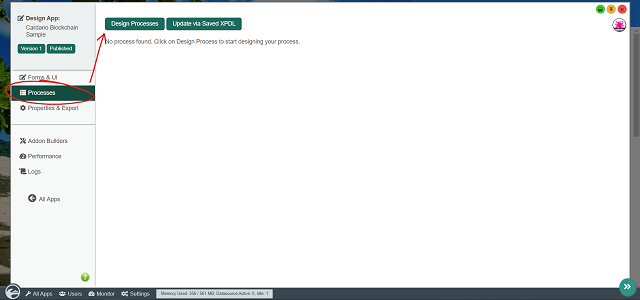
  7. At this point, now that we have the form, list, and UI to display account data, we are ready to incorporate the Cardano Generate Account Tool plugin into the app. On the app design page, go to the Processes tab, and click on Design Processes.
    Design New Process to Generate Accounts

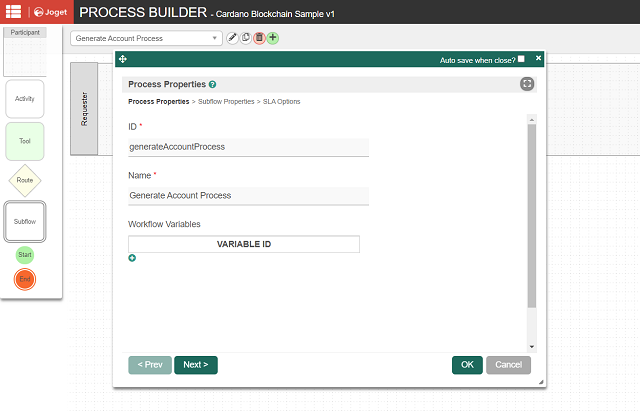
  8. Now in the Process Builder, change the process properties accordingly:
    ID         : generateAccountProcess
    Name : Generate Account Process

    Rename the Process Name accordingly

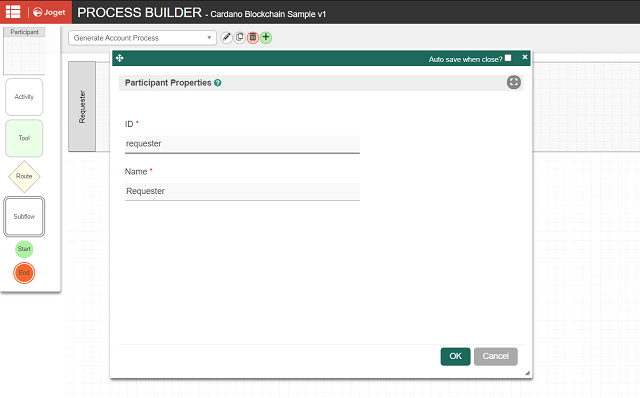
  9. Edit the one-and-only participant and give it a meaningful name (e.g.: Requester).

    Rename the participant as "Requester"

  10. Now within the process design, simply drag in a process tool and use such design as below. Rename the process tool with a meaningful name (e.g.: Generate Account).

    Drag in Process Tool and name as "Generate Account"

  11. We are done with the process design. Click on Deploy at the top right corner to deploy the process.

  12. Coming back to the app design page, go to Map Tools to Plugins tab, and add a plugin to the Generate Account tool.
    Select Cardano Generate Account Tool.

    Map the "Generate Account" Tool

  13. Configure the Cardano Generate Account Tool accordingly by selecting the Testnet network and mapping the form fields of the Account Details form to store to.

    You can also refer to the plugin’s documentation.

    Configure Cardano Generate Account Tool - Page 1

    Configure Cardano Generate Account Tool - Page 2

    Configure Cardano Generate Account Tool

    Property

    Value

    Network Type

    Testnet

    Store Account Data to Form

    Property

    Value

    Form

    Account Details

    Field Mapping

    Account Mnemonic Phrase (encrypted)

    (Point to Account Mnemonic Phrase field)

    Account Owner Field

    (Point to Account Owner field)

    Account Owner Value

    #currentUser.username#

    (Accepts a Hash Variable. Typically points to an actual user, e.g.: Joget username.)

    Is Test Account Flag

    (Point to Is Test Account field)

    Account Enterprise Address

    (Point to Account Enterprise Address field)

    Save the plugin configuration.

  14. And that’s it! To quickly test Cardano account generation, click on Run Process.

    Run the Generate Account Process

    Upon doing so, a valid account should be generated successfully. To check this, simply launch the app and navigate to the CRUD menu that was generated earlier.

    We can see that there is now 1 record available.

    A valid Cardano account is generated as seen in the CRUD

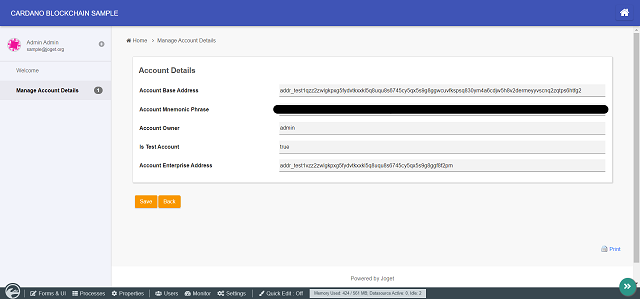
    And upon viewing the record, we can see details about the particular account.

    Viewing account details via CRUD view form

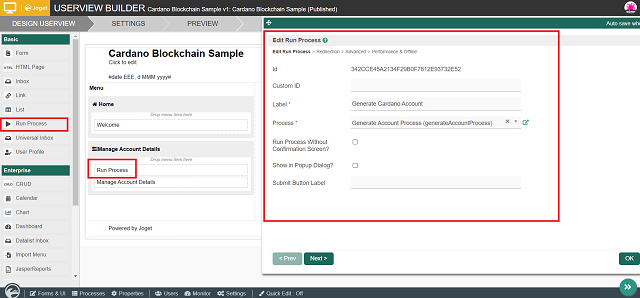
    Optionally, if you wish to make this function available for end users in runtime, you can edit the userview in the Userview Builder and drag in a Run Process Menu. Configure the Run Process Menu by pointing it to the Generate Account Process that we have created.

    Remember to save the userview after editing it.

    Add "Run Process Menu" to userview

5.3 Loading Cardano Account Data from Blockchain to Form
Now that we are able to generate Cardano accounts and store its data to a form, we can use the Cardano Account Load Binder plugin to load additional mutable data of an account (e.g.: account balance) directly from the Cardano blockchain into a form. 
Before we proceed, do note that for freshly created accounts, it must be funded for the first time in order for the blockchain to be aware of the account’s existence.

To fund a test account, use the testnet faucet here and specify the base address of the account that you have generated earlier: https://testnets.cardano.org/en/testnets/cardano/tools/faucet/
Requested tADA (also known as Test ADA) funds will be transferred to the testnet account you specified within about a minute, depending on network load at that time period.
  1. After funding your test account, edit the Account Details form.
  2. Add a new form section. Rename the new form section accordingly (e.g.: Account Details From Blockchain).
    Then, add a few more text fields to this new form section:
    Account Balance
    Account Type

    Upon doing so, it should look like this:
    Additional fields for Account Details form
  3. Edit this new form section, go to Data Binder tab, and select the Cardano Account Load Binder plugin for the Load Binder property.
    Select "Cardano Account Load Binder" for the section's load biinder

  4. Configure the Cardano Account Load Binder accordingly by selecting the Testnet network, and keying in your Blockfrost testnet project’s API Key that you have generated earlier, along with the necessary configurations.

    You can also refer to the plugin’s documentation.

    Configure Cardano Account Load Binder - Page 1

    Configure Cardano Account Load Binder - Page 2

    Configure Cardano Account Load Binder

    Property

    Value

    Network Type

    Testnet

    Blockfrost Project Key

    (Your Blockfrost testnet project’s API Key)

    Account Address

    #form.cardano_accounts.id#

    (We can use Form Data Hash Variable to dynamically point to the Account Base Address of the current form record.)

    Map Value To Form Fields

    Property

    Value

    Current Account Balance

    (Key in the field ID for Account Balance field)

    Account Type

    (Key in the field ID for Account Type field)

    Save the form section configuration.

  5. As there is no need for end users to modify any values in this new form section, we can set this section as read-only. Go to Advanced Tools, Permission tab, and set this section as “readonly“.
    Set this new form section as read-only

  6. Save the form.
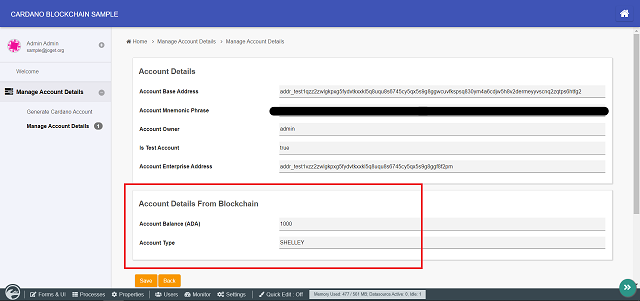
  7. And that’s it! Upon navigating back to the Account Details CRUD menu, we can now see these additional account details as such:
    Additional account details loaded directly from Cardano blockchain

5.4 Performing ADA Transaction w/ Metadata
Now that we can see meaningful account data in our sample app, we are ready to try performing transactions on the Cardano blockchain via the Cardano Send Transaction Tool plugin.
  1. To test out sending from one account to another, do generate another account in the sample app by running the Generate Account Process.

    We should end up with 2 accounts now.

    2 valid Cardano accounts generated in total so far

  2. In the app design page, create a new form with the following details:
    Form ID         : sendTransaction
    Form Name : Send Transaction
    Table Name : cardano_send_test
  3. After creating the form, using the Joget Form Builder, let’s add a few necessary fields that a Cardano transaction requires:
    a) Sender Account
    Use a select box. Edit the element. For the Options Binder, select the Default Form Options Binder. For Form property, select the Account Details form. For Label Column property, simply select the “id” field.

    b) Amount To Send (ADA)
    Use a text field. Edit the element and go to Advanced Options tab, and select the Default Validator for the Validator property. Check the Mandatory property and select the Type property as Numeric.

    c) Receiver Account
    Use a select box. Edit the element. For the Options Binder, select the Default Form Options Binder. For Form property, select the Account Details form. For Label Column property, simply select the “id” field.

    Send Transaction Form Design

  4. Save the form.
  5. Once the form is saved, click on the Generate App button to use the App Generator.
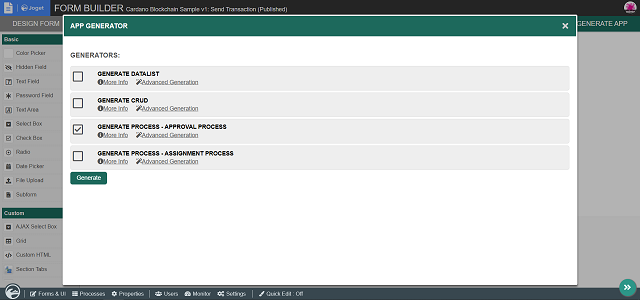
    Check the option for Generate Process – Approval Process, then click Generate.
    Generate Approval Process via App Generator

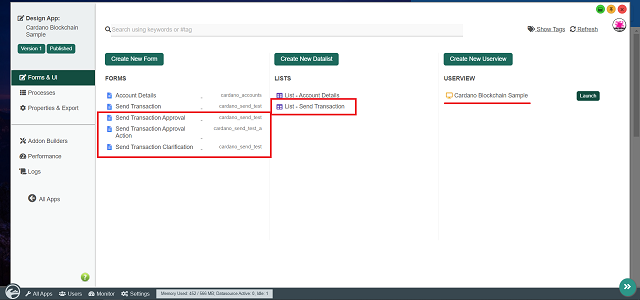
    Upon completing the generation, coming back to the app design page, we can see that the relevant components for an approval-type process have been generated accordingly, with a Send Transaction Approval Process automatically deployed for us.

    Various app components generated for the approval process

    Send Transaction Approval Process generated by App Generator

  6. Now we just need to slightly modify the generated process design to incorporate the Cardano Send Transaction Tool plugin into the app. On the app design page, go to the Processes tab, select the Send Transaction Approval Process in the dropdown, and click on Design Process.
  7. Now that we are in the Process Builder, edit the process properties, and add these additional workflow variables:
    txValidated
    txExplorerUrl

    These workflow variables will be used by the Cardano Send Transaction Tool plugin later on to update the transaction validation status and store an auto-generated Cardano transaction explorer URL.
    Added additional workflow variables to be populated during transaction later on

  8. For the process tool that is after the “Status == Approved” path, rename it to Send Transaction.
    Rename process tool to "Send Transaction"

  9. We are done with the process design. Click on Deploy at the top right corner to deploy this modified process.
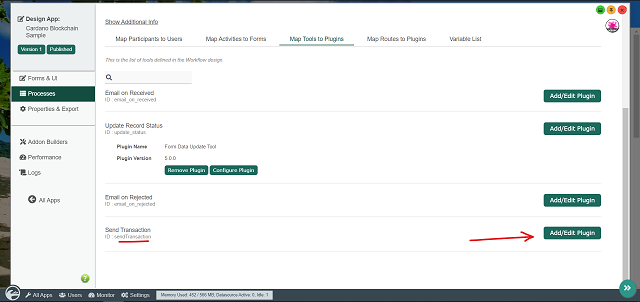
  10. Coming back to the app design page, go to Map Tools to Plugins tab, and remove all the unneeded email tools that were automatically mapped during the approval process generation just now.
  11. Add a plugin to the Send Transaction tool. Select Cardano Send Transaction Tool.
    Map the "Send Transaction" tool

  12. Configure the Cardano Send Transaction Tool accordingly by selecting the Testnet network, and keying in your Blockfrost testnet project’s API Key that you have generated earlier, along with the necessary configurations.

    To demonstrate the ability to embed form data into the transaction metadata, we will also check the Enable Transaction Metadata property and add these fields from the Send Transaction form:
    id
    dateCreated
    createdBy

    You can also refer to the plugin’s documentation.

    Configure Cardano Send Transaction Tool - Page 1

    Configure Cardano Send Transaction Tool - Page 2

    Configure Cardano Send Transaction Tool - Page 3

    Configure Cardano Send Transaction Tool

    Property

    Value

    Network Type

    Testnet

    Blockfrost Project Key

    (Your Blockfrost testnet project’s API Key)

    Transaction Details

    Property

    Value

    Sender Address

    #form.cardano_send_test.sender_account#

    Sender Account Mnemonic Phrase

    #form.cardano_accounts.mnemonic[{form.cardano_send_test.sender_account}]#

    (This uses Form Data Hash Variable with Nested Hash Variable to dynamically point to the sender’s account mnemonic phrase in reference to the Sender Address of the current form record.)

    NOTE: Do not key in the plain-text mnemonic phrase here.

    Receiver Address

    #form.cardano_send_test.receiver_account#

    Amount To Send (ADA)

    #form.cardano_send_test.amount#

    Enable Transaction Metadata

    Yes

    Form

    Send Transaction

    Metadata

    • id

    • dateCreated

    • createdBy

    Store Response to Workflow Variable

    Property

    Value

    Is Transaction Validated

    txValidated

    Transaction Explorer URL

    txExplorerUrl

    Save the plugin configuration.

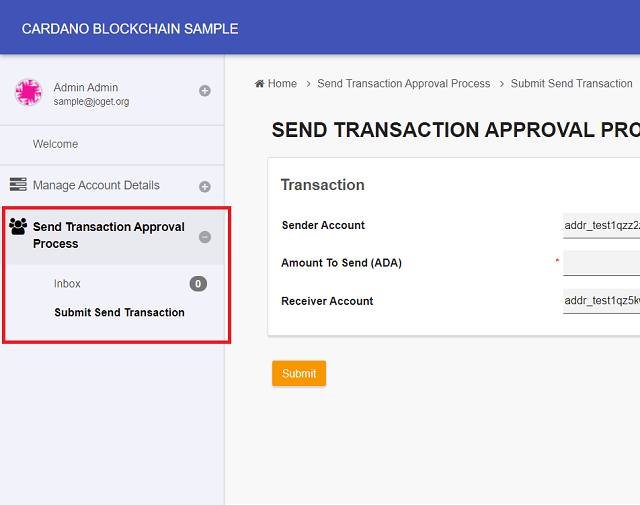
  13. And that’s it! To try sending transactions, launch the app. Due to the approval process generation done earlier, we should see a new userview category that contains an Inbox Menu & Run Process Menu for the Send Transaction Approval Process.
Auto-generated userview menus from the Approval Process Generation previously
Click on Submit Send Transaction to start the process, and follow through the process flow.

Here, simply select the account that you have funded previously as the sender account, specify the amount of ADA coins to send, and select the latter account that was just generated just now as the receiver account.

Start the Send Transaction Approval Process

After submitting this activity, the process will flow to the Approval activity. Navigate to the Inbox Menu, select the Status as Approved, and submit this approval activity.

Approve and submit the approval activity

After doing so, the Cardano Send Transaction Tool will pick up these form field values and perform the transaction accordingly. To observe this, click on Monitor in the admin bar, and navigate to Completed Processes tab.

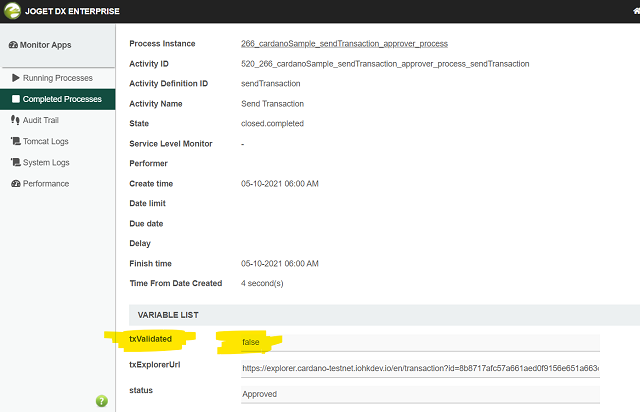
Inspecting the completed process instance via Monitor
Upon inspection of the completed process instance, we can see that the Transaction Validation Flag (represented by txValidated workflow variable) is false. This is perfectly normal in the initial time period as transactions performed on the Cardano Blockchain undergo confirmation in order for the transaction to be accepted into the chain and become immutable. Transaction confirmations are usually completed in about 20 seconds, depending on the network load.
 
NOTE: Transaction confirmations and chain confirmations (sometimes referred to as block confirmations) are different concepts. Transaction confirmation is the point in time when a transaction is accepted into the chain and becomes immutable, whereas chain confirmation is the point beyond which the chain is guaranteed by protocol not to alter any further and is usually considered complete after 15-30 blocks deep.

Once the transaction is confirmed, it is considered confirmed and validated, and thus will later on be automatically set to true by the Cardano Send Transaction Tool.

Workflow variable set to true after transaction confirmed
Additionally, we can see that the Transaction Explorer URL (represented by txExplorerUrl workflow variable) contains a URL generated by the plugin. By navigating to this URL in your browser, it leads to the official Cardano blockchain explorer website and we can see this transaction there as a form of proof-of-existence, along with the form data embedded as the transaction metadata.

Transaction viewed from official Cardano blockchain explorer website

6. Customizing the Cardano Blockchain Plugin Pack

This plugin pack’s source code is available in a new open source repository at https://github.com/jogetoss/cardano-blockchain-pack
JogetOSS is a community-led team for open source software related to the Joget no-code/low-code application platform. Projects under JogetOSS are community-driven and community-supported, and you are welcome to contribute to the projects. Feel free to clone the project and customize accordingly to suit your needs.

7. The Future
In this article, we have explored how we can use Joget’s extensive plugin architecture to leverage blockchain technology to build composable blockchain apps.

By combining blockchain technology with a no-code/low-code application development platform such as Joget, developers can abstract away the technicalities of blockchain functions/components to enable business users and citizen developers to independently build enterprise blockchain applications in a no-code manner. 
The ultimate goal is to achieve full integration ; a functionally complete blockchain plugin pack so to speak. By doing this, it is certainly possible in the foreseeable future where Joget app designers only need to understand the concepts of a particular blockchain technology to start building full-fledged enterprise web apps with their preferred blockchain pack as composable/modular blockchain components, all without the need to write any code of any sort.
This effectively and drastically lowers the skill floor and time-to-market to enable large-scale adoption of blockchain technology. Just to name a few enterprise blockchain solutions:
  • Fast-Paced Supply Chain & Logistics Tracking
  • Authenticity Token/Non-Fungible Token Generation & Management
  • Real-World Asset Tokenization & Management
  • Certificate Issuance & Verification
  • Fully-customizable and UI-friendly Stake Pool Management
  • And many more…
As what we have learned in this article, integration is possible not only with Cardano but also for any other blockchain technologies out there, given the right tools and libraries. Just to demonstrate, here’s another proof-of-concept plugin pack that allows app designers to interact with the XRP Ledger. See:
8. Resources & References
9. Credits
Get Started
Resources to get started developing low-code apps with Joget:
Follow us for the latest news and updates:
 

Leave a Comment

Get the BPI Web Feed

Using the HTML code below, you can display this Business Process Incubator page content with the current filter and sorting inside your web site for FREE.

Copy/Paste this code in your website html code:

<iframe src="https://www.businessprocessincubator.com/content/cardano-and-joget-building-no-code-composable-blockchain-apps/?feed=html" frameborder="0" scrolling="auto" width="100%" height="700">

Customizing your BPI Web Feed

You can click on the Get the BPI Web Feed link on any of our page to create the best possible feed for your site. Here are a few tips to customize your BPI Web Feed.

Customizing the Content Filter
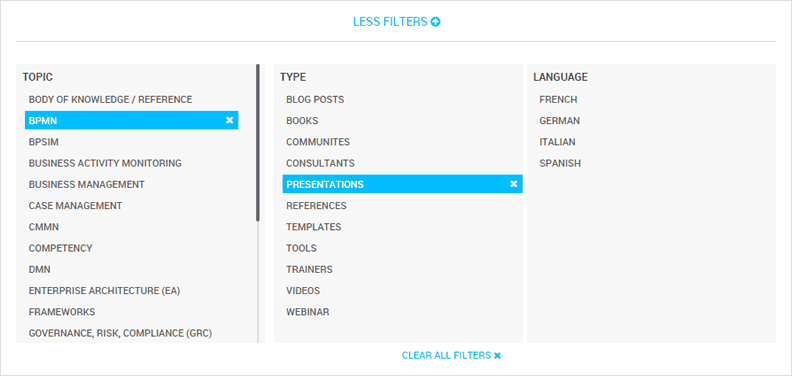
On any page, you can add filter criteria using the MORE FILTERS interface:

Customizing the Content Filter

Customizing the Content Sorting
Clicking on the sorting options will also change the way your BPI Web Feed will be ordered on your site:

Get the BPI Web Feed

Some integration examples

BPMN.org

XPDL.org

×