
Simplest Custom Tasks in Kogito
Blog: Drools & jBPM Blog
As a Kogito developer, you can add custom tasks to the designer palette. Customs tasks are process’ activities that allow users to perform custom operations within your process flows. In addition, custom tasks can predefine different visual and execution time properties of the node on the canvas. An example can be input and output parameters, icon, predefined name, documentation, and others.
In this example, we will take a look at how to create basic custom tasks from scratch. We will use Kogito developers tools for VS Code.
Generating project
Let’s start with creating a Kogito maven project structure. Copy and paste this command in the console to create a Kogito project:
mvn archetype:generate
    -DarchetypeGroupId=org.kie.kogito
    -DarchetypeArtifactId=kogito-quarkus-archetype
    -DgroupId=com.github.hasys -DartifactId=custom-task-sample
    -DarchetypeVersion=1.4.0.Final
    -Dversion=1.0-SNAPSHOT
This command will create for us maven project structure with basic Kogito project:
.
├── README.md
├── pom.xml
└── src
    ├── main
    │   ├── java
    │   │   └── com
    │   │       └── github
    │   │           └── hasys
    │   └── resources
    │       ├── Traffic Violation.dmn
    │       ├── application.properties
    │       └── test-process.bpmn2
    └── test
        ├── java
        │   └── com
        │       └── github
        │           └── hasys
        │               ├── GreetingsTest.java
        │               └── TrafficViolationTest.java
        └── resources
            └── application.properties
We can remove Traffic Violation.dmn and TrafficViolationTest.java as DMN is not part of this example.
Defining our custom task
To create a custom service, first, let’s create a Work Item Definition file. It is a plain text file written in MVEL language. The file specifies the task properties and visual effects like icon and default name. You can place a .wid file in the same directory as the BPMN file. The second option is to put a .wid file in a directory with the name global under the root folder.
NOTICE: Keep in mind that only one project root folder can be opened in VS Code to support global directory.
WID files under the global directory will be visible for all BPMN files in the project. Let’s create a WID file customTasks.wid under the global directory. Now our structure looks like this:
.
├── README.md
├── global
│   └── customTasks.wid
├── pom.xml
└── src
    ├── main
    │   ├── java
    │   │   └── com
    │   │       └── github
    │   │           └── hasys
    │   └── resources
    │       ├── application.properties
    │       └── test-process.bpmn2
    └── test
        ├── java
        │   └── com
        │       └── github
        │           └── hasys
        │               └── GreetingsTest.java
        └── resources
            └── application.properties
We will use all currently supported properties in the WID file.
NOTE: Not all parameters from Business Central are supported in Kogito anymore. That’s why we recommend removing all unsupported parameters before migrating to Kogito.
Kogito supported parameters are:
- name – is a string and represents the name or the ID of the WID. It is an internal name used by the engine to map WID with Work Item Handler Java class
- displayName – is a string and represents the human-readable name. This name will be shown to the user in Process Designer on the canvas
- icon – is a string and represents the file name. The file can be located in the same directory as the WID file. Also, it is possible to use icon in base64 format
- parameters – is an MVEL map and represents the default Data Inputs which will present in Data assignments editor by default
- results – is MVEL map and represents default Data Outputs which will present in the Data assignments editor by default
- category – is a string and represents a category of the task in the pallet of Process Designer
- documentation – is a string and represents the default documentation. This value will present in the Documentation field of the Service task by default
[
    [
        "name" : "CustomTask",
        "displayName" : "Custom Task",
        "icon" : "data:image/png;base64,iVBORw0KGgoAAAA...",
        "category" : "Custom created task",
        "documentation" : "Basic minimal custom task.",

        "parameters" : [
            "Message" : new StringDataType()
        ],
        "results" : [
            "Result" : new StringDataType()
        ]
    ]
]
Adding some logic
In Kogito, you can tune your custom task using different mechanisms like LifeCycle. But for our example, we will use the simplest version of the Work Item Handler. This method is backward compatible with Business Central so you can reuse your custom tasks logic. Our Custom Task firstly will print a hello message in the console. Secondly, it will print Data Input parameters we passed from the process to our Work Item Handler. And finally, our custom task will string back from the Handler to the process variable. This result will be printed in the console later in the process using Script Task.
First let’s add CustomTaskWorkItemHandler.java under src/main/java/com/github/hasys/customTask/config folder. This is our custom task work item handler and it will contain all our business-specific logic. In the simplest case, we just need to implement executeWorkItem and abortWorkItem methods from KogitoWorkItemHandler.
NOTE: KogitoWorkItemHandler has the same signature as the WorkItemHandler interface from Business Central. However, have a different name and package so don’t forget to change it during migration from/to Business Central.
Content of our Custom Task handler:
package com.github.hasys.customTask.config;

import java.util.Map;
import java.util.HashMap;

import org.kie.kogito.internal.process.runtime.KogitoWorkItem;
import org.kie.kogito.internal.process.runtime.KogitoWorkItemHandler;
import org.kie.kogito.internal.process.runtime.KogitoWorkItemManager;

public class CustomTaskWorkItemHandler implements KogitoWorkItemHandler {

    @Override
    public void executeWorkItem(KogitoWorkItem workItem, KogitoWorkItemManager manager) {
        System.out.println("Hello from the custom work item definition.");
        System.out.println("Passed parameters:");

     // Printing task’s parameters, it will also print
     // our value we pass to the task from the process
        for(String parameter : workItem.getParameters().keySet()) {
            System.out.println(parameter + " = " + workItem.getParameters().get(parameter));
        }

        Map<String, Object> results = new HashMap<String, Object>();
        results.put("Result", "Message Returned from Work Item Handler");
     // Don’t forget to finish the work item otherwise the process
     // will be active infinitely and never will pass the flow
     // to the next node.
        manager.completeWorkItem(workItem.getStringId(), results);
   }

    @Override
    public void abortWorkItem(KogitoWorkItem workItem, KogitoWorkItemManager manager) {
        System.err.println("Error happened in the custom work item definition.");
   }
}
That is pretty is. The same as it was in the Business Central, but there is one difference between Business Central and Kogito. Before you can start to use it – you must manually register your Work Item Handler in Work Item Handler Configuration. Luckily it can be done very easily, you just need to create a Java class that extends DefaultWorkItemHandlerConfig class. Let’s create CustomWorkItemHandlerConfig Java class under src/main/java/com/github/hasys/customTask/config folder with content:
package com.github.hasys.customTask.config;

import javax.enterprise.context.ApplicationScoped;
import org.kie.kogito.process.impl.DefaultWorkItemHandlerConfig;

@ApplicationScoped
public class CustomWorkItemHandlerConfig extends DefaultWorkItemHandlerConfig {
    {
            register("CustomTask", new CustomTaskWorkItemHandler());
    }
}
Executing our task
The final tree structure of the project will be:
.
├── README.md
├── global
│   └── customTasks.wid
├── pom.xml
└── src
    ├── main
    │   ├── java
    │   │   └── com
    │   │       └── github
    │   │           └── hasys
    │   │               └── customTask
    │   │                   └── config
    │   │                       ├── CustomTaskWorkItemHandler.java
    │   │                       └── CustomWorkItemHandlerConfig.java
    │   └── resources
    │       ├── application.properties
    │       └── test-process.bpmn2
    └── test
        ├── java
        │   └── com
        │       └── github
        │           └── hasys
        │               └── GreetingsTest.java
        └── resources
            └── application.properties
Now we are ready to modify the process to use our new Custom Task! Open test-process.bpmn2 and model process as below:

To test parameters, we need to create to Process variables:

Process Variable contains Tag internal since it will be used internally in the process and there is no need to expose it to the service API. Variable input we will use to get data during REST API call to pass to the Custom task.
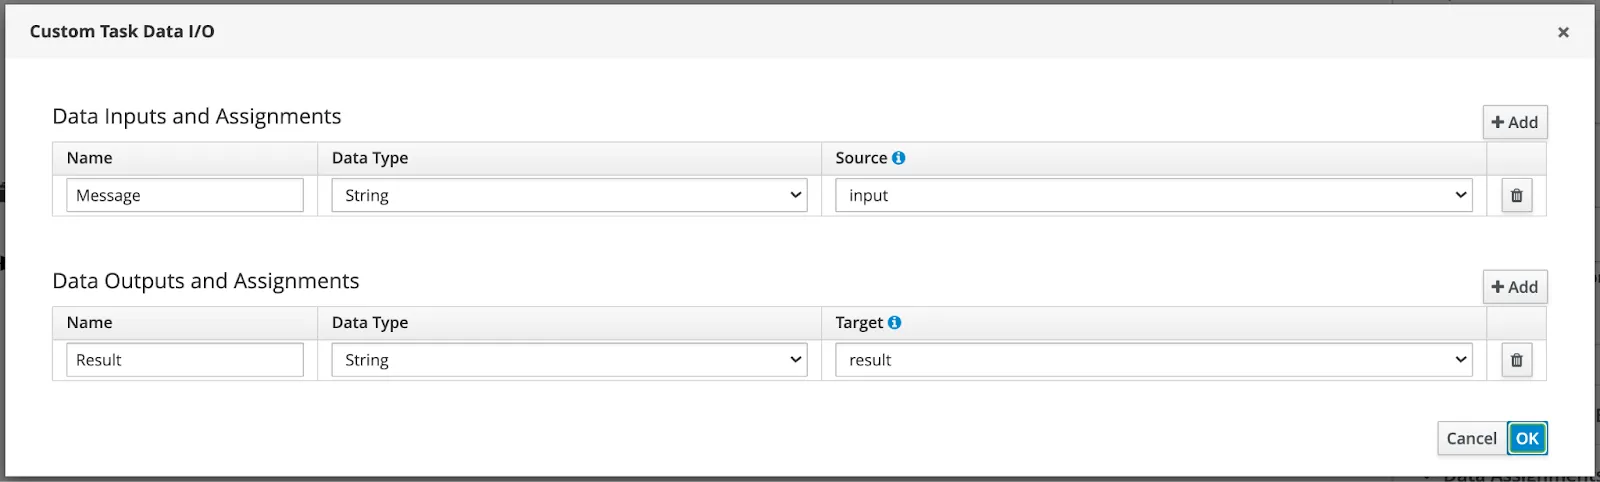
Link our process variable with Custom Task Data I/O like this:
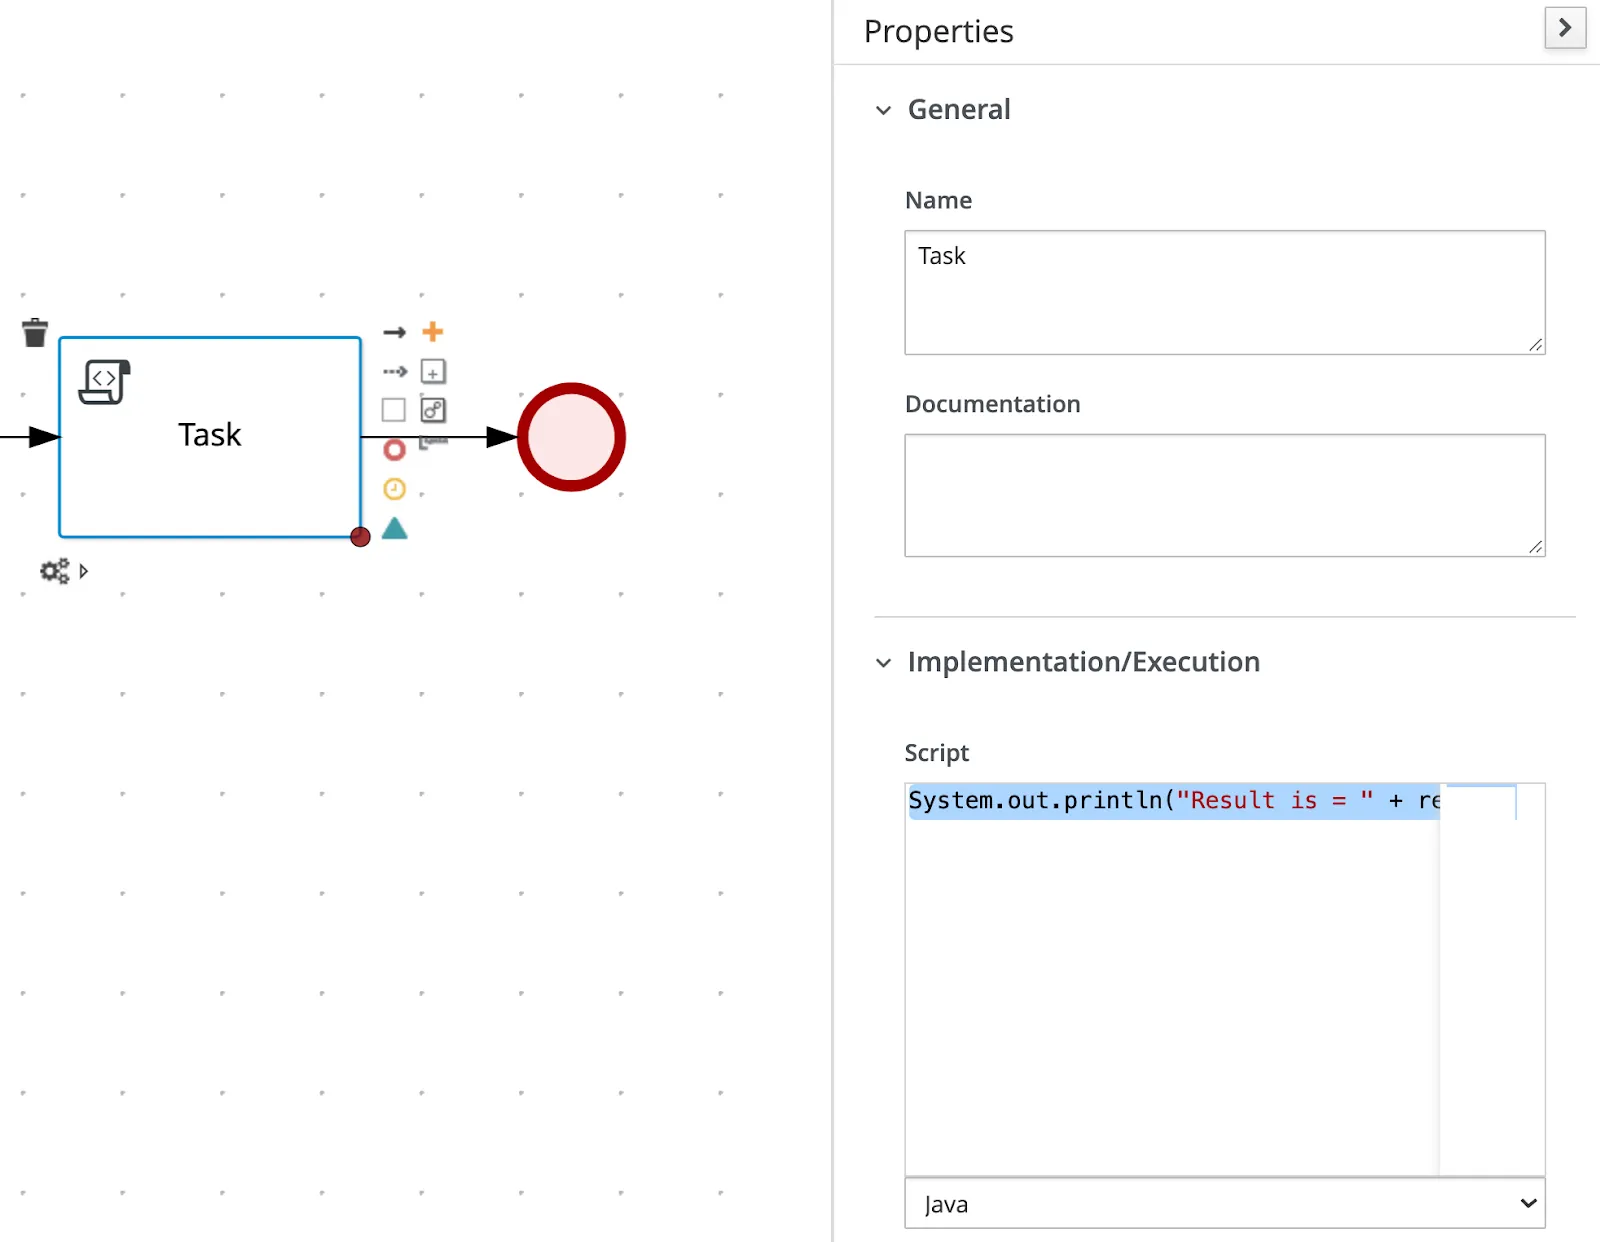
In the last step, we will add a simple script to the script task. This script will check that string value where returned from the Custom task:
System.out.println("Result is = " + result);
Now we are ready to start and execute our process with our brand new Custom Task! In the console, go to the project root and start the Quarkus development mode with the following command:
mvn clean package quarkus:dev
You can use UI to test your REST API if you open the link http://localhost:8080/q/swagger-ui/ or you can execute the curl command in the separate console window:
curl -X POST "http://localhost:8080/greetings" -H "accept: */*" -H "Content-Type: application/json" -d "{"input":"some value"}"
As you can see, this command has parameter input with some value. This parameter is our Process Variable which will be later passed to our Custom Task! When you trigger our greetings REST API in the console with running the Quarkus project you will see the following output:
Hello from the custom work item definition.
Passed parameters:
Message = some value
TaskName = CustomTask
Result is = Message Returned from Work Item Handler
As you can see, our Custom task was executed and our input parameters were passed correctly. Also, the result returned to the process and printed by the Script task also without any issues.
I hope you enjoyed the reading! And now it will be easy for you to add your custom tasks with custom appearance and behavior to the Kogito projects. Full code of the example you can find here.
The post Simplest Custom Tasks in Kogito appeared first on KIE Community.