Running multi Workbench modules on the latest IntelliJ Idea with live reloading (client side)
Blog: Drools & jBPM Blog
NOTE: The instructions below apply only to the old version of the gwt-maven-plugin
At some point in the past, IntelliJ released an update that made it impossible to run the Workbench using the GWT plugin. After exchanging ideas with people on the team and summing up solutions, some workarounds have emerged. This guide provides information to running any Errai-based applications in the latest version of IntelliJ along with other modules to take advantage of IntelliJ's (unfortunately limited) live reloading capabilities to speed the development workflow.
Table of contents
1. Running Errai-based apps in the latest IntelliJ
2. Importing other modules and use live reload for client side code
3. Advanced configurations
3.1. Configuring your project's pom.xml to download and unpack Wildfly for you
3.2. Alternative workaround for non-patched Wildfly distros
1. Running Errai-based apps in the latest IntelliJ
As Max Barkley described on #logicabyss a while ago, IntelliJ has decided to hardcode gwt-dev classes to the classpath when launching Super Dev Mode in the GWT plugin. Since we're using the EmbeddedWildflyLauncher to deploy the Workbench apps, these dependencies are now deployed inside our Wilfdfly instance. Nothing too wrong with that except the fact that gwt-dev jar depends on apache-jsp, which has a ServletContainerInitializer marker file that causes the deploy to fail.
To solve that issue, the code that looks to the ServletContainerIntitilizer file and causes the deploy to fail was removed in custom patched versions of Wildfly that are available in Maven Central under the org.jboss.errai group id.
The following steps provide a quick guide to running any Errai-based application on the latest version of IntelliJ.
1. Download a patched version of Wildfly and unpack it into any directory you like
- For Wildfly 11.0.0.Final go here
2. Import the module you want to work on (I tested with drools-wb)
- Open IntelliJ, go to File -> Open.. and select the pom.xml file, hit Open then choose Open as Project
3. Configure the GWT plugin execution like you normally would on previous versions of IntelliJ
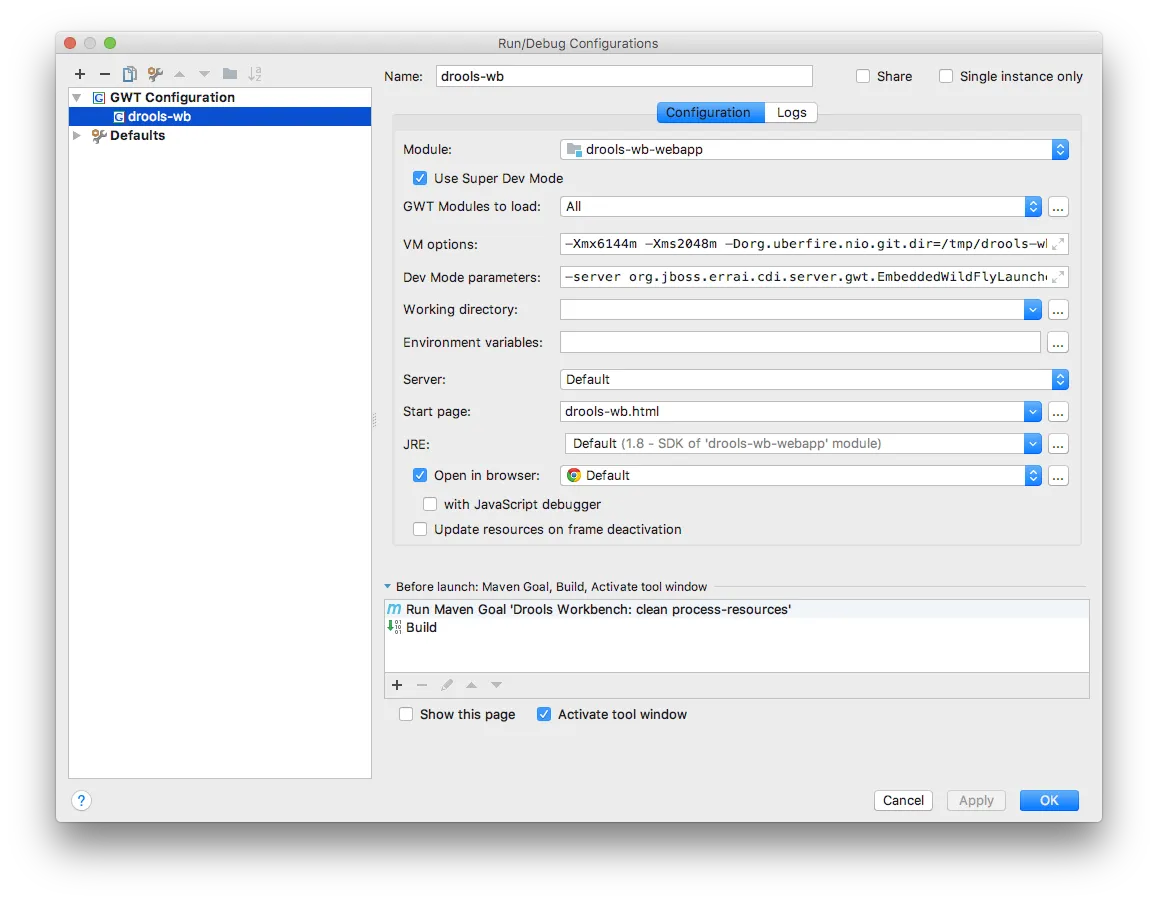
- VM Options:
-Xmx6144m
-Xms2048m
-Dorg.uberfire.nio.git.dir=/tmp/drools-wb
-Derrai.jboss.home=/Users/tiagobento/drools-wb/drools-wb-webapp/target/wildfly-11.0.0.Final
- Dev Mode parameters:
-server org.jboss.errai.cdi.server.gwt.EmbeddedWildFlyLauncher
4. Hit the Play button and wait for the application to be deployed
2. Importing other modules and using live reload for client side code
After being able to run a single webapp inside the latest version of IntelliJ, it might be very useful to have some of its dependencies be imported as well, so that after changing client-code on that dependency, you don't have to wait (way) too long for GWT to compile and bundle your application's JavaScript code again.
Simply go to File > New > Module from existing sources.. and choose the pom.xml of the module you want to import.
If you have kie-wb-common or appformer imported alongside with another project, you'll most certainly have to apply a patch in the beans.xml file of your webapp.
For drools-wb you can download the patch here. For other projects such as jbpm-wb, optaplanner-wb or kie-wb-distributions, you'll have to essentially do the same thing, but changing the directories inside the .diff file.
If your webapp is up, hit the Stop button and then hit Play again. Now you should be able to re-compile any code changed inside IntelliJ much faster.
3.1. Configuring your project's pom.xml to download and unpack Wildfly for you
If you are used to a less manual workflow, you can use the maven-dependency-plugin to download and unpack a Wildfly instance of your choice to any directory you like.
After you've added the snipped below to your pom.xml file, remember to add a "Run Maven Goal" before the Build of your application in the "Before launch" section of your GWT Configuration. Here I'm using the process-resources phase, but other phases are OK too.
<plugin>
<groupId>org.apache.maven.plugins</groupId>
<artifactId>maven-dependency-plugin</artifactId>
<executions>
<execution>
<id>unpack</id>
<phase>process-resources</phase>
<goals>
<goal>unpack</goal>
</goals>
<configuration>
<artifactItems>
<artifactItem>
<!-- Using a patched version of Wildfly -->
<groupId>org.jboss.errai</groupId>
<artifactId>wildfly-dist</artifactId>
<version>11.0.0.Final</version>
<type>zip</type>
<overWrite>false</overWrite>
<!-- Unpacking it into /target/wildfly-11.0.0.Final -->
<outputDirectory>${project.build.directory}</outputDirectory>
</artifactItem>
</artifactItems>
<skip>${gwt.compiler.skip}</skip>
</configuration>
</execution>
</executions>
</plugin>
3.2. Alternative workaround for non-patched Wildfly distros
If you want to try a different version of Widlfly or if you simply don't want to depend on any patched versions, you can still use official distros and exclude the ServletContainerInitializer file from the apache-jsp jar on your M2_REPO folder.
If you're working on a Unix system, the following commands should do the job.
1. cd ~/.m2/repository/
2. zip -d org/eclipse/jetty/apache-jsp/{version}/apache-jsp-{version}.jar META-INF/services/javax.servlet.ServletContainerInitializer
By excluding it manually from the apache-jsp jar, Maven won't try to download it again after you remove the file. That makes this workaround permanent as long as you don't erase your ~/.m2/ folder. Keep in mind that if you ever need the apache-jsp jar to have this file back, the best option is to delete the apache-jsp dependency directory and let Maven download it again.
New instructions for the new version of the gwt-maven-plugin are to come, stay tunned!