OIC Connectivity Agent Installation Pointers by Greg Mally
Blog: PaaS Community

The connectivity agent has been a feature of Oracle’s integration cloud strategy from the beginning to address the challenge of the cloud/on-premise integration pattern. However, the implementation of the agent differs between Oracle Integration Cloud Service (ICS) and Oracle Integration Cloud (OIC). With both offerings, the pattern for setup remains the same:
- 1. Create Agent Group in ICS/OIC Console
- 2. Download the connectivity agent installer
- 3. “Install” the agent on an on-premise machine using the Agent Group ID from step 1 (this registers the agent with ICS/OIC)
- 4. Verify that the agent is communicating with ICS/OIC via the integration console
However, step 3 differs dramatically between ICS and OIC. With ICS, the installation process resulted in a WebLogic Server (WLS) Single-Server configuration (i.e., all-in-one WLS server). Although the setup for the ICS agent has been optimized for an easy installation experience, the end result is fairly heavyweight. Now looking at how the agent is installed on OIC, it is simply a jar file that is kicked off using java -jar connectivityagent.jar. The end result is “behavior wise” is the same, but the footprint and experience from a setup/configuration perspective is radically different. The rest of this blog will focus on what happens when the OIC agent is “installed” and details that may not be obvious from the on-line documentation that can result in some “why does this not work” head scratching.
OIC Connectivity Agent High-Level Installation Steps
- 1. Create an Agent Group in the OIC Console
- 2. Download the Connectivity Agent zip file from the OIC Console
- 3. Unzip the contents of the zip file on the on-premise agent machine
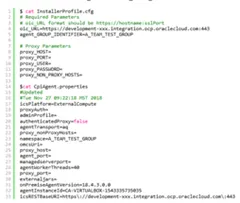
- 4. Update the InstallerProfile.cfg with the details of the OIC environment and on-premise network
- 5. Run the agent using java -jar connectivityagent.jar
Please refer to the OIC Connectivity Agent on-line documentation for the details associated with the steps mentioned above.
OIC Connectivity Agent Installation Experience
Once the zip file is downloaded from the OIC console and unzipped on the agent machine, you will see something like the following directory structure (as of 18.4.3): Read the complete article here.
For regular information on Oracle PaaS become a member in the SOA & BPM Partner Community for registration please visit www.oracle.com/goto/emea/soa (OPN account required) If you need support with your account please contact the Oracle Partner Business Center.
![]() Blog
Blog ![]() Twitter
Twitter ![]() LinkedIn
LinkedIn ![]() Facebook
Facebook ![]() Wiki
Wiki
Technorati Tags: SOA Community,Oracle SOA,Oracle BPM,OPN,Jürgen Kress