

Mastering Confluent Schema Registry
Blog: Smile - Le blog des consultants
Part 1: What is Schema Registry
This article is part of a series of articles on Schema Registry. The purpose of this serie is to describe how to implement and use the Confluent Schema Registry to serialize and deserialize Kafka messages with schema validation.

What is Schema Registry?
The Schema Registry component is an open-source component initially developed by Confluent (the original creators of Apache Kafka® found confluent). It’s a shared repository of schemas that allows centralized management of a data platform’s schemas and, therefore, better data governance. These schemas are used in the process of serialization and deserialization of messages by the platform’s clients.
The Schema Registry design principle is to provide a way to tackle the challenges of managing and sharing schemas between components. In such a way, the schemas are designed to support evolution. A consumer and producer can understand different versions of those schemas but still read all information shared between both versions and safely ignore the rest.
Schema Registry Concepts
Each schema in Schema Registry is saved (registered) under a subject. A subject can be seen as a scope in which schemas can evolve.
A Schema stored in Schema Registry is composed of 4 fields:
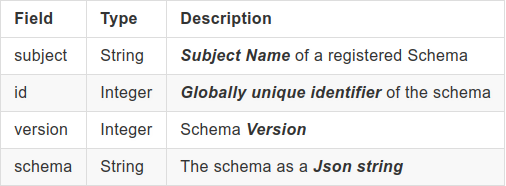
Subject
Each message published in Kafka is a key-value pair. Either we can use a schema to validate the message key, the message value, or both.
Imagine that we want to check that the data associated with the key and the value of a message conforms to a specific format, one for the key and another for the value.
To do this, we define two separate schemas, a schema key and a schema value. Then, to enable schema validation of data, we must register these schemas in the Schema Registry.
In Schema Registry, the schemas are registered under a Subject. Each Subject can contain several schemas, but the Subject name has to be unique.
When a schema is registered, Schema Registry checks whether there is already a version of that schema. If so, a new version of the schema is added to the Subject name that references the already previous saved schema.
The relation between a Topic and a schema (producers and consumers schema validation) is done by computing the subject’s name (in which the schema is saved) from the Topic name, some schema elements, and the selected naming strategy.
Three Subject naming strategies are supported:
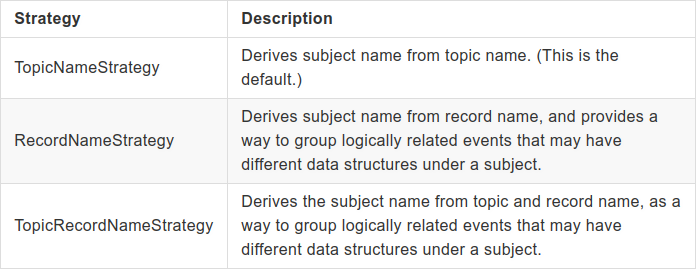
Suppose we have defined two schemas (one for the key and another for the value of the message) and two topics: my-topic-avro and my-topic-json. Let’s see how it works in practice:
Note:
To serve as an example (they are also used in code samples), I have defined several small schemas designed to store information about actors from TV series of the 1970s-1980s!
Avro (my-topic-avro)
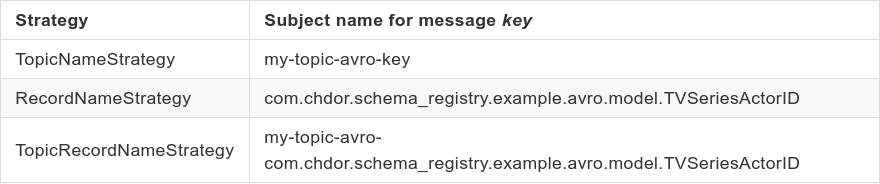
- Schema of key (TVSeriesActorID):
{"type":"record",
   "name":"TVSeriesActorID",
   "namespace":"com.chdor.schema_registry.example.avro.model",
   "fields":
    [
      {"name":"id","type":"int"}
    ]
}
Key subject naming :
- Schema of value (TVSeriesActor1.avsc):
{ "namespace": "com.chdor.schema_registry.example.avro.model",
  "type": "record",
  "name": "TVSeriesActor",
  "fields":
   [ {"name": "firstName","type": "string"},
     {"name": "lastName","type": "string"},
     {"name": "tvShow","type": "string"}
   ]
}
Subject naming:

JSON
- Schema of key (TVSeriesActorID.json):
{ "$schema":"http://json-schema.org/draft-07/schema#",
  "title":"TVSeriesActorID",
  "type":"object",
  "additionalProperties":false,
  "properties":
  {"id" : {"type" : "integer"}}
}
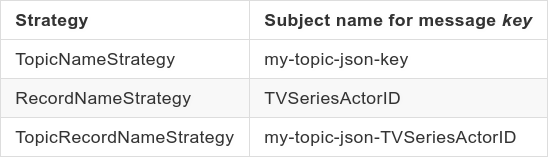
Key subject naming:
- Schema of value (TVSeriesActor1.json):
{ "$schema":"http://json-schema.org/draft-07/schema#",
  "title":"TVSeriesActor",
  "type":"object",
  "additionalProperties":false,
    "properties" :
     {
       "lastName" : {"type" : "string"},
       "firstName" : {"type" : "string"},
       "tvShow" : {"type" : "string"}
     }
}
Value subject naming:
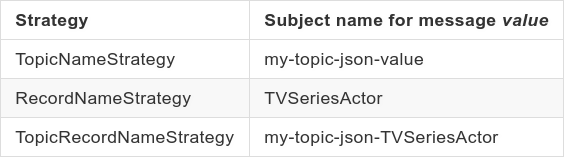
As we can see, the Subject name is constructed in:
- TopicNameStrategy by concatenating the topic name with “-key” or “-value.”
- RecordNameStrategy by concatenating the namespace+name fields for AVRO and title field for JSON.
- TopicRecordNameStrategy by concatenating the topic name with the RecordNameStrategy.
Any supporting Subject names are allowed for the AVRO name field value and the JSON title field value. For example, if the name/title field has space characters, then the subject name.
This Subject naming strategy behavior can be modified by programming through Producer/Consumer configuration properties settings. These properties are KEY_SUBJECT_NAME_STRATEGY for the message key naming strategy and VALUE_SUBJECT_NAME_STRATEGY for the message value naming strategy.
To do this they have to be set with one the following Java classes (depending of the Subject naming selected):
- io.confluent.kafka.serializers.subject.TopicNameStrategy
- io.confluent.kafka.serializers.subject.RecordNameStrategy
- io.confluent.kafka.serializers.subject.TopicRecordNameStrategy
Version
An important aspect of data management is schema evolution.
After the initial schema is defined, applications may need to evolve it over time. When this happens, the downstream consumers must handle data encoded with both the old and the new schema seamlessly.
To serve this functionality, Schema Registry uses schemas version revision management.
In our schemas evolve and change, we need to add (register) different schemas versions. Before adding a new version of a schema, Schema Registry checks whether the new schema is compatible with the old ones previously registered under the Subject.
This compatibility is managed through the Schema Registry compatibility parameter.
We can set seven compatibility types:
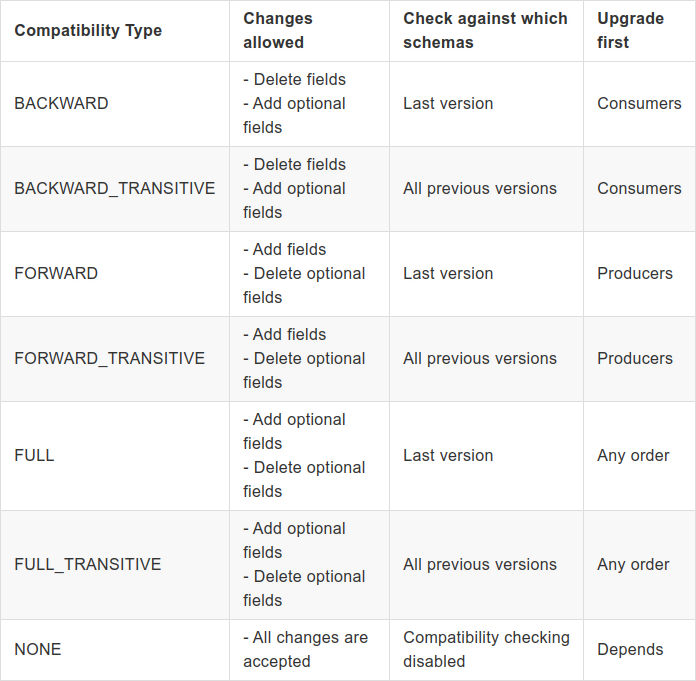
We can set the compatibility type for each schema type supported by Schema Registry (AVRO, JSON Schema, and protobuf). That’s mean that compatibility mode is unique and can be different for Schemas, allowing multiple compatibility rules simultaneously. So you can have your AVRO schemas evolve in a backward-compatible manner, and your JSON schemas evolve in a forward-compatible manner.
Schema Type
Schema Registry supported the following Schema format:
- Avro Schema
- JSON Schema
- Protobuf
Schema Reference
Confluent Schema Registry allows Schema reference, which is a schema’s ability to refer to other schemas.
A schema reference consists of the following:
- name (String): For AVRO, the reference name is the fully qualified schema name. For JSON, it is a URL, and for Protobuf, it’s the name of another Protobuf file.
- subject (String): Name of the Subject under which the referenced schema is registered.
- version (Integer): The reference schema version.
Mode
The mode parameter defines which operations are allowed on schemas.
Three modes are available:
- IMPORT: This parameter allows you to import a schema and specify its id and its version.
- READONLY
- READWRITE
We can set the mode at a global level (for all subjects) or on a specific subject.
To enable mode changes on Schema Registry, you have to set the following properties in the Schema Registry properties file before starting it:
mode.mutability=true
Environment Setup
To test and use the Confluent Schema Registry features, you need to install the Confluent Platform. Two versions are available, a commercial version and a community version. I chose the community version because although it has some restrictions (see Confluent Community License FAQ), it’s free of charge.
My test environment is:
- Operating system: Ubuntu 18.04.5 LTS, 64 bits (you can also use a more recent version like Ubuntu 20.04.2 LTS 64 bits)
- Memory: 8 Go
- Storage: 10–20 Go
At the time of writing, the last Confluent Platform version available is 6.1.1. Two distributions are offered, a Docker distribution and a Tar distribution. In these examples, and because it’s a lighter solution, I chose the Tar distribution and configured a single node with a single Kafka broker (In the case of a Kafka Brokers Cluster, apart from the configuration, the code is almost the same).
- Download the Confluent Platform Community Edition:
curl -O http://packages.confluent.io/archive/6.1/confluent-community-6.1.1.tar.gz
- Extract the contents of the archive:
tar xzvf confluent-community-6.1.1.tar.gz
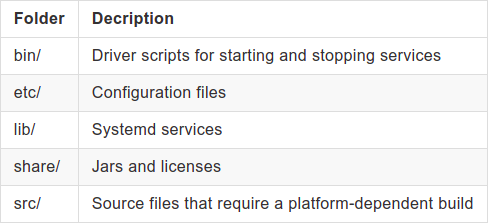
In ~/confluent-6.1.1 you should have these directories:
Components Configuration
In the following examples, we define the Confluent Platform installation directory (for example: /home/confluent/opt/confluent-6.1.1) as CONFLUENT_HOME.
- Configure Zookeeper
For a single node configuration, you can use the zookeeper.properties file as-is.
However, if you want to change some values like the directory where the snapshot is stored, the file is located in:
cd $CONFLUENT_HOME/etc/kafka
vi zookeeper.properties
- Configure the Kafka Broker:
cd $CONFLUENT_HOME/etc/kafka
// Just in case, make a backup of the file
cp server.properties server.properties.backup
Edit server.properties and made the following changes (in the corresponding sections):
# listeners=PLAINTEXT://<FQDN or IP of your host>:9092
listeners=PLAINTEXT://localhost:9092
# zookeeper.connect=<FQDN or IP of your host>:2181
zookeeper.connect=localhost:2181
Once modified, save it.
- Configure Schema Registry
cd $CONFLUENT_HOME/etc/schema-registry
// Just in case, make a backup of the file
cp schema-registry.properties schema-registry.properties.backup
Edit schema-registry.properties and made the following changes (in the corresponding sections):
# listeners=http://<FQDN or IP of your host>:8081
listeners=http://localhost:8081
# Schema Registry can now operate without Zookeeper, handling all
# Schemas coordination via Kafka brokers.
# You can add how many hosts (comma separated) your cluster have.
# kafkastore.bootstrap.servers=PLAINTEXT://<FQDN or IP of your broker host>:9092
kafkastore.bootstrap.servers=PLAINTEXT://localhost:9092
mode.mutability=true
Once modified, save it.
Components Starting
Perform the following commands to start and running our test environment:
- Start Zookeeper
Run this command in its own terminal:
cd $CONFLUENT_HOME
bin/zookeeper-server-start etc/kafka/zookeeper.properties
If everything is working fine you should see: INFO binding to port 0.0.0.0/0.0.0.0:2181 (org.apache.zookeeper.server.NIOServerCnxnFactory)
- Start Kafka Broker
Run this command in its own terminal:
cd $CONFLUENT_HOME
bin/kafka-server-start etc/kafka/server.properties
If everything is working fine, you should see: INFO [KafkaServer id=0] started (kafka.server.KafkaServer)
- Start Schema Registry
Run this command in its own terminal:
cd $CONFLUENT_HOME
bin/schema-registry-start etc/schema-registry/schema-registry.properties
If everything is working fine, you should see: INFO Server started, listening for requests…
That’s all, folks!
🥳 That’s it for this first part. You now have a working single node single Kafka broker with Schema Registry enabled.
👂 Stay tuned for the second part, in which we will explore the management of AVRO and JSON schemas.
Did you enjoy it? If so, don’t hesitate to 👏 our article or subscribe to our Innovation watch newsletter! You can follow Smile on Facebook, Twitter & Youtube.
This series “Mastering Confluent Schema Registry” consists of three articles:
- Overview of Schema Registry, description of its concepts, and environment setup
- Management and manipulation of AVRO Schemas and JSON Schemas
- Code Sample
Mastering Confluent Schema Registry was originally published in Smile Innovation on Medium, where people are continuing the conversation by highlighting and responding to this story.
Leave a Comment
You must be logged in to post a comment.