Linking Workflows: How to Connect Master and Detail Processes in Imixs Office Workflow
Blog: IMIXS-WORKFLOW Blog
When modeling business processes, you quickly run into a very common challenge: one workflow is not enough. Real-world operations are made up of interconnected processes — and forcing everything into a single monolithic workflow creates complexity that is hard to maintain and even harder to reuse.
Imixs Office Workflow solves this elegantly with the concept of ‘Master and Detail Processes‘, also called Workitem Linking. It lets you model separate, focused workflows and connect them at runtime — without writing a single line of code.
The Master–Detail Pattern
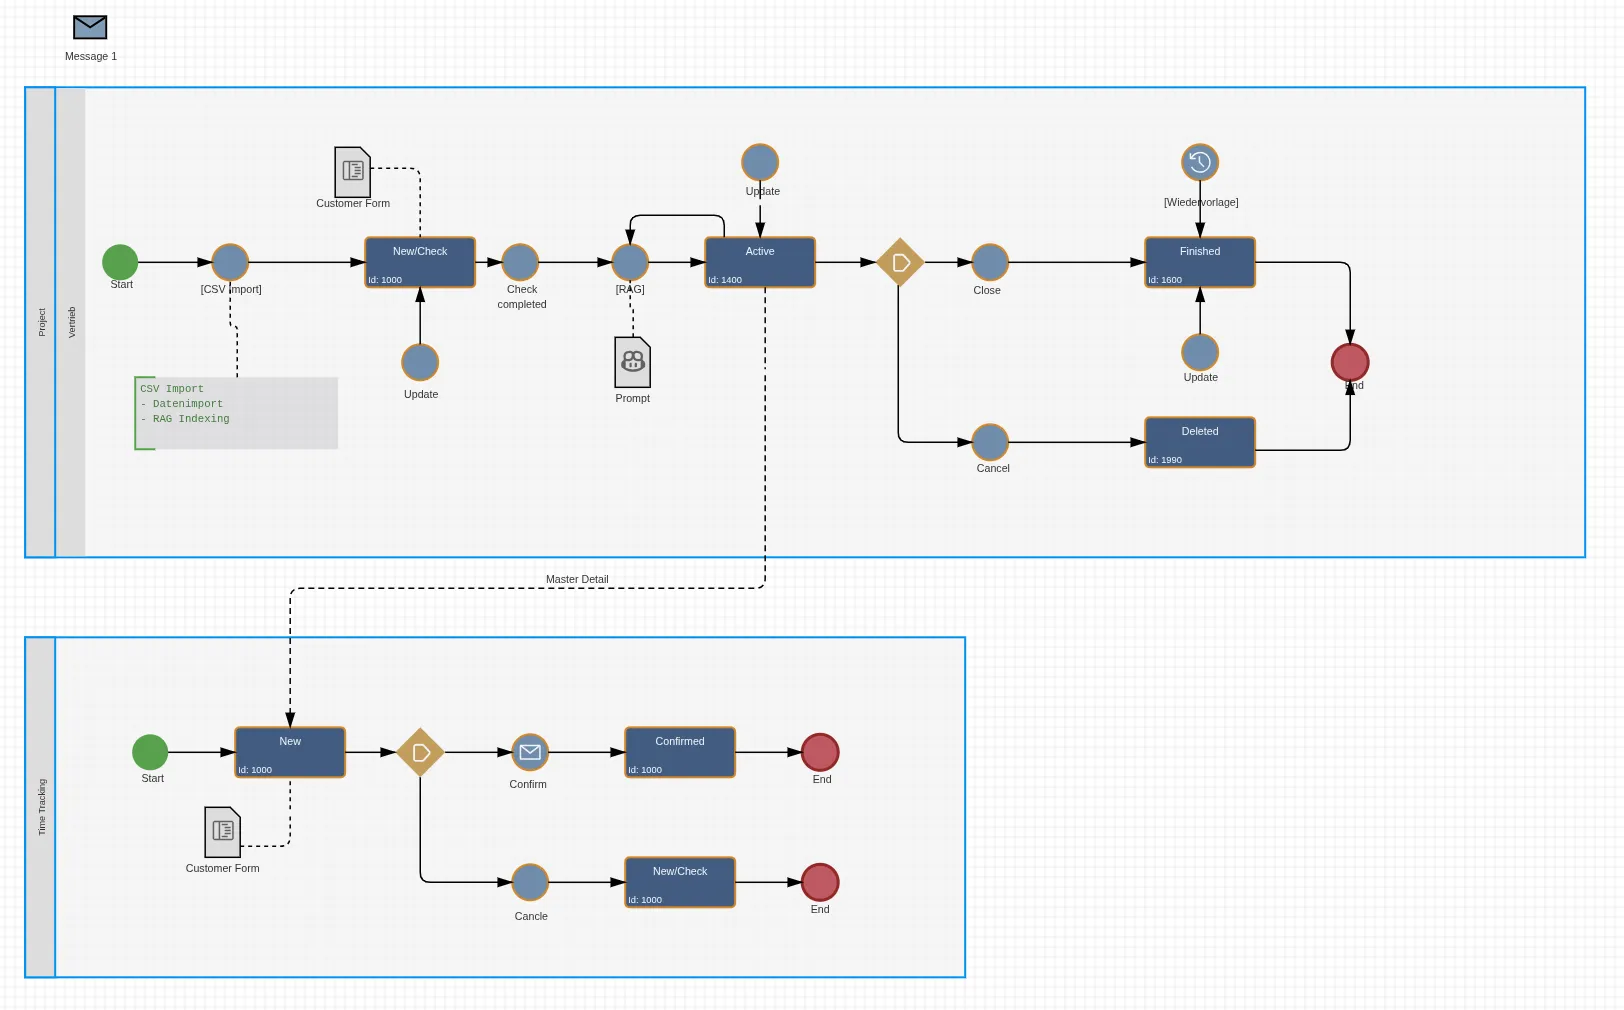
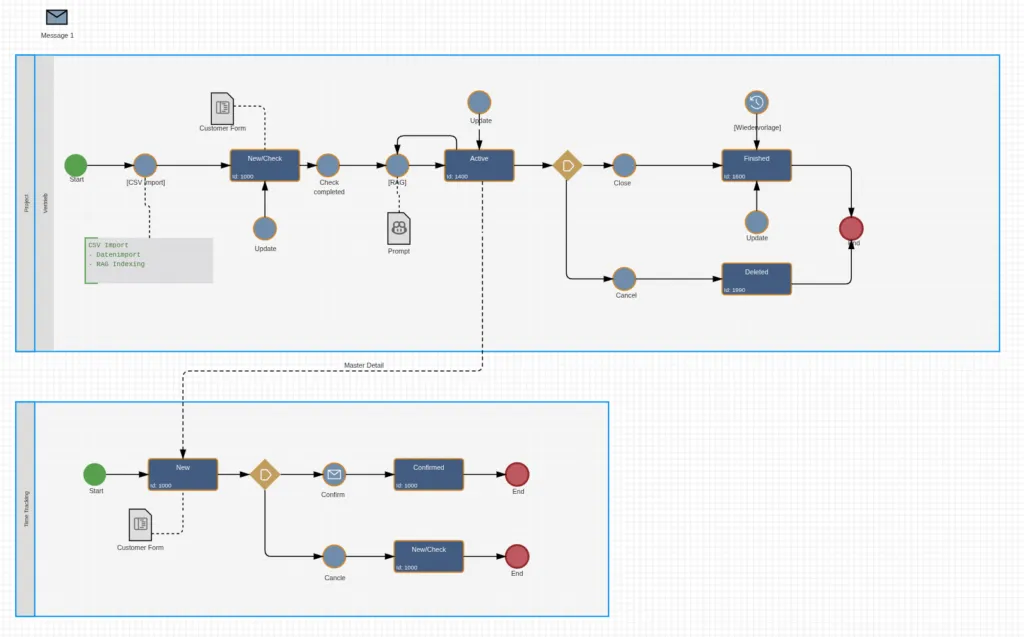
Think of a classic business scenario: you manage customer projects. Each project goes through an approval process — it gets created, reviewed, and eventually signed off. That’s your master workflow.
Now you also need time tracking. Employees log their hours against a specific project. Each time entry is its own process instance — it can be created, reviewed, and billed independently. That’s your detail workflow.
The relationship between them is clear:
- One project → many time entries
- Each time entry belongs to exactly one project
This is the master–detail pattern, and it appears everywhere in business operations:
| Master Workflow | Detail Workflow |
|---|---|
| Customer Project | Time Tracking Entry |
| Sales Opportunity | Activity / Call Log |
| Contract | Invoice |
| Purchase Order | Delivery Note |
Modeling the Connection — No Code Required
The key insight in Imixs Office Workflow is that you don’t need to change your master workflow at all. You simply model the detail workflow independently — either in the same BPMN model as a separate pool, or in a completely separate model. Both approaches work equally well.
The connection is established purely through a form element in the detail workflow. In your time tracking form, you add a single item declaration:
<item name="project.ref"
      type="custom"
      path="workitemlink"
      readonly="false"
      options="$workflowgroup:Project"
      label="Project:" />
That’s it. This form element renders a smart search widget that lets the user find and select a project from the running workflow instances. The options attribute acts as a filter — here it restricts the search to workitems belonging to the workflow group Project, so users only see relevant entries.

The selected project’s unique ID is stored in the item project.ref, creating a persistent link between the time entry and its parent project.
Outbound and Inbound Links
Workitem Linking works in both directions:
Outbound links (from detail → master) are what you just saw: the time tracking entry holds a reference to its project. You can display these as a simple list or in a table layout using workitemlink_outbound_table:
<item name="project.ref"
      type="custom"
      path="workitemlink_outbound_table"
      options="($workflowgroup:Project)"
      label="Linked Project" />
Inbound links (from master → detail) are the reverse view: on the project, you can display all time entries that point back to it. These are resolved dynamically via the Lucene index — no stored back-references needed. Use workitemlink_inbound or workitemlink_inbound_table on the project form:
<item
      type="custom"
      path="workitemlink_inbound_table"
      options="($workflowgroup:TimeEntry)"
      label="Time Entries" />
This gives users a live, always-up-to-date view of all related records directly inside the master workitem.
Visualizing the Data with DataViews
Beyond showing linked records inside a single form, you can also build DataViews — dedicated dashboards and list views that aggregate linked data across your entire platform. For example, a project manager could open a project and immediately see a summary table of all logged hours, grouped by employee or date.
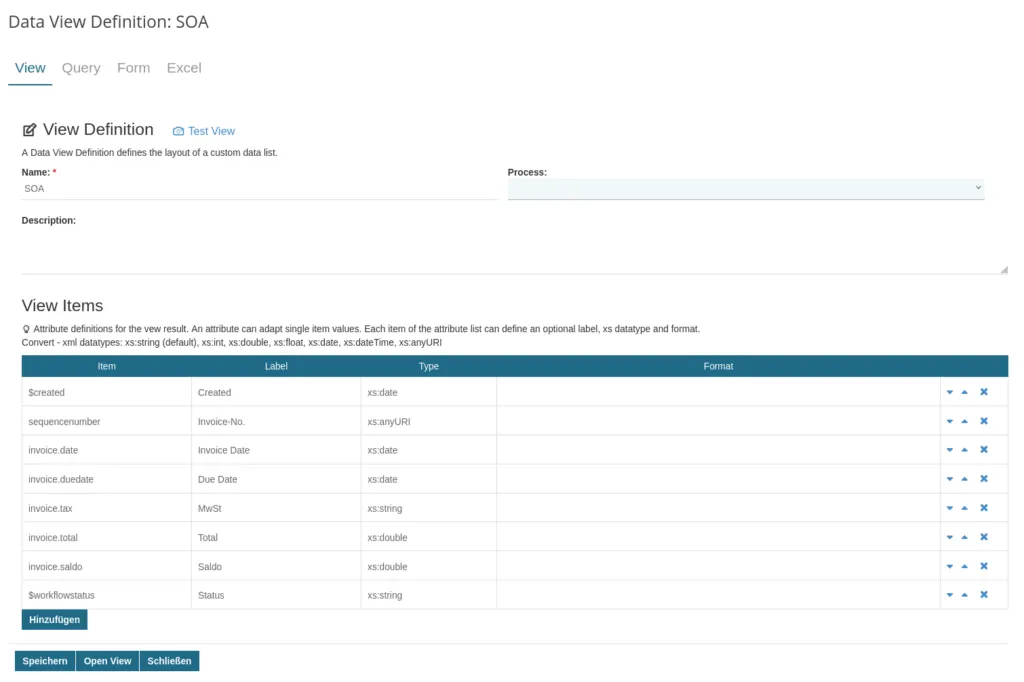
The Imixs DataViews sub-project provides exactly this capability, letting you build rich cross-workflow views without custom development.
Copying Data Between Linked Workitems
Sometimes you need more than just a reference — you want to copy specific data from the master into the detail workitem at the moment of linking. For example, when a time entry is linked to a project, you might want to automatically pull in the customer name or project number.
This is handled by the WorkitemLinkPlugin:
<workitemlink name="copydata">
    <ref>project.ref</ref>
    <items>project.name, customer.number</items>
</workitemlink>
You can also use regular expressions to copy entire groups of fields at once:
<items>(^project\.)</items>This copies all items whose name starts with project. — keeping your data consistent across linked processes automatically.
Why This Approach Works
The beauty of Workitem Linking is in what it doesn’t require:
 No custom Java code — the link is established entirely through form configuration
- No schema changes — links are resolved dynamically at query time via the index
- No tight coupling — each workflow remains independently modelable and deployable
- Flexible placement — detail workflows can live in the same BPMN model or a separate one
You keep each process clean and focused on its own responsibility, while still enabling rich relationships between them at runtime.
Getting Started
To implement Workitem Linking in your own processes:
- Model your workflows — create your master and detail workflows independently in the Imixs BPMN Modeler
- Add the link element to your detail workflow’s form definition using the
workitemlinkcustom part - Optionally add an inbound view to your master workflow’s form to display related records
- Create DataViews for platform-level reporting and dashboards
For a full reference of all form elements and configuration options, see the Workitem Linking documentation and the Forms overview.
Workitem Linking turns Imixs Office Workflow into a genuine process platform — not just a place to run isolated workflows, but a connected environment where your business processes reflect the real relationships between your business objects.