Laravel Workflow Automation Tutorial
Blog: ProcessMaker Blog
Organizations can automate several manual processes or activities using predefined rules or criteria, known as workflow automation. It can help save money and time by reducing the resources and time spent on a project. Business innovation moves more quickly now because of the rapid advances in technology. As a result, process optimization has become increasingly vital.
In addition, a business’s capacity to respond swiftly and data-driven to market developments or consumer requests might be hampered by outdated manual processes inefficiencies. Thus, many businesses will use workflow automation in 2021 and beyond to keep their digital workflows structured and flexible.
Deploy digital workflow automation with Laravel workflow
Using Laravel workflow design, all you’ll have to tackle is the more esoteric idea of how it will appear to your intended audience. Setting up a consistent process is all about making it easier for your team to improve the customer experience. You can find the workflow package on Github.
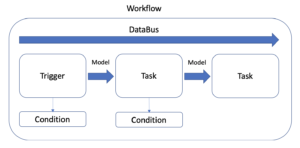
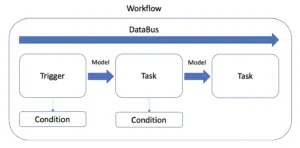
The laravel workflow tool contains triggers and tasks. Fortunately, all of your workflow deployments are logged. Thus, you can always evaluate and review your previous workflows.
What’s crucial to the Laravel tool is the Data Bus, which sends data between tasks. Also, you can save or modify your data throughout your workflow.
What is a trigger? A trigger initiates your workflow while the Task is a component of your workflow and it executes the code you enter.
Remember, every Trigger and Task will have a Condition. Hence, the Conditions set the parameters and rules for every Trigger and Task.
Let’s move on with a straightforward tutorial below:

Let’s use the example of transmitting welcome emails to new subscribers as part of your onboarding process.
Begin by clicking on “Observer Trigger.” You’ll notice “Observer Trigger Settings” pop up.
Under “Description” you’ll see “New User Created”
Beneath “Class” select “From Direct Input” in the first box and “User” in the second box.
Below “Event” choose “From Direct Input” in the first box and “created” in the second box.
Next, the “Input Task” will transcribe the content for your onboarding email.
Under “Description” type “Welcome Email Text.”
Beneath “HTML,” select “From Direct Input.”
Now, you can type whatever text is relevant to onboarding your new subscribers.
Beneath “HtmlOutput” select “mail_content.”
Click on “Save.”
It’s time to work on the “Send Mail Task.”
Within the “Send Mail Settings” write “Send Email to New Subscriber” under the “Description” box.
In the “Subject” box, select “From Direct Input” and your welcome message in the second box.
Under “Recipients” select “From Model” in the first box and “AppUser->email” in the second box.
Beneath “Sender” type “From Direct Input” in the first box and your email address or webpage URL in the second box.
Under “Content” select “From Workflow” for the first box and “HtmlInput – HtmlOutput – mail_content” from the second box.
Click on “Save.”
Frequently, when executing critical onboarding or other business processes, whether sending personalized emails or following up with a strategic prospect requires many repetitive and redundant tasks. Achieving these objectives on time is challenging when it comes to manual activities performed by staff. Fortunately, workflow automation can help with this. For instance, when a prospect opens your email and clicks on your desired webpage, where they may claim an offer you’ve made, your workflow automation is activated.
The post Laravel Workflow Automation Tutorial appeared first on ProcessMaker.