How To Document Client Processes (Without Losing Your Mind)
Blog: Blog | Process Street | Compliance Operations Platform

If you run an agency, a consulting practice, or a freelance shop, sooner or later you have to document a client’s processes. Onboarding flows, intake checks, delivery handoffs, monthly reporting, the unglamorous middle of the work that keeps the relationship alive. The trouble is that those processes never sit cleanly inside your own four walls. They live half in your head, half in your client’s head, and half in a shared doc that nobody opens after week three.
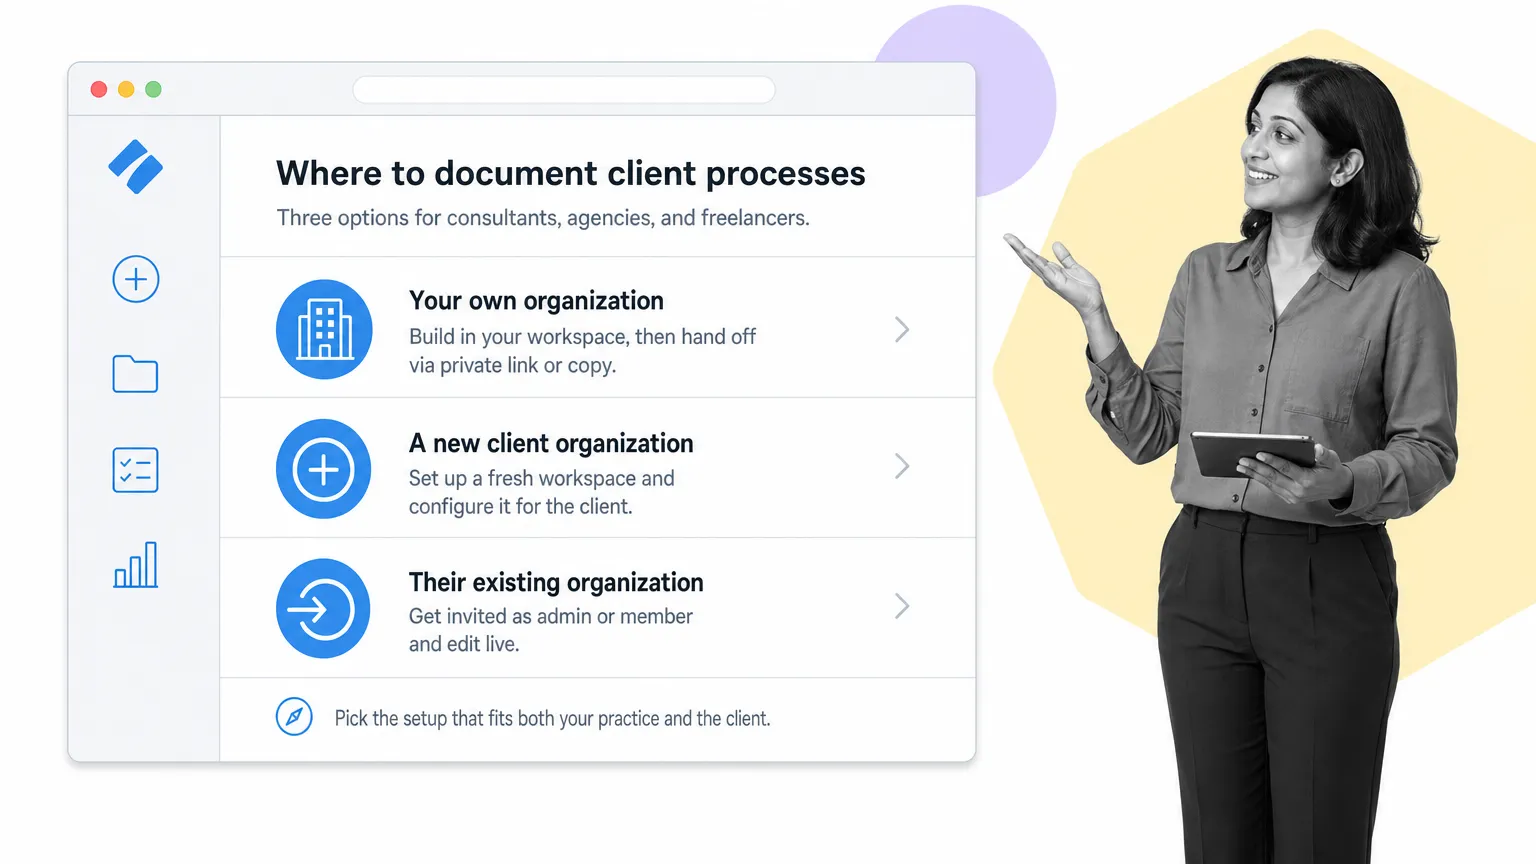
This is the heart of our consultant’s guide to Process Street: how to capture client processes inside BPM software, hand them off cleanly, and make sure they actually get used after you walk away. By weighing the trade-offs of the three places you can do that work, you can pick the setup that fits your practice and your client’s reality.
I’ll cover the methods, advantages, and disadvantages of:
- Documenting client processes in your own Process Street organization before handing them off
- Setting up a new organization in the app to later hand off the whole thing
- Accessing and working inside a client’s existing Process Street organization
I’ll also cover how to actually document those workflows (whether you build from scratch or start from a premade workflow), how to collaborate with clients without slowing them down, how to hand off business processes, and when to wire up integrations and automations.
Using your own organization
Creating workflows in your own organization before handing them off is a double-edged sword.
On one hand, it makes building checklist templates easier because you don’t have to switch between organizations to access them, and you don’t have to worry about getting permission from the client to access anything. Plus, if your client has any existing experience with Process Street and can set up their own permissions and integrations, there’s no real need to do anything outside your own organization anyway.
On the other hand, if your client needs help setting up the correct permissions and integrations, you’ll probably have to access their organization anyway. Your only other option would be to create a workflow, copy it into their organization, and then set up integrations and permissions for them, which makes a little more work on your end.
Either way, if you choose to do this and avoid copying the workflow over before it’s finished, you have two options for client collaboration: inviting the client to view your workflow as a member or guest, or privately sharing the workflow with the client.
Inviting clients to your organization
The first way to let your client see a workflow is to invite them into your organization and give them permission to access it. Security risks (even with variable permissions, mistakes are possible) can be kept to a minimum by moving the client’s workflow into a separate folder and only giving the client access to that folder.

The main disadvantage of this method is that as a guest they won’t be able to edit the workflow, and as a member you’ll have to pay for them as part of your organization. That price could be included in your bill to the client, but overall it’s a blunt way to do things.
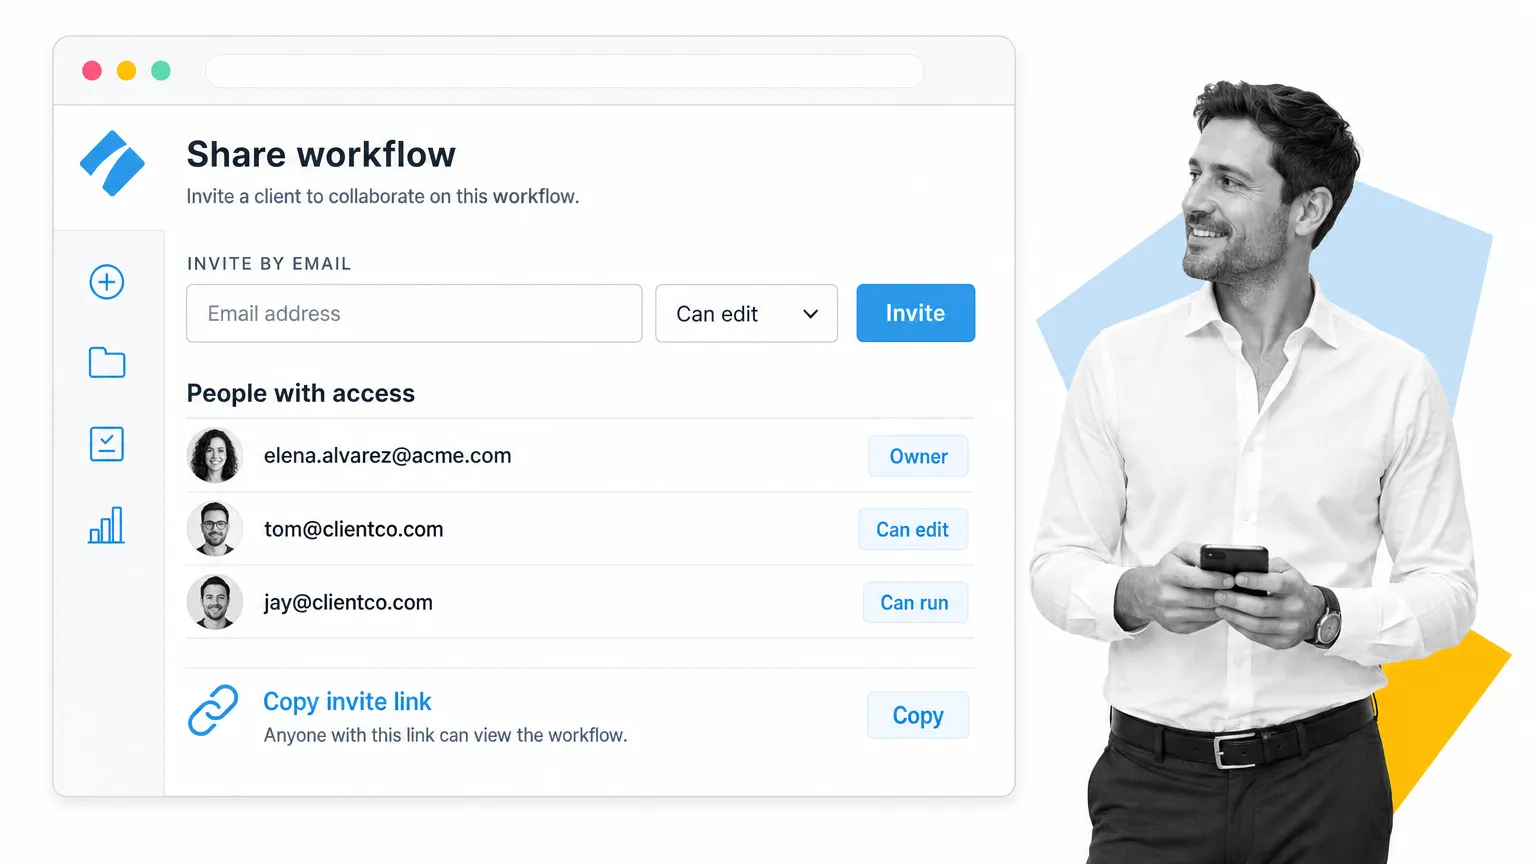
Privately sharing workflows with clients
Alternatively, you could set up a private share link for the workflow and give the client access to view it through that.
Your client won’t even need a Process Street account. With permission set to “Anyone with the link can view,” your client can see the workflow in full, but they won’t be able to start workflow runs (which would only add clutter to your organization).
Again, doing this won’t allow them to edit the workflow, but they will be able to import it into their own organization, so bear that in mind when deciding how far you’ll work with them to build their processes.
For example, if you’re monetizing your workflows by selling them to clients, privately sharing them to show them off would be a bad idea, since the client could just import it for free.
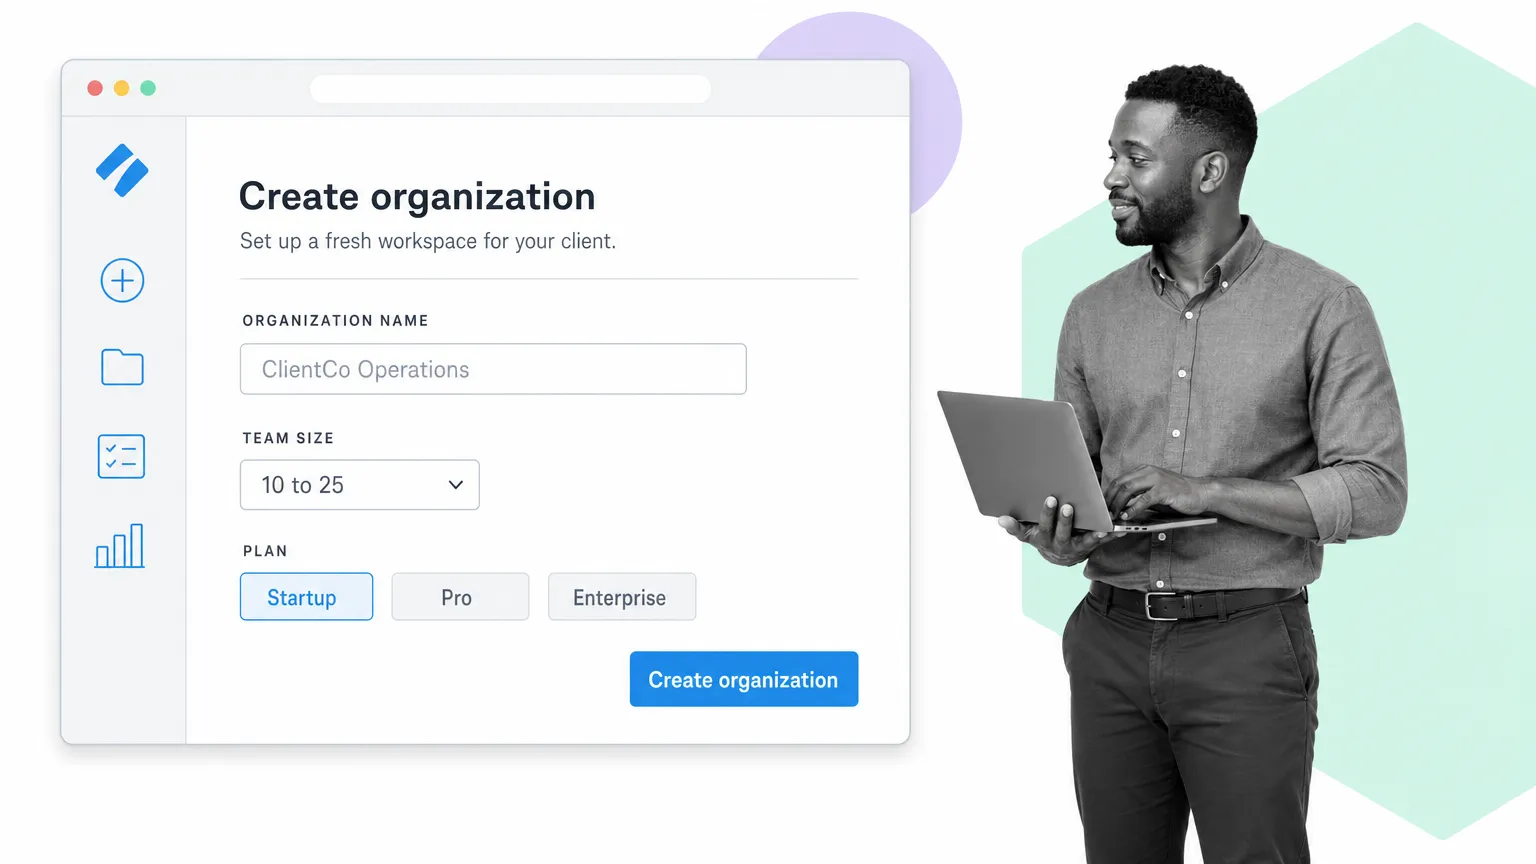
Setting up a new organization
Setting up a new organization to hold your client’s processes is a great way to get everything ready for them if they don’t already have a Process Street account or any documented processes in general.
The main challenge is that you’ll have to build the framework for your client’s organization as well as the actual workflows that populate it. That said, it’s much easier to work directly with your client and collaborate on every detail, since you can both be given access to everything. There’s no sensitive information because everything is being created from scratch.
Plus, remember that pricing is per organization. In other words, you won’t be forced to pay extra by adding clients to your own pricing plan so they can see your workflows. The client can handle their own billing right from the start.
Think of this as the high-touch method to process documentation for clients new to Process Street.
Creating an organization and switching between them
Creating a new organization is easy: click your profile picture in the top right of the app, then click “My Organizations.” After that, click “New Organization,” name it, and confirm.
To switch between your own organization and the new client one, click on your profile picture and then click the name of the organization you want to enter.
Structure folders and sub-folders
The first thing to do is fill out the structure of your client’s organization, and by that I mean creating folders and sub-folders.
I’ve already covered the mechanics back in the basic features of Process Street, so I won’t repeat the method here. Instead, here are some tips on best practices for folders.
From the “Home” dashboard view, create folders for each of your client’s teams, such as HR, Sales, Marketing, Engineering, and so on. Each of those folders can be segmented further with sub-folders, such as an “Onboarding” folder inside HR, or a “Blog” folder inside Marketing.

That way you, your client, and their entire workforce can navigate easily to where they need to be, since it’s all logically divided up.
Configure client permissions
Once the structure is in place, set up your client’s permissions so the relevant teams can access their folders and workflows.
Create groups of users (eg, “Sales team”) to make this easier. Setting up group permissions for your folders means the client can invite their employees to that group without having to fiddle with individual assignments. If someone is part of a group, they share all of that group’s permissions.
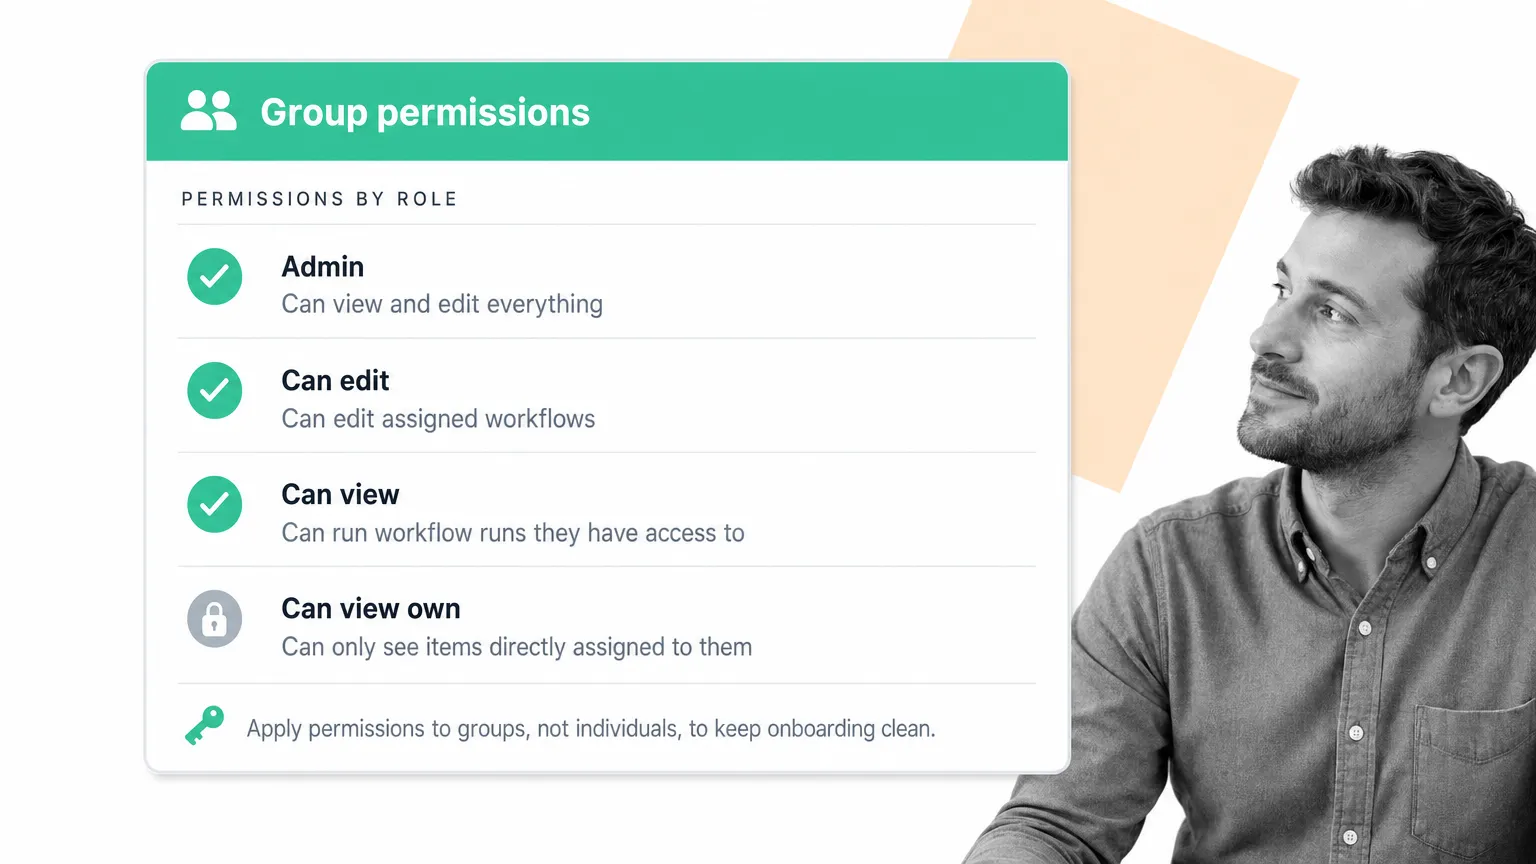
The exception is senior employees, such as managers. They’ll usually need to be assigned to folders individually with different permission levels, since they may need permission to edit the workflows.
A quick recap:
- Admins have access to view and edit everything. These are your senior management figures, co-founders, and CEO
- Members and groups with “can edit” can still be limited to not see items that aren’t relevant to them. These are your regular management figures
- Members and groups with “can view” can start workflow runs and see all other workflow runs they have permission to view
- Members and groups with “can view own” can only see items they’re directly assigned to
Knowing this, talk it through with your client and decide which employees should have which permissions, then adjust your folders, sub-folders, groups, and individual permissions accordingly.
Accessing an existing client’s organization
The final way to set up processes for your clients is to have them invite you into their own organization. This is a perfect option for clients who already have experience with Process Street (or similar products), and for anyone whose workflows you’ve set up in the past.
There’s practically no setup required here. All your client has to do is invite you as a member or admin (depending on whether you’re working on a section of their company or the whole thing).
However, doing so will add you to their pricing plan. They will pay for an extra member for as long as you’re a part of their organization.
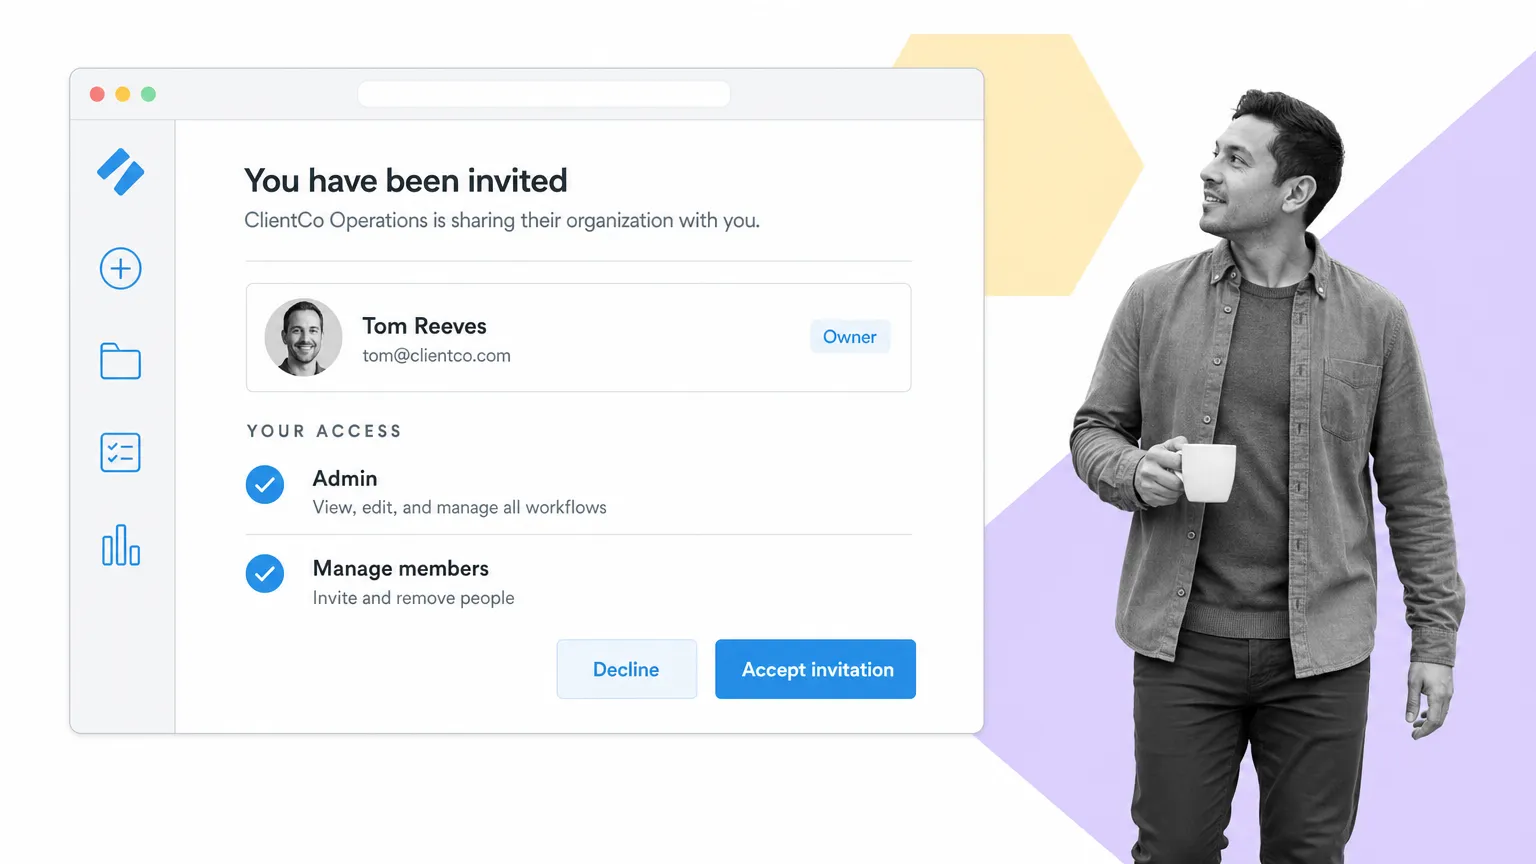
On the upside, you can edit and deploy the client’s workflows in a live environment, which means you can be certain everything works once you’ve finished, including integrations and automations.
When working in a client’s organization you’ll want to handle their workflows in one of three ways:
- Editing existing workflows (good for quick iteration and testing, but potentially dangerous since changes go live directly)
- Editing workflows without clicking “Save changes” (this autosaves your changes as a draft version, so you can review and iterate before deploying them to the live workflow, but all changes will be lost if “Discard changes” is clicked)
- Copying a workflow, editing the copy, then deleting or editing the original (the safest option for avoiding edits to live workflows and giving you more time to test before deploying, but deleting the original means that all integrations and automations need updating to the new workflow, and otherwise you’ll have to repeat your edits manually in the original)
Options to document client processes
Once you’ve decided on the organization you’re going to work in and set up things like folders and permissions, it’s time to get started with documenting your client’s processes in actionable workflows.
As mentioned above, there are a few options at your disposal:
- Building workflows from scratch (best for new processes or completely overhauling an existing one)
- Using existing workflows as a framework (editing either Process Street’s premade workflows or your client’s workflows to improve their performance without building an entirely new process)
First, however, a quick note about collaborating with clients, because documenting from guesswork will only get you so far.
Collaborating with clients and their employees
No matter what organization you’re in and what method you’re using, collaborate with your client to document or edit their processes. If they haven’t already, build a workflow that captures the exact steps they currently take to complete a task, then improve it using both your expertise with processes and software and the expertise of any employees who currently use the process you’re working on.
That gives you a solid framework to improve from, which lets you identify the biggest points of friction and the easiest opportunities to boost consistency. Bringing in the employees who actually use the process and will use the finished workflow is a great way to increase accountability.
By including them, you’re making them co-authors of the improved process, with in-depth knowledge of why changes have been made and how to carry them out. You’re making them accountable and motivating them to stick to the new process until it becomes the norm. They want it to succeed because they helped to write it.
The other thing worth saying out loud: you no longer have to start every client process from a blank workflow. A recorded screen-share, a Loom of the client walking through their current intake, or a messy Google Doc full of “this is how Janice does it” can be turned into a first-draft workflow in minutes. That moves the consultant’s job up the value chain to where it belongs: judgment calls about which steps to enforce, who owns each handoff, what should be approved before the next step starts, and which exceptions deserve their own branch. Capture the raw process fast, then spend your time on the parts only a human can decide.
The exception to this is if you’re selling workflows you’ve already built for a flat rate. Those can be sold as a pack (more on that later) and then customized by the client to their needs (if needed).
Building workflows from scratch
This is the obvious method for documenting a new process. If your client hasn’t used Process Street before, you’ll want to either do this or edit a premade workflow (if the process is more generic, more on that in a second).
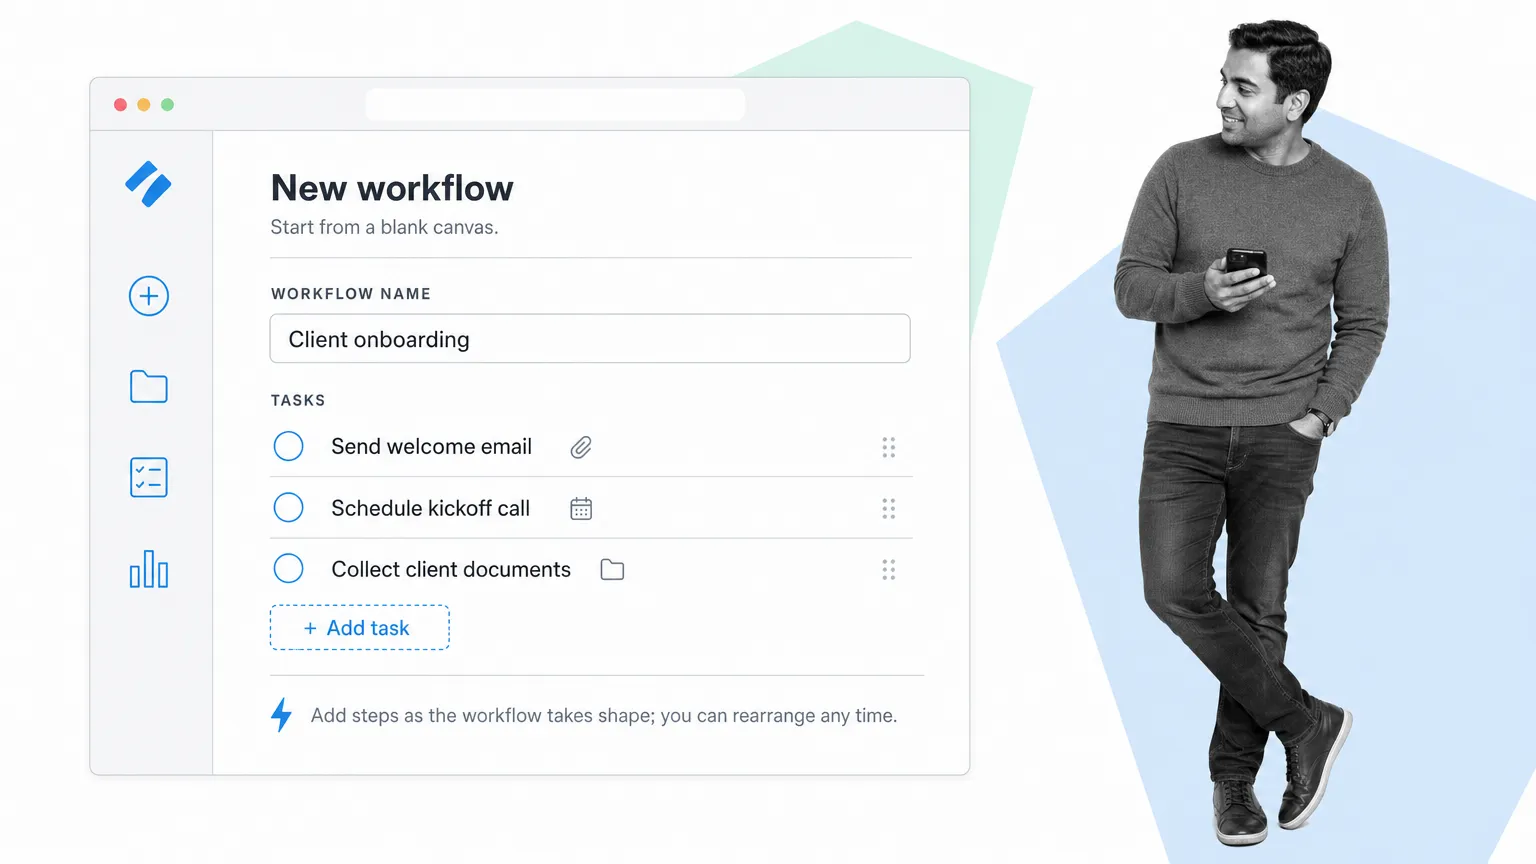
Build the workflow, then work with your client to lay out a task list and instructions to complete each one (with supporting materials such as videos, images, and files).
The only other noteworthy point in building new workflows is how to hand them off to your client. If you’ve built it in your own organization, you’ll have to copy it into theirs and set up the correct permissions, or let them import it through a private sharing link.
Alternatively, if you’re building it in a new or existing client organization, you can move straight on to integrations and the like.
Using existing workflows as a framework
If you don’t need to build an entirely new process, you can use an existing workflow as a framework, then edit it to suit your client’s needs. This can be done by using one of our premade workflows, or by editing (or copying) an existing workflow in your own organization or that of your client.
Premade workflows are processes we’ve already documented for you, available for free to anyone. They give you the foundation for processes such as onboarding, sales reporting, and more, can be edited to fit your client’s needs, and are available no matter what organization you’re working in.
In other words, you’d open the organization you’re working in, insert a “New premade workflow,” and edit away.
Otherwise you can use an existing workflow (built by yourself or the client) as a framework to edit, which is ideal when only minor changes are required (as opposed to an entirely new process). The main thing to remember here is to never edit the original workflow. Even if the changes are minor, any mistakes will be felt immediately by the client, and you run the risk of their employees using a half-edited process.
Instead, make a copy of the existing workflow and then edit that. This is the safest option, since you and the client can test it in a controlled environment before deploying. Once the edits have been checked, tested, and approved, you can either archive the old workflow and use the new one, or apply the same changes to the original.
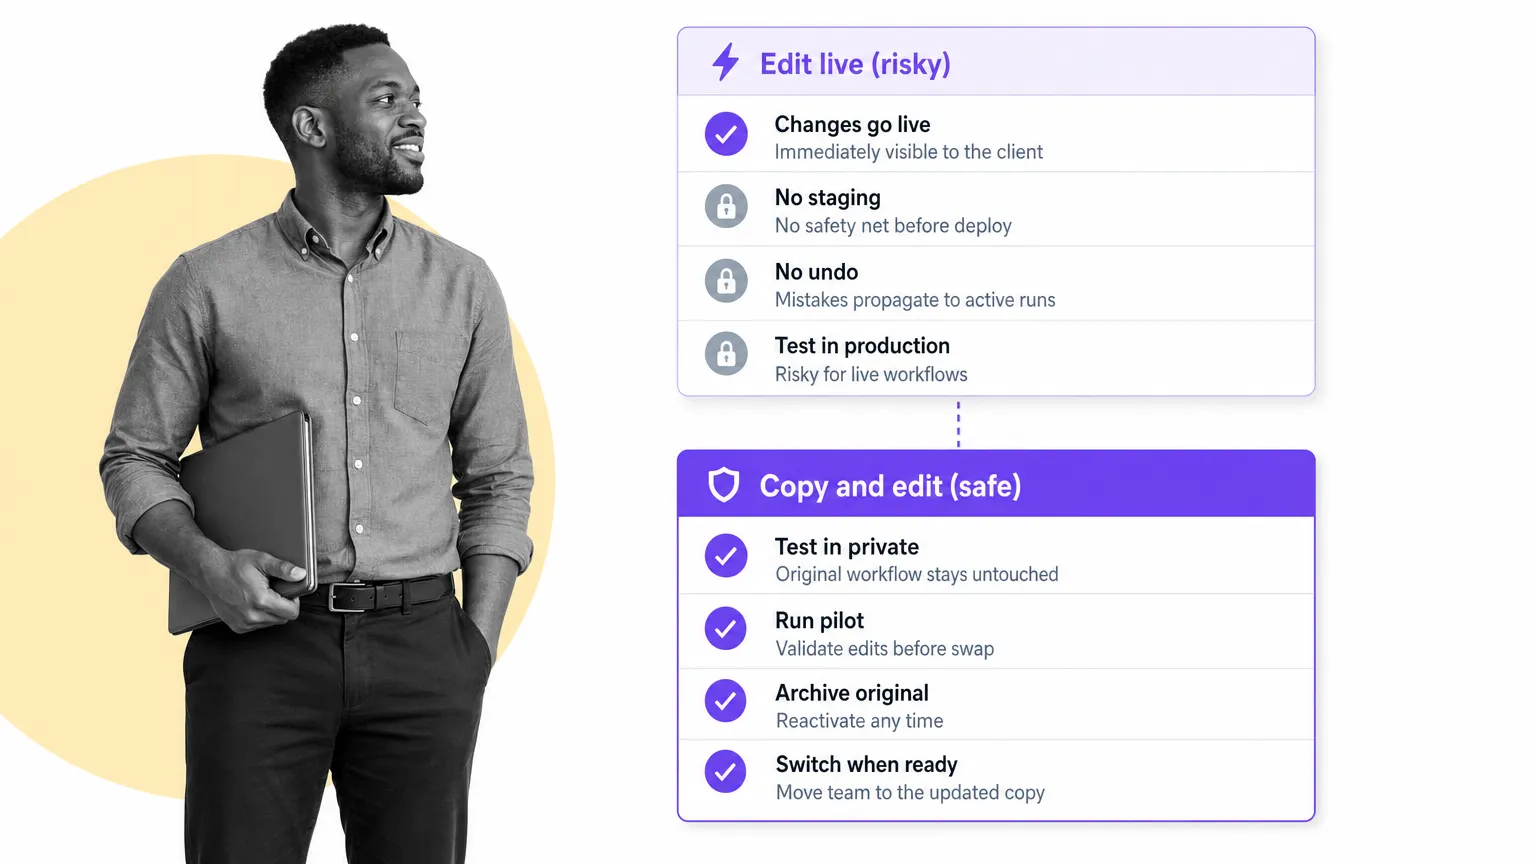
Archiving (or deleting) the old workflow means you’ll have to reconfigure all integration links, workflow run links, and automations with Zapier. Not only that, but you’ll lose access to all workflow runs created from that workflow (which is why archiving is better than deleting; you can reactivate an archived workflow, but you can’t recover a deleted one). Updating the old workflow means more work on your end and meticulously checking that all changes are replicated.
Configuring client processes
Once you’ve built or edited their workflows, you should start setting up any schedules, integrations, and automations the client wants or can take advantage of. This won’t always be necessary (the client may just be paying you for the workflows, not the implementation), but it’s a great way to upsell if they can benefit from them.
These integrations and automations make your client’s business consistent and scalable, so it pays (quite literally) to at least mention the possibilities and offer to set them up. Process Street connects natively with the apps your clients already use and integrates with thousands of others through Zapier, so most “can we connect this?” questions have a clean answer.
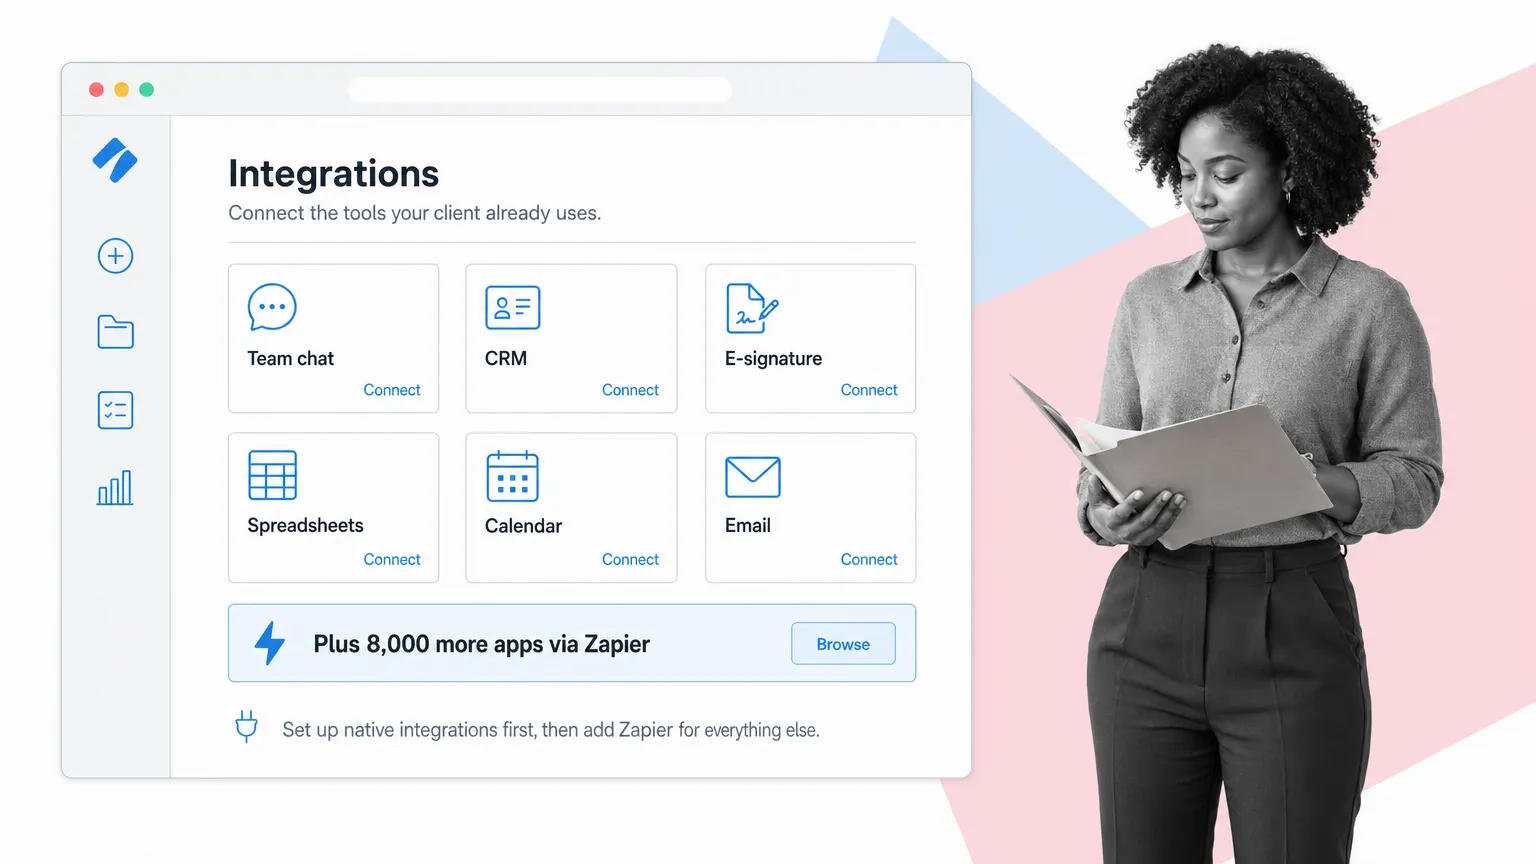
To do this you’ll ideally need access to any apps your client wants to integrate, but you can manage without. If they don’t want to give you access to their accounts, you can set up the integration framework in Process Street and then tell them what they need to do in their other apps to link them up.
Create any required schedules
If any of your client’s processes run on a predictable schedule, you’ll need to set this up in Process Street with the scheduled workflow runs feature.
You can set up almost any cadence for workflow runs to start automatically, including daily, weekly, on certain days of the week, monthly (by date or day of the week), yearly, and every couple of years. Employees and groups can also be assigned in advance to take care of any teams that need to work on workflow runs.
Recurring workflow runs are locked to times. By themselves, they can’t be triggered by a specific event. Also, any staff changes may mean that the permissions have to be changed on the scheduled workflow runs (unless you’re using groups, in which case changing the group permissions will also apply to the schedule).
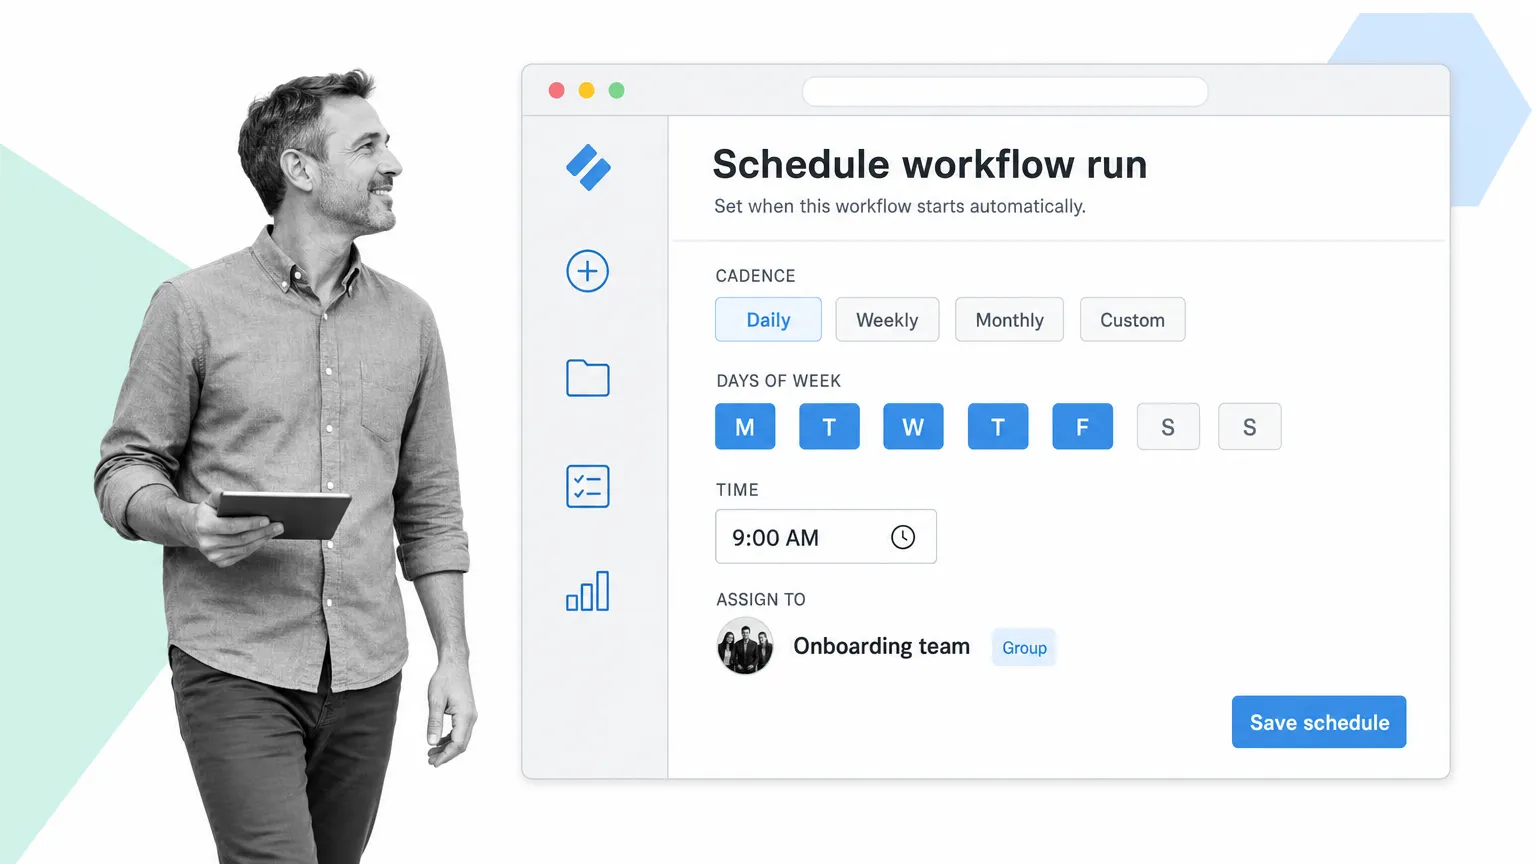
Schedules are not copied between organizations, so if you copy over a workflow to a client’s organization, you’ll have to manually set up the schedule again.
Set up integration and workflow run links
Integration links and workflow run links are where things get a little trickier, since you’ll ideally need to access whatever apps the links will be posted in so you can directly insert them and double-check they work correctly.
Talk with the client and explain what integration and workflow run links are, and suggest areas where they could optimize processes with them (such as custom Google searches in a keyword research workflow). From there you can decide where they may want to start a workflow run from directly (with a run link) and what other apps and websites they may want to integrate with from inside a workflow run (with an integration link).

Workflow run links can be generated inside Process Street, but they need to be inserted into (and possibly customized for) the location where your client’s workflow runs will be triggered from. This can be done without giving you access to the client’s account in another app, but letting you inside to paste it in and configure any variables is a great way to make sure it’s set up correctly.
Also, make sure the workflow is in the client’s organization before creating any run links, since that affects its URL and therefore the link. Moving the workflow to a new folder in the same organization does not change its URL.
Integration links are technically only inserted into workflow runs, but your client may still need to provide information from other apps to set them up, such as a webhook’s individual address from Zapier, or the URL of a separate workflow in Process Street.
Configure Zapier automations
After all else is said and done, talk to your client about setting up any potential process automations with Zapier. This will require them to set up (or already have) a Zapier account, so be sure to clear any potential costs with them beforehand.
Once that’s clear, walk them through the options for automating the workflows you’ve documented, such as triggering them to run when a particular event happens or automatically pushing data into and out of workflow runs from different apps.
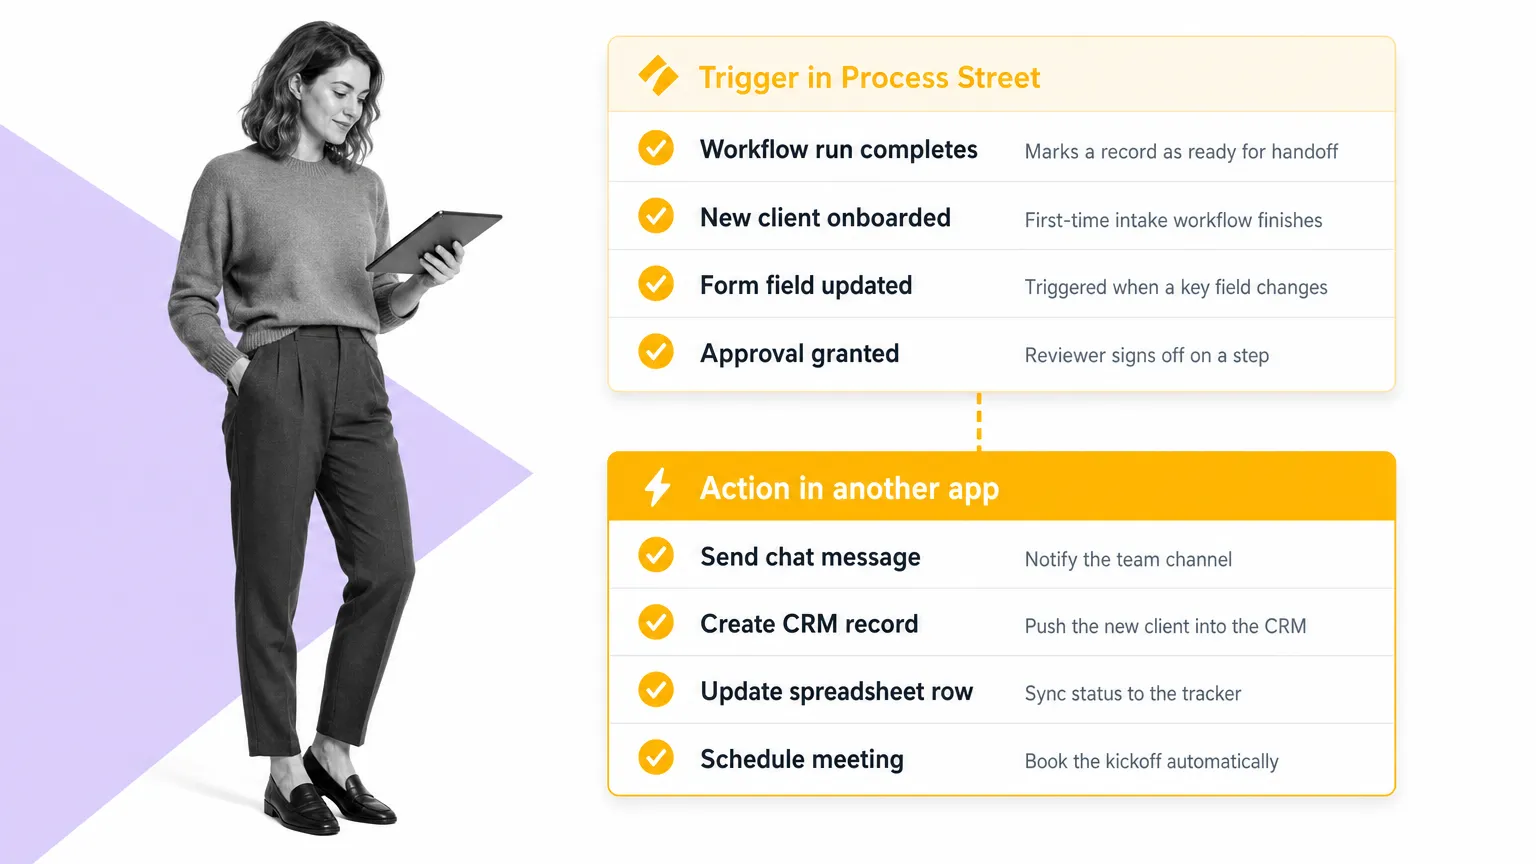
Finally, either you or the client (if they have experience with Zapier) will need to go and set up the automations (or “Zaps”). Even if you’re doing this for your client, I’d highly recommend either recording a video or sharing your screen during a video call to explain exactly what you’ve set up and how. That way they’ll know how everything works, get a little insight on how to use Zapier, and even get inspiration on how else they could automate their tasks and increase efficiency.
To learn more about automating your workload with Zapier, check out our free Business Process Automation Guide.
Document client processes: FAQ
What does it actually mean to document a client process?
Documenting a client process means turning the steps a client (or you on the client’s behalf) takes to deliver an outcome into a clear, repeatable workflow that anyone on the team can follow without asking. At minimum that includes the trigger, the steps in order, the owner of each step, the inputs and outputs, and the handoff at the end. In Process Street that lives as a workflow, with structured tasks, due dates, conditional logic, and integrations attached.
What’s the difference between client onboarding and client process documentation?
Client onboarding is one specific client process, the workflow that runs when a new client signs. Client process documentation is the broader practice of capturing every recurring workflow attached to a client account, including intake, onboarding, delivery, monthly reporting, renewal, and offboarding. Onboarding is usually the first one consultants document because it’s the most painful when it goes wrong; the others should follow in the same shape.
Should I build the workflow in my own Process Street organization or in the client’s?
Three options. Build in your own organization if you want speed and total control, plan to share via a private link, or are creating a productized workflow you’ll sell to multiple clients. Build in a new organization you set up for the client if they don’t already have Process Street and you want to hand off everything (including billing) at the end. Work inside the client’s existing organization if they’re already a Process Street user and want changes deployed live. The full trade-offs are above.
How long should a documented client process be?
As long as it needs to be to make the work repeatable, no longer. A useful rule of thumb: every step should answer “what do I do next?” without the reader having to message someone. If a step is “send the welcome email,” the workflow should attach the template and the variables. If a step is “schedule the kickoff,” the workflow should link to the scheduling tool with the right calendar pre-selected. Steps that read like a vague reminder (“check in with the client”) usually mean a real sub-workflow is hiding underneath.
What are the most common mistakes when documenting client processes?
Four show up over and over: no named owner per step (so nothing actually moves), no defined trigger (so the workflow runs only when someone remembers), too much narrative text inside steps (so people skim past the actual instruction), and a workflow that’s never reviewed after launch (so it drifts within a quarter). Reviewing every workflow once a quarter and pruning what isn’t used is the cheapest way to keep documented processes from rotting.
Document client processes with ease
There you have it: how to document, configure, and hand off your client’s standard operating procedures so their operations stay consistent. This has been a chunky chapter of our consultant’s guide, but hopefully you can see the options available and how flexible (and powerful) Process Street is once you put it to work for client engagements.
If you’re a consultant, agency, or freelancer building this kind of practice on top of Process Street, the partner program is the natural next step: it covers monetizing the workflows you build, getting listed as a Process Street partner, and the commercial side of selling productized processes to your clients.
The post How To Document Client Processes (Without Losing Your Mind) first appeared on Process Street | Compliance Operations Platform.