Building your own Flowable Spring Boot Application
Blog: Flowable Blog
During our last community event (FlowFest 2018 hosted by Dow Jones), I gave a demo on how to build your own Flowable Spring Boot Application from scratch. You can find the video here and the code for this blog post can be found here.
In this blog post we’re going to cover how we can create a base Spring Boot Application and convert it into a Flowable application that can run the different engines embedded or with the full REST API.
Before we get started, let’s first explain what Spring Boot is. Spring Boot is a framework that makes it easy to create standalone, production-ready Spring based Applications that you can just run. Applications can be started by using java -jar or the using more traditional WAR deployments. The main goals of the framework are:
- Provide a radically faster and widely accessible getting started experience for all Spring development
- Be opinionated out of the box, but get out of the way quickly as requirements start to diverge from defaults
- Provide a range of non-functional features that are common for many projects (e.g. embedded servers, security, metrics, health checks, externalised configuration)
- No need for XML configuration
Flowable has had support for Spring Boot since the beginnings of the framework. Actually, the first official Flowable support for Spring Boot was released just one month after the release of Spring Boot 1.0. We have kept on track with the latest releases of Spring Boot and have provided support shortly after each release. With Flowable 6.3.0 we added support for Spring Boot 2.0 and expanded it to all the Flowable engines (BPMN, CMMN, DMN). On top of that, we migrated our UI applications (flowable-task, flowable-idm, flowable-modeler and flowable-admin) and our flowable-rest application to Spring Boot 2.0. If you want to read more about that endeavor have a look at The road to Spring Boot 2.0 blog post.
Getting started
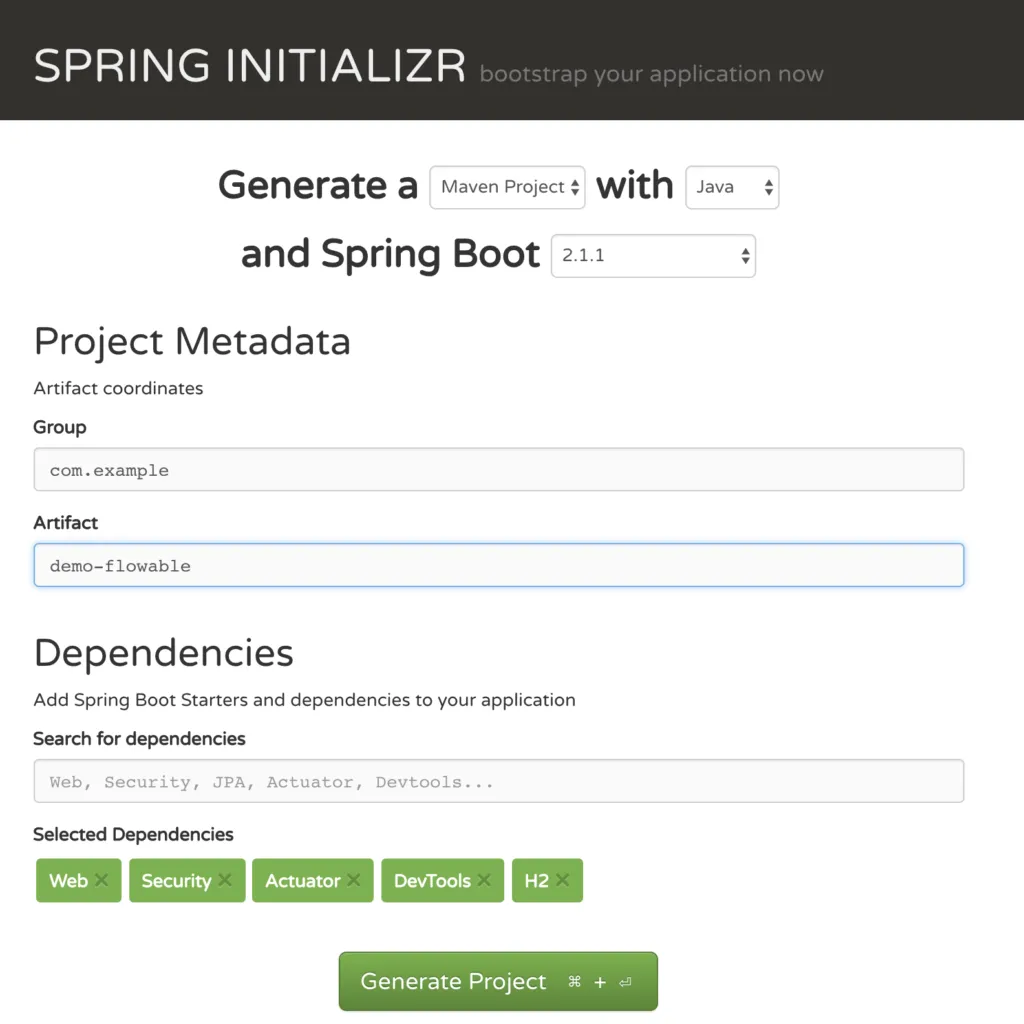
Hopefully, you now have a better understanding of Spring Boot, so we can start with creating our application. The first step is to go to Spring Initializr and pick our base dependencies.

We’re going to create a Java Maven Project with Spring Boot 2.1.1 and add the web, security, actuator, devtools and h2 dependencies. Go ahead and click the “Generate Project” button, which will download a zip file that contains all the base elements for our application. Unpackage the zip file and import the project into your favourite IDE; you can also just build the project by doing ./mvnw install. Once you’ve imported the project into your IDE you can run the application (if you’re using IntelliJ, like me, then you should be able to see the run configuration for the application).
Currently, this is an empty application that has the actuators exposed and not much more. We can go to localhost:8080/actuator/ to see which actuators (production ready features) are available. As we added the security dependency, a default login screen will show up. We can login using the username “user” and the password that was generated in the log file (look for “Using generated security password” to spot the password). To have all actuator endpoints exposed we need to add:
management.endpoints.web.exposure.include=*
management.endpoint.health.show-details=when_authorized
in our application.properties. The first property will expose all actuator endpoints over REST and the second one will display a more detailed health endpoint.
Customising our application
Let’s add some custom code to our application. We are first going to add a HelloController. The controller looks like:
@RestController
public class HelloController {

    @GetMapping("/hello")
    public String hello(Principal principal) {
        return "Hello " + principal.getName() + "!";
    }
}
We can go to localhost:8080/hello and see the result. The controller will do nothing more than just print out hello to the currently logged in user.
Use Flowable in the application
In order to make this a Flowable application we only need to add:
<dependency>
    <groupId>org.flowable</groupId>
    <artifactId>flowable-spring-boot-starter-rest</artifactId>
    <version>${flowable.version}</version>
</dependency>
With this, we will get the complete Flowable REST API. If we didn’t want the Flowable REST API to be exposed, we could use the flowable-spring-boot-starter artifact. When using the Flowable starters, the Flowable default security configuration will kick in. What does this mean? It means that a default Spring Security UserDetailsService that uses the Flowable IdmIdentityService will be enabled and users will be loaded through there. On top of that, a Spring Security PasswordEncoder will be registered. This is used to encode the user passwords when creating a user and to check if the passwords the users used when logging in matches the one stored in our system. In order to follow the Spring Security best practices we’re going to add
flowable.idm.password-encoder=spring_delegating
to our application.properties. Using this property, the DelegatingPasswordEncoder from Spring Security will be used. This encoder allows us to be more flexible when updating and changing encoders, as it adds the passwords with a hint to which encoder needs to be used to perform the password match. We will also add a simple CommandLineRunner (a Spring Boot bean that will be executed after the application starts) that will create the initial users:
@Component
public class UserCreatorCommandLineRunner implements CommandLineRunner {

    protected final IdmIdentityService idmIdentityService;

    public UserCreatorCommandLineRunner(IdmIdentityService idmIdentityService) {
        this.idmIdentityService = idmIdentityService;
    }

    @Override
    public void run(String... args) {
        createUserIfNotExists("flowfest");
        createUserIfNotExists("flowfest-actuator");
        createUserIfNotExists("flowfest-rest");

        if (idmIdentityService.createPrivilegeQuery().privilegeName("ROLE_REST").count() == 0) {
            Privilege restPrivilege = idmIdentityService.createPrivilege("ROLE_REST");
            idmIdentityService.addUserPrivilegeMapping(restPrivilege.getId(), "flowfest-rest");
        }

        if (idmIdentityService.createPrivilegeQuery().privilegeName("ROLE_ACTUATOR").count() == 0) {
            Privilege restPrivilege = idmIdentityService.createPrivilege("ROLE_ACTUATOR");
            idmIdentityService.addUserPrivilegeMapping(restPrivilege.getId(), "flowfest-actuator");
        }
    }

    protected void createUserIfNotExists(String username) {
        if (idmIdentityService.createUserQuery().userId(username).count() == 0) {
            User user = idmIdentityService.newUser(username);
            user.setPassword("test");
            idmIdentityService.saveUser(user);
        }
    }
}
When using the FlowableUserDetailsService the privileges of the users / groups are going to get mapped into Spring Security GrantedAuthority. Finally, we’re going to add a custom SecurityConfiguration that will change the default Spring Security configuration:
@Configuration
public class SecurityConfiguration extends WebSecurityConfigurerAdapter {

    @Override
    protected void configure(HttpSecurity http) throws Exception {
        http
            .authorizeRequests()
            .requestMatchers(EndpointRequest.to(InfoEndpoint.class, HealthEndpoint.class)).permitAll()
            .requestMatchers(EndpointRequest.toAnyEndpoint()).hasRole("ACTUATOR")
            .antMatchers("/*-api/**").hasRole("REST")
            .anyRequest().authenticated()
            .and()
            .sessionManagement().sessionCreationPolicy(SessionCreationPolicy.NEVER).and()
            .csrf().disable()
            .httpBasic();
    }
}
With this configuration we’re only going to use HTTP Basic authentication, be stateless, permit all users to access the info and health actuator endpoints, permit only users with the ACTUATOR role to access the rest of the actuator endpoints, permit only users with the REST role to access the Flowable REST APIs and, finally, allow all authenticated users to access the rest of the API.
Now we can restart the application. In the logs we can see more things happening. The Flowable DB tables and REST servlets will get initialised and the users will be created. When accessing the hello controller as above, we’ll get a popup for the login, we can login with one of the users and will see its name in the result. The REST Servlets are also available under:
process-apifor the Process Enginecmmn-apifor the CMMN Enginedmn-apifor the DMN Engineidm-apifor the IDM Engineform-apifor the Form Enginecontent-apifor the Content Engine
We can also inject the Flowable services into our own beans and REST controllers. We’re going to add a new Controller that will display the keys of all the latest process definitions:
@RestController
public class DefinitionsController {

    protected final RepositoryService repositoryService;

    public DefinitionsController(RepositoryService repositoryService) {
        this.repositoryService = repositoryService;
    }

    @GetMapping("/latest-definitions")
    public List latestDefinitions() {
        return repositoryService.createProcessDefinitionQuery()
            .latestVersion()
            .list()
            .stream()
            .map(ProcessDefinition::getKey)
            .collect(Collectors.toList());
    }

}
Deploying resources
We’ve shown how we can setup a base Flowable Spring Boot application. Now we’re going to show how processes / cases / decisions can be auto-deployed from our application. When using the Flowable Spring Boot auto configuration, resources in certain folders on the classpath are automatically scanned and deployed. The scanned folders are:
- apps – By default looks for all files ending with .zip or .bar and deploys them
- cases – By default looks for all files ending with .cmmn, .cmmn11, .cmmn.xml or .cmmn11.xml and deploys them
- dmn – By default looks for all files ending with .dmn, .dmn11, .dmn.xml or .dmn12.xml and deploys them
- forms – By default looks for all files ending with .form and deployes them
- processes – By default looks for all files ending with .bpmn20.xml or .bpmn
Wrapping up
In this blog post we’ve shown how we can create our own custom Flowable Spring Boot Application. Creating an application with the REST endpoints exposed is just the same as using the standard flowable-rest application. We’ve shown how we can customize the security configuration, how we can auto-deploy resources when the application starts and how we can use the Flowable Services in our own Java logic.
What’s Next
In the next post we’re going to show how we can use Spring Cloud in the application we just built.