Automation using Playwright Library with Cucumber JS.
Blog: Indium Software - Big Data
Topics:
- About
- Extensions required
- Project setup
- Modules/Libraries required
- Features
- World (Hooks)
- Steps
- Script execution
- Reporting
- Attach screenshot for failure
- Feature file navigation support
- Conclusion
About
This tutorial will walk you through using the Playwright library with Cucumber JS. Playwright supports TypeScript out of the box. We conducted effective end-to-end tests with the best possible narration by integrating the Playwright library with Cucumber- a test automation tool.
Extensions required
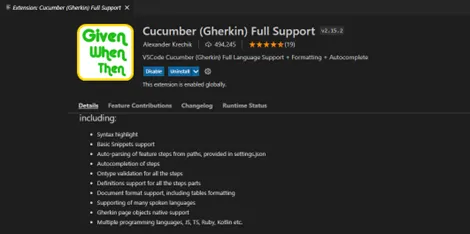
- Cucumber (Gherkin) Full Support
The VS code requires this extension to recognize the .feature files and provide snippet support. Some of the primary support functions are auto-parsing of feature steps, auto-completion, syntax highlight, and type validations.

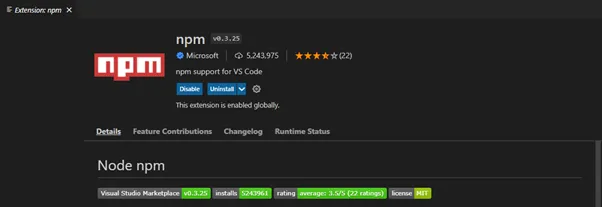
npm:
This extension purely supports running npm scripts as defined in the package.json file. It also is equipped to validate installed modules against dependencies as defined in the package.json file
It would be a great piece to read on 10 Open Source Automation Tools For Your Automation Needs
Project setup:
Precondition: Node JS and Visual studio code should be installed.
- Navigate to C: or D: drive.
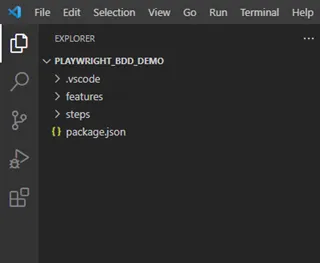
- Create a folder with the name ‘Playwright_BDD_Demo.’
- Create subfolders. vscode, features, and steps within ‘Playwright_BDD_Demo’.
- Open Visual Studio code.
- Click File ->Open Folder->Locate the created folder and select folder (now project is loaded).
- Open Terminal->New Terminal.
- Type the command ‘npm init’ in the terminal and press enter for all the suggestions. (package. json is created where project dependencies are maintained).
Now your project structure looks similar to the below picture:
Modules/Libraries required:
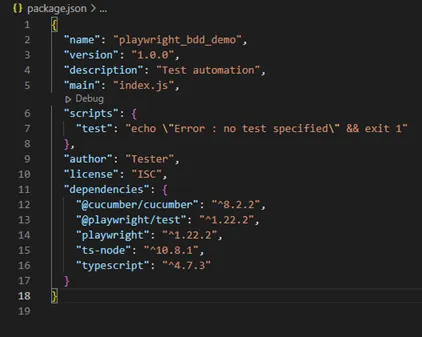
As our project base is ready, modules related to Playwright and Cucumber have to be added to the package.json file. The required modules can be added under the file’s dependencies section by running npm commands to install the respective modules.
· Run the command ‘npm i playwright’ in the terminal – This command will install the playwright library and browser dependencies required for testing.
· Run the command ‘npm i @playwright/test’ in the terminal – This command will install the modules required for validations with built-in automatic waits.
· Run the command ‘@cucumber/cucumber’ – This command will install the Cucumber, a tool for running automated tests written in plain language.
· Run the command ‘npm i typescript’ – This command will install the typescript.
· Run the command ‘npm i ts-node’ – This command will install the typescript dependencies to support with node.
After installing all the required packages, your package.json looks similar to the below picture:
Features:
Features files are the test case files written in Gherkin language, which explains the motive of the tests in plain English, making it easier for non-technical people to understand the context of the test.
A feature can have ‘n’ number of scenarios, and each can have an ‘n’ number of steps.
A step has to start with the Gherkin keyword ‘Given,’ ‘When,’ ‘And,’ or ‘Then.’
Let’s create a sample feature using Gherkin keywords and derive the logic using Playwright.
· A feature file should always end with a .feature extension.
· Create a sample feature under the features folder with the name ‘demo_blaze.feature’ (feature named after the demo site will be using).
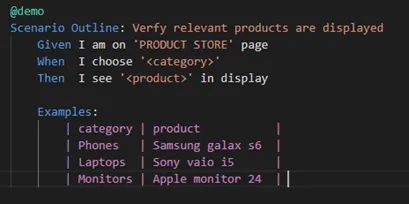
· Add feature and scenario details as per the below image, based on the demo site’s functionality.
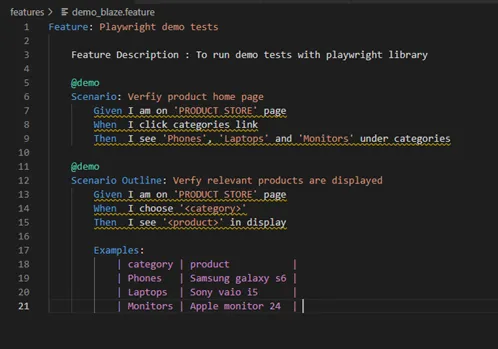
- From the above image, we have created one general ‘scenario’ to verify the title of the products and another ‘scenario outline’ to verify products under the category as part of the data-driven test.
- Tag the scenario and scenario outline as ‘demo’ for now (later sections demonstrate how to use these tags).
- Yellow lines indicate a warning as our steps have not been implemented.
- Implementation of steps will be discussed in detail under the ‘Steps’ section.
World (Hooks):
The word ‘World’ describes the steps where we can declare and invoke the objects/variables that can be used globally. The Java/C# version of Cucumber is said to be Hooks.
Hooks are primarily used to specify pre and post-conditions globally across the features. Here, we will create two global variables, one for the browser and another for the page.
The ‘Before’ and ‘After’ functions launch the app before each scenario and then kill it. The goal is to make the scenarios independent. The Before function captures the browser and page variables from the initializer and exports.
- Create a file with the name ‘world.ts’ under the steps folder.
- Initialize the browser and page variables.
- Set default timeout as 60 seconds (default wait till promise gets resolved).
- Create a ‘Before’ function to launch the chromium browser and assign the session id to the browser object.
- Create a browser context and assign it to the page variable.
- Navigating the URL is specified here as part of the precondition.
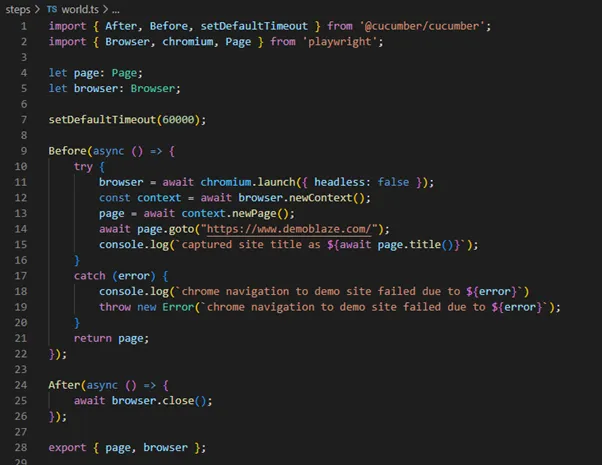
Create an ‘After’ function and close the chromium browser using the browser reference created.
Export the page and browser variables as given in the above image to use for further actions.
Steps:
Steps from the feature file have to be implemented as definitions to specify your business logic.
Gherkin’s steps from the features are initially considered undefined by Cucumber, and when running the script command defined in package.json, Cucumber generates the undefined snippets which could be used in the steps file instead of writing them, which saves time for us.
Firstly, Cucumber needs to know where to look for the steps to notify us with the snippets of unimplemented ones (In case already implemented, it will directly run the matching step).
The below procedure helps you to run the script and get the status from Cucumber.
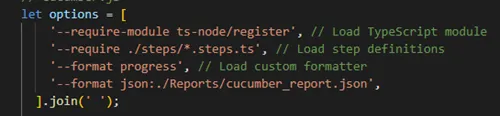
- Create a file named cucumber.js to define the Cucumber options where the path to the feature and step are defined.
Declare the options and export them as a module with the name ‘test_runner.’
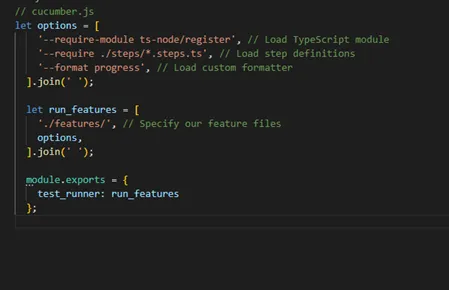
- From the above image, the specific name of the feature is not mentioned. We will run the scenarios based on tags, a best practice with Cucumber.
- Now navigate package.json and remove the error from the test command under scripts.
- Paste the command ‘npx cucumber-js -p test_runner –tags @demo’ .
- (Here, we have specified the module name ‘test_runner’ where the Cucumber options are mentioned, which the cucumber-js module will identify. Following that, we note our tags from the feature where Cucumber identifies all the tests based on the tag and runs them.)

- Run the command ‘npm test’ in the terminal to execute the scripts.
- Now, Cucumber generates all the undefined steps in the terminal.
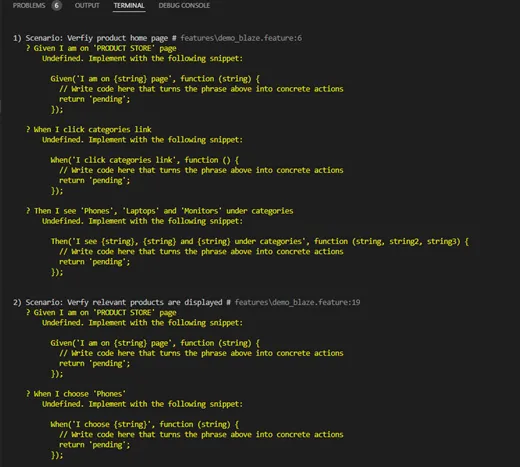
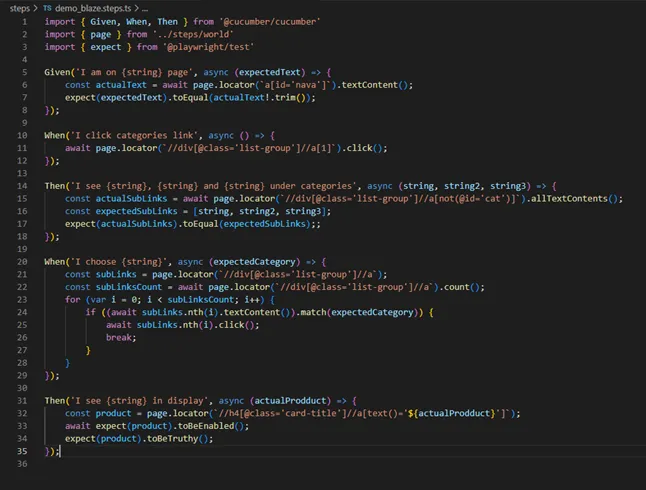
- Create a step file under ‘demo_blaze.steps.ts’ under the ‘steps’ folder. Copy the snippets from the terminal and paste them into the steps File.
- Import ‘Given, When, and Then’ from the Cucumber module.

- As snippets are now in place, the relevant business logic can be written below each snippet.
- Import ‘page’ from ‘world’ to perform actions on the page.
- Import ‘expect’ from ‘@playwright/test’ to perform validations.
The following image shows that locators and logic are scripted below each step.
Script execution:
It is time to execute the completed scripts as we are done with the logic implementation. This time we won’t see an undefined warning from Cucumber as the implementation is done. To execute the scripts, let’s repeat the steps to get undefined snippets:
- Open the terminal and run the command ‘npm test.’
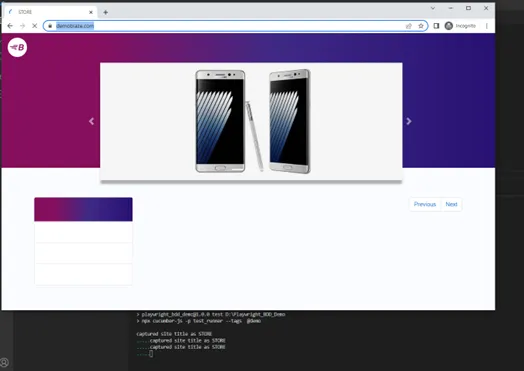
- Now browser launches (headless mode set to false), and the test starts running.
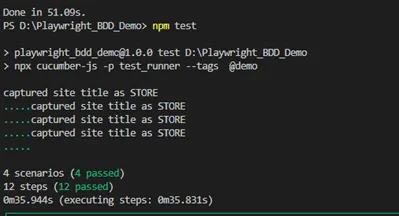
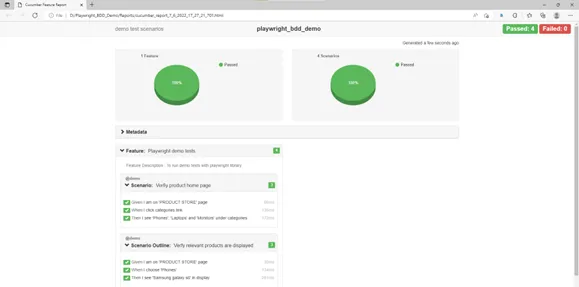
Once the tests are completed, you will see the scenario/step count details as in the image below.
Reporting:
Though we have results displayed in the terminal, a report implementation is required to share the results as an html file with your colleagues/teammates.
Cucumber provides an html reporter plugin to generate the reports based on Gherkin’s steps, which can be customized using metadata.
The following steps will walk you through setting up the Cucumber report:
- Open the terminal and run the command ‘npm i cucumber-html-reporter’ and ‘npm i @types/cucumber-html-reporter.’
- The above commands will install the dependencies related to the reporter.
Add a file ‘htmlReportGenerator.js’ under the root folder to define the report options per the image below.
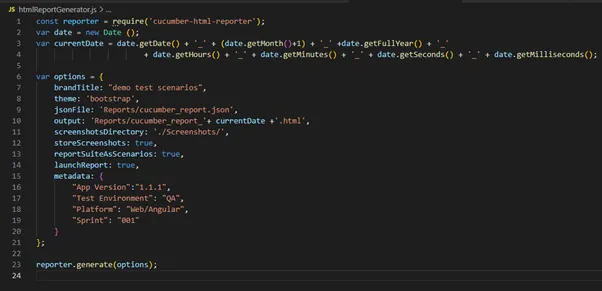
- A bootstrap theme is generally preferred for the report. The paths to the json file and output are defined.
- The current date is appended next to the output to avoid the html report overriding the previous one.
- The screenshot is set as accurate where it could be attached for failure scenarios which we discuss later in this section, and the remaining metadata are user-defined.
- To store the json data, create a folder named ‘Reports’ and create a file ‘cucumber_report.json’ inside the folder, which the Cucumber requires to parse to the html file

Navigate to the cucumber.js file and add the below option to format json data’– format json:./ Reports/cucumber_report.json.’
- Navigate to package.json and edit the ‘test’ command under scripts as
‘npx cucumber-js -p test_runner –tags @demo & node ./htmlReportGenerator.js’.

- Rerun the tests using the command ‘npm test’ to ensure reports are generated.
- After completing the test run, you can find the message in the terminal as the report has been generated successfully.
- The report will be automatically launched in the default browser (Edge/Chrome).
Also, the report file .html will be auto-generated in the Reports folder, which can be shared with others.


Attach screenshot for failure:
Attaching the screenshots for failed steps helps us identify what went wrong with the application under test. To achieve it, we can make use of the ‘world.ts’ file to define the same as post-condition.
- Navigate to steps->world.ts file.
- In the ‘After’ function, remove the arrow signature and add a function keyword next to async, which supports the attached screenshot interface.
- Add the ‘Status’ module to Cucumber’s import to track the status of the scenario.
Add the ‘Scenario’ as a hooks parameter and define the condition to attach a screenshot of the scenario fails.

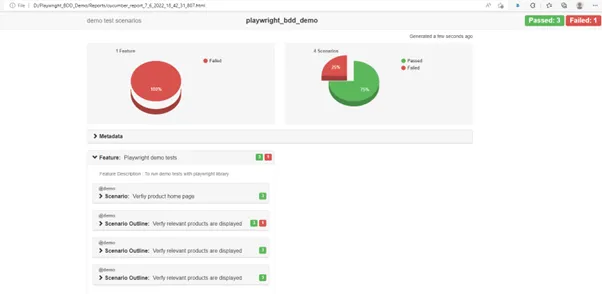
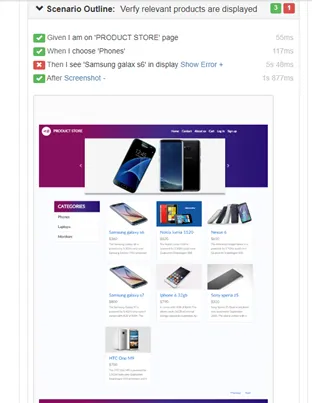
Now let’s test whether the reporter adds the screenshot in case of failure.
- Navigate to the demo_blaze.feature and change the product name from ‘Samsung galaxy s6’ to ‘Samsung galax s6’ to fail the test.
- Run the command ‘npm test’ to execute the scripts.
- A failure is recorded, and a screenshot is attached to the report.
Feature file navigation support:
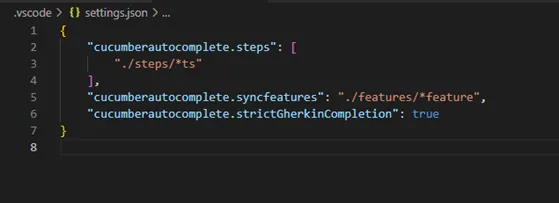
VS code does not provide the default support to navigate from feature to step. However, it can be achieved by adding additional Cucumber options such as sync features and auto-complete in the .settings.json file.
- Add a file ‘settings.json’ inside the ‘.vscode’ folder.
- Add the below content as per the image.
Now, navigation from feature to step can be done by right-clicking step->Go To Definition or using the F12 key.
Conclusion:
Playwright is now considered a sensational tool for modern web apps. Integration of Cucumber with Playwright attracts a broader audience already using Cucumber with their deprecated tools such as Protractor/Spectron.
Below are some advantages of using Cucumber with Playwright:
- It helps the business team understand the automation coverage by visiting features written in plain language.
- Using world/hooks helps to hide the logic related to precondition to the business team, which might reduce confusion.
- Maximum re-usable code can be achieved.
- Maintenance will be easier.
- The feature files can be shared as automation coverage and backups instead of entire logic.
- Transparent reporting with actual narration in plain language.
Modernizing QA with life-cycle automation and AI practices to address scale, speed, security and innovation in the cloud is a prerequisite for Digital Transformation.
The post Automation using Playwright Library with Cucumber JS. appeared first on Indium Software.